Identity Providers
There are a few Identity Provider options that you can choose to run a self-hosted version Netzilo.
Netzilo supports generic OpenID (OIDC) protocol allowing for the integration with any IDP that follows the specification.
Self-hosted IDPs
Zitadel
This guide is a part of the Netzilo Self-hosting Guide and explains how to integrate self-hosted Netzilo with Zitadel.
If you prefer not to self-host an Identity and Access Management solution, then you could use the managed alternative Zitadel Cloud.
Step 1. Create and configure Zitadel application
In this step, we will create and configure Netzilo application in zitadel.
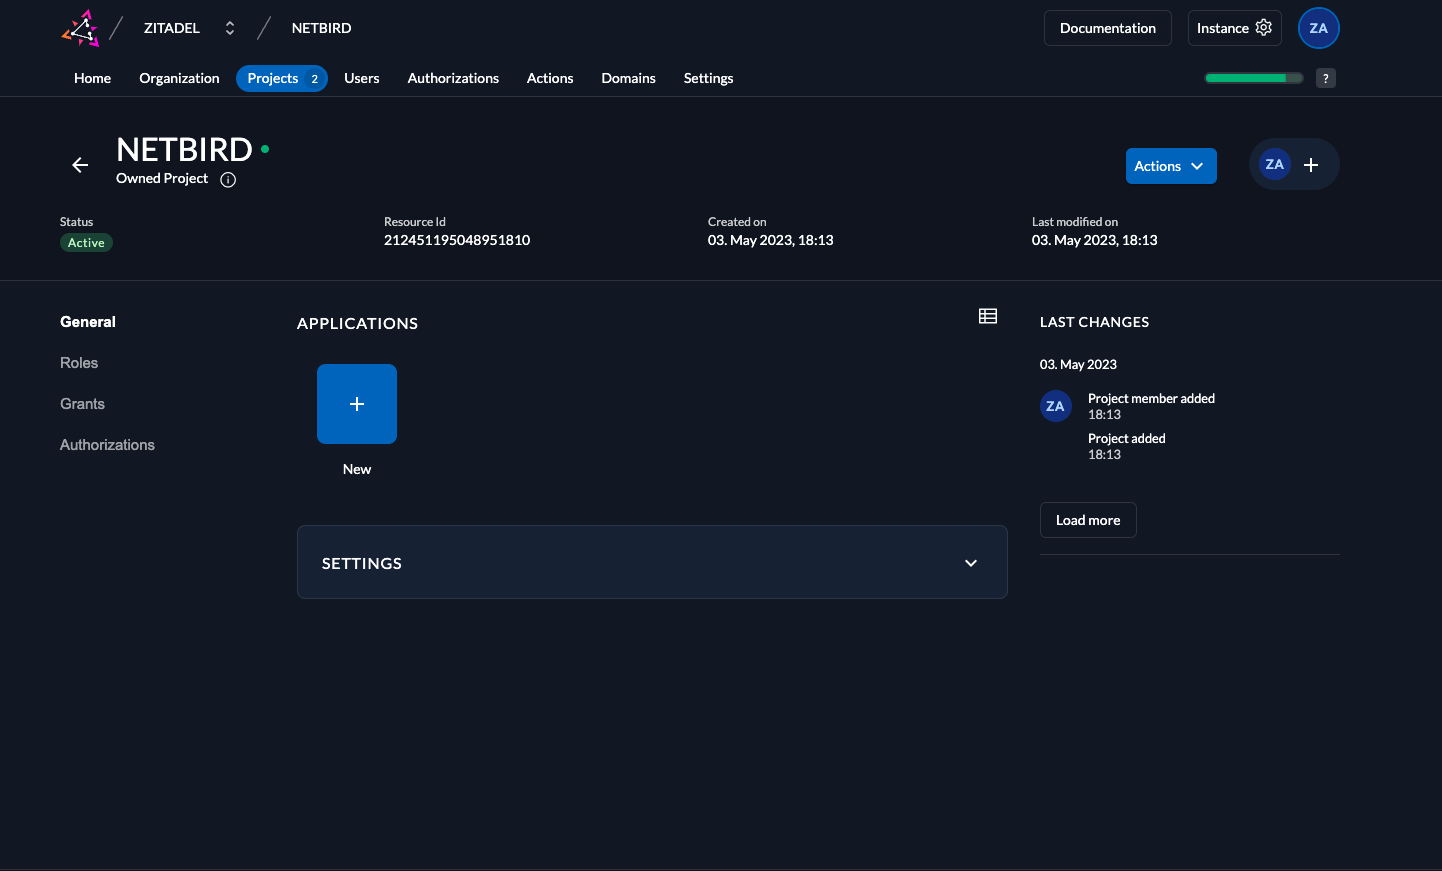
Create new zitadel project
- Navigate to zitadel console
- Click
Projectsat the top menu, then clickCreate New Projectto create a new project - Fill in the form with the following values and click
Continue - Name:
netzilo
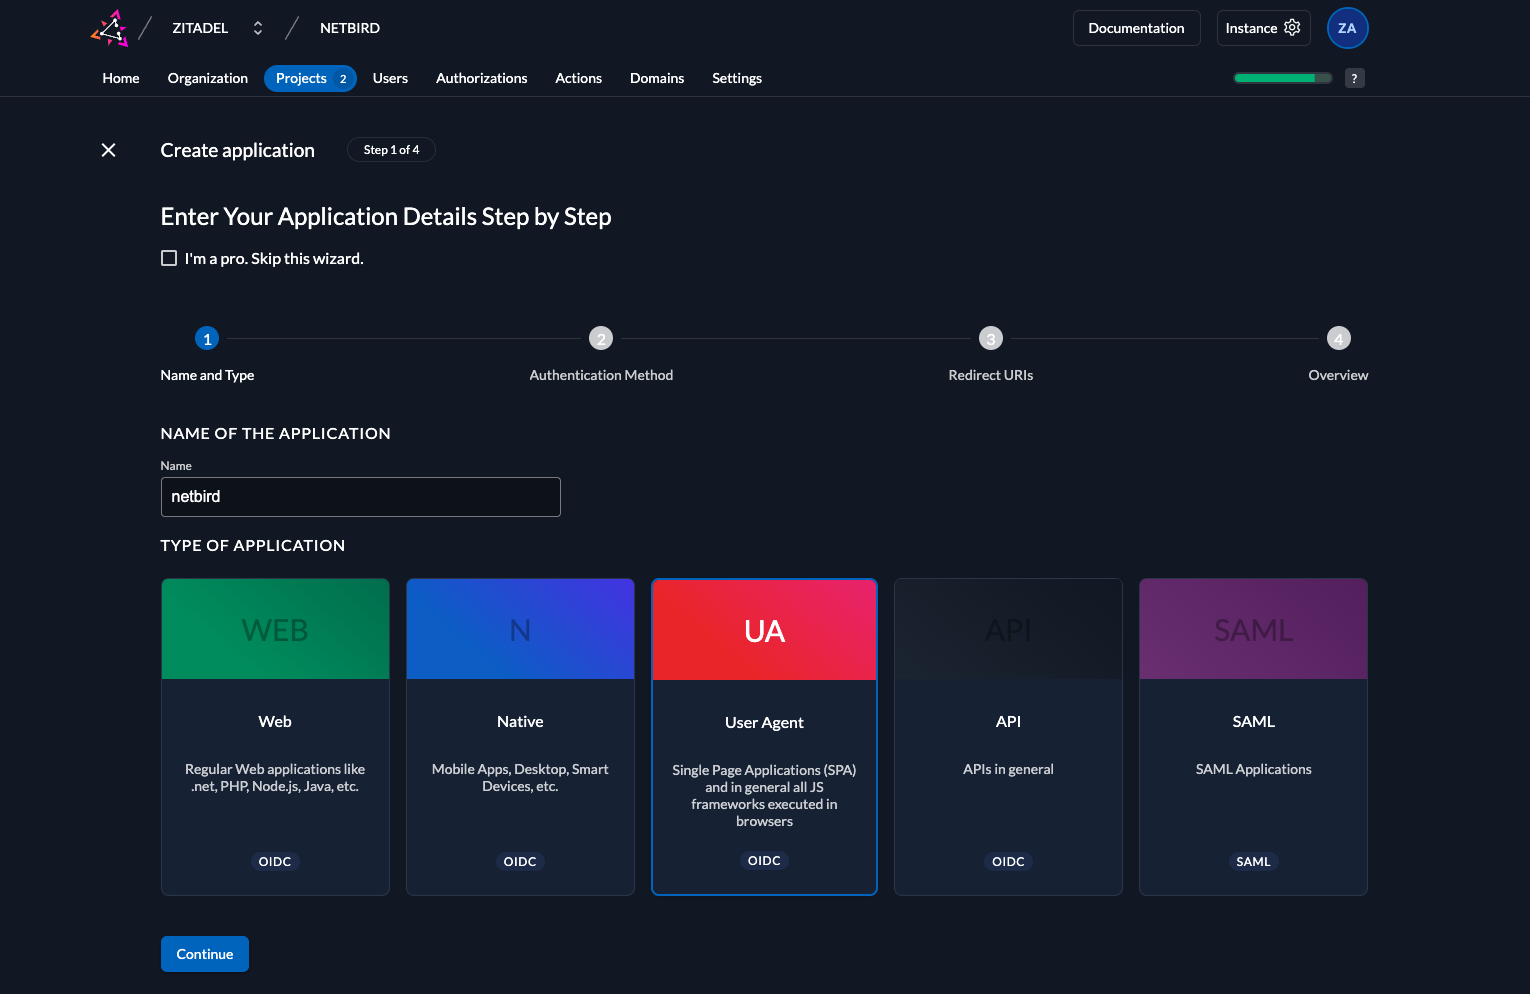
Create new zitadel application
- Click
Projectsin the top menu and selectnetziloproject from the list - Click
NewinAPPLICATIONSsection to create a new application - Fill in the form with the following values and click
Continue - Name:
netzilo - TYPE OF APPLICATION:
User Agent
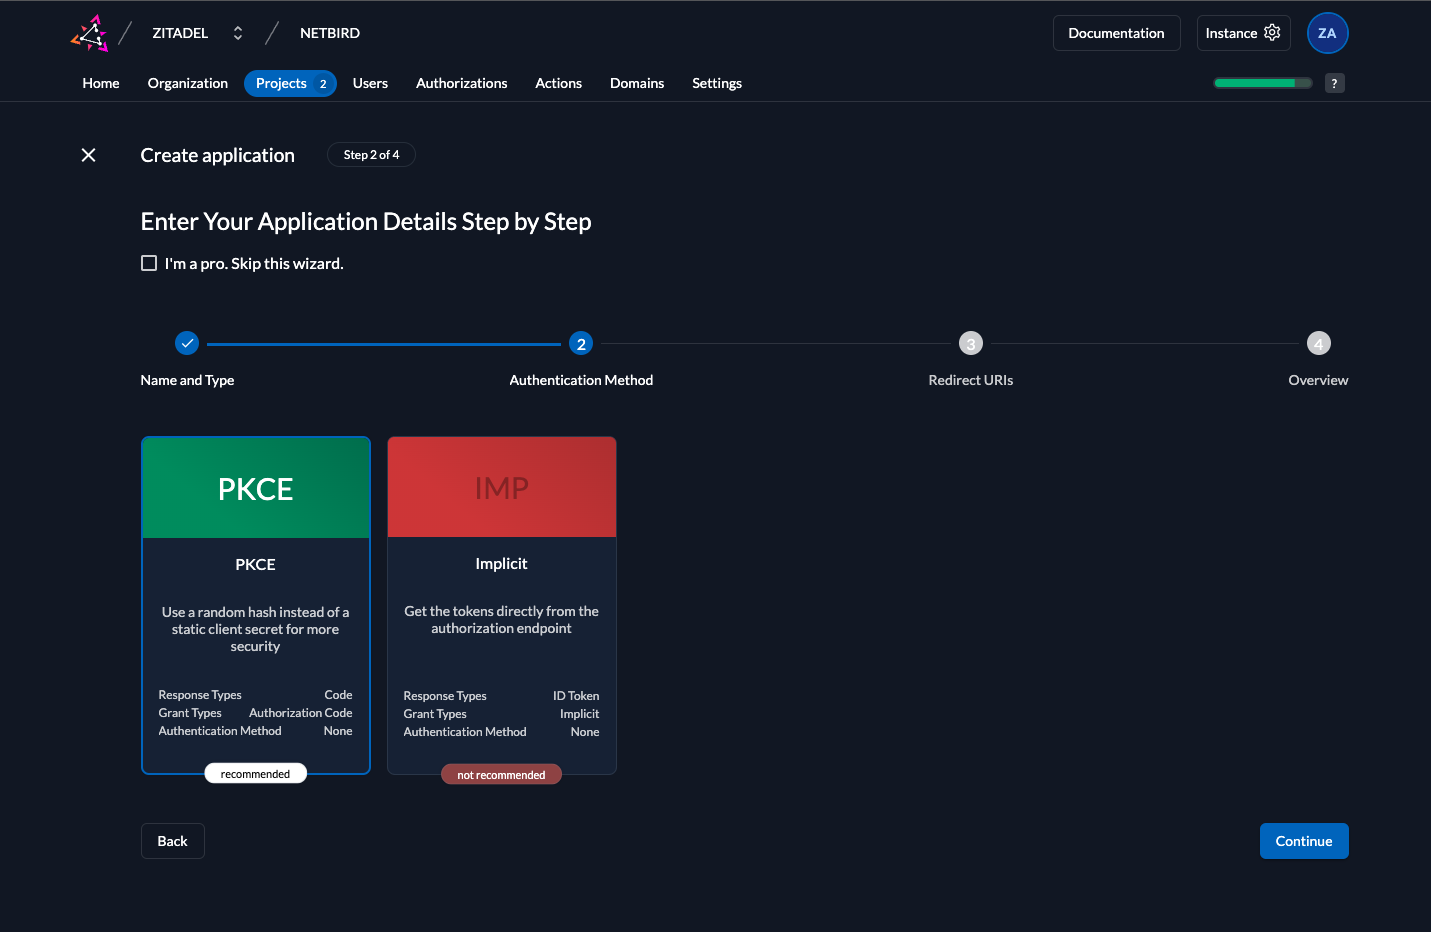
- Fill in the form with the following values and click
Continue - Authentication Method:
PKCE
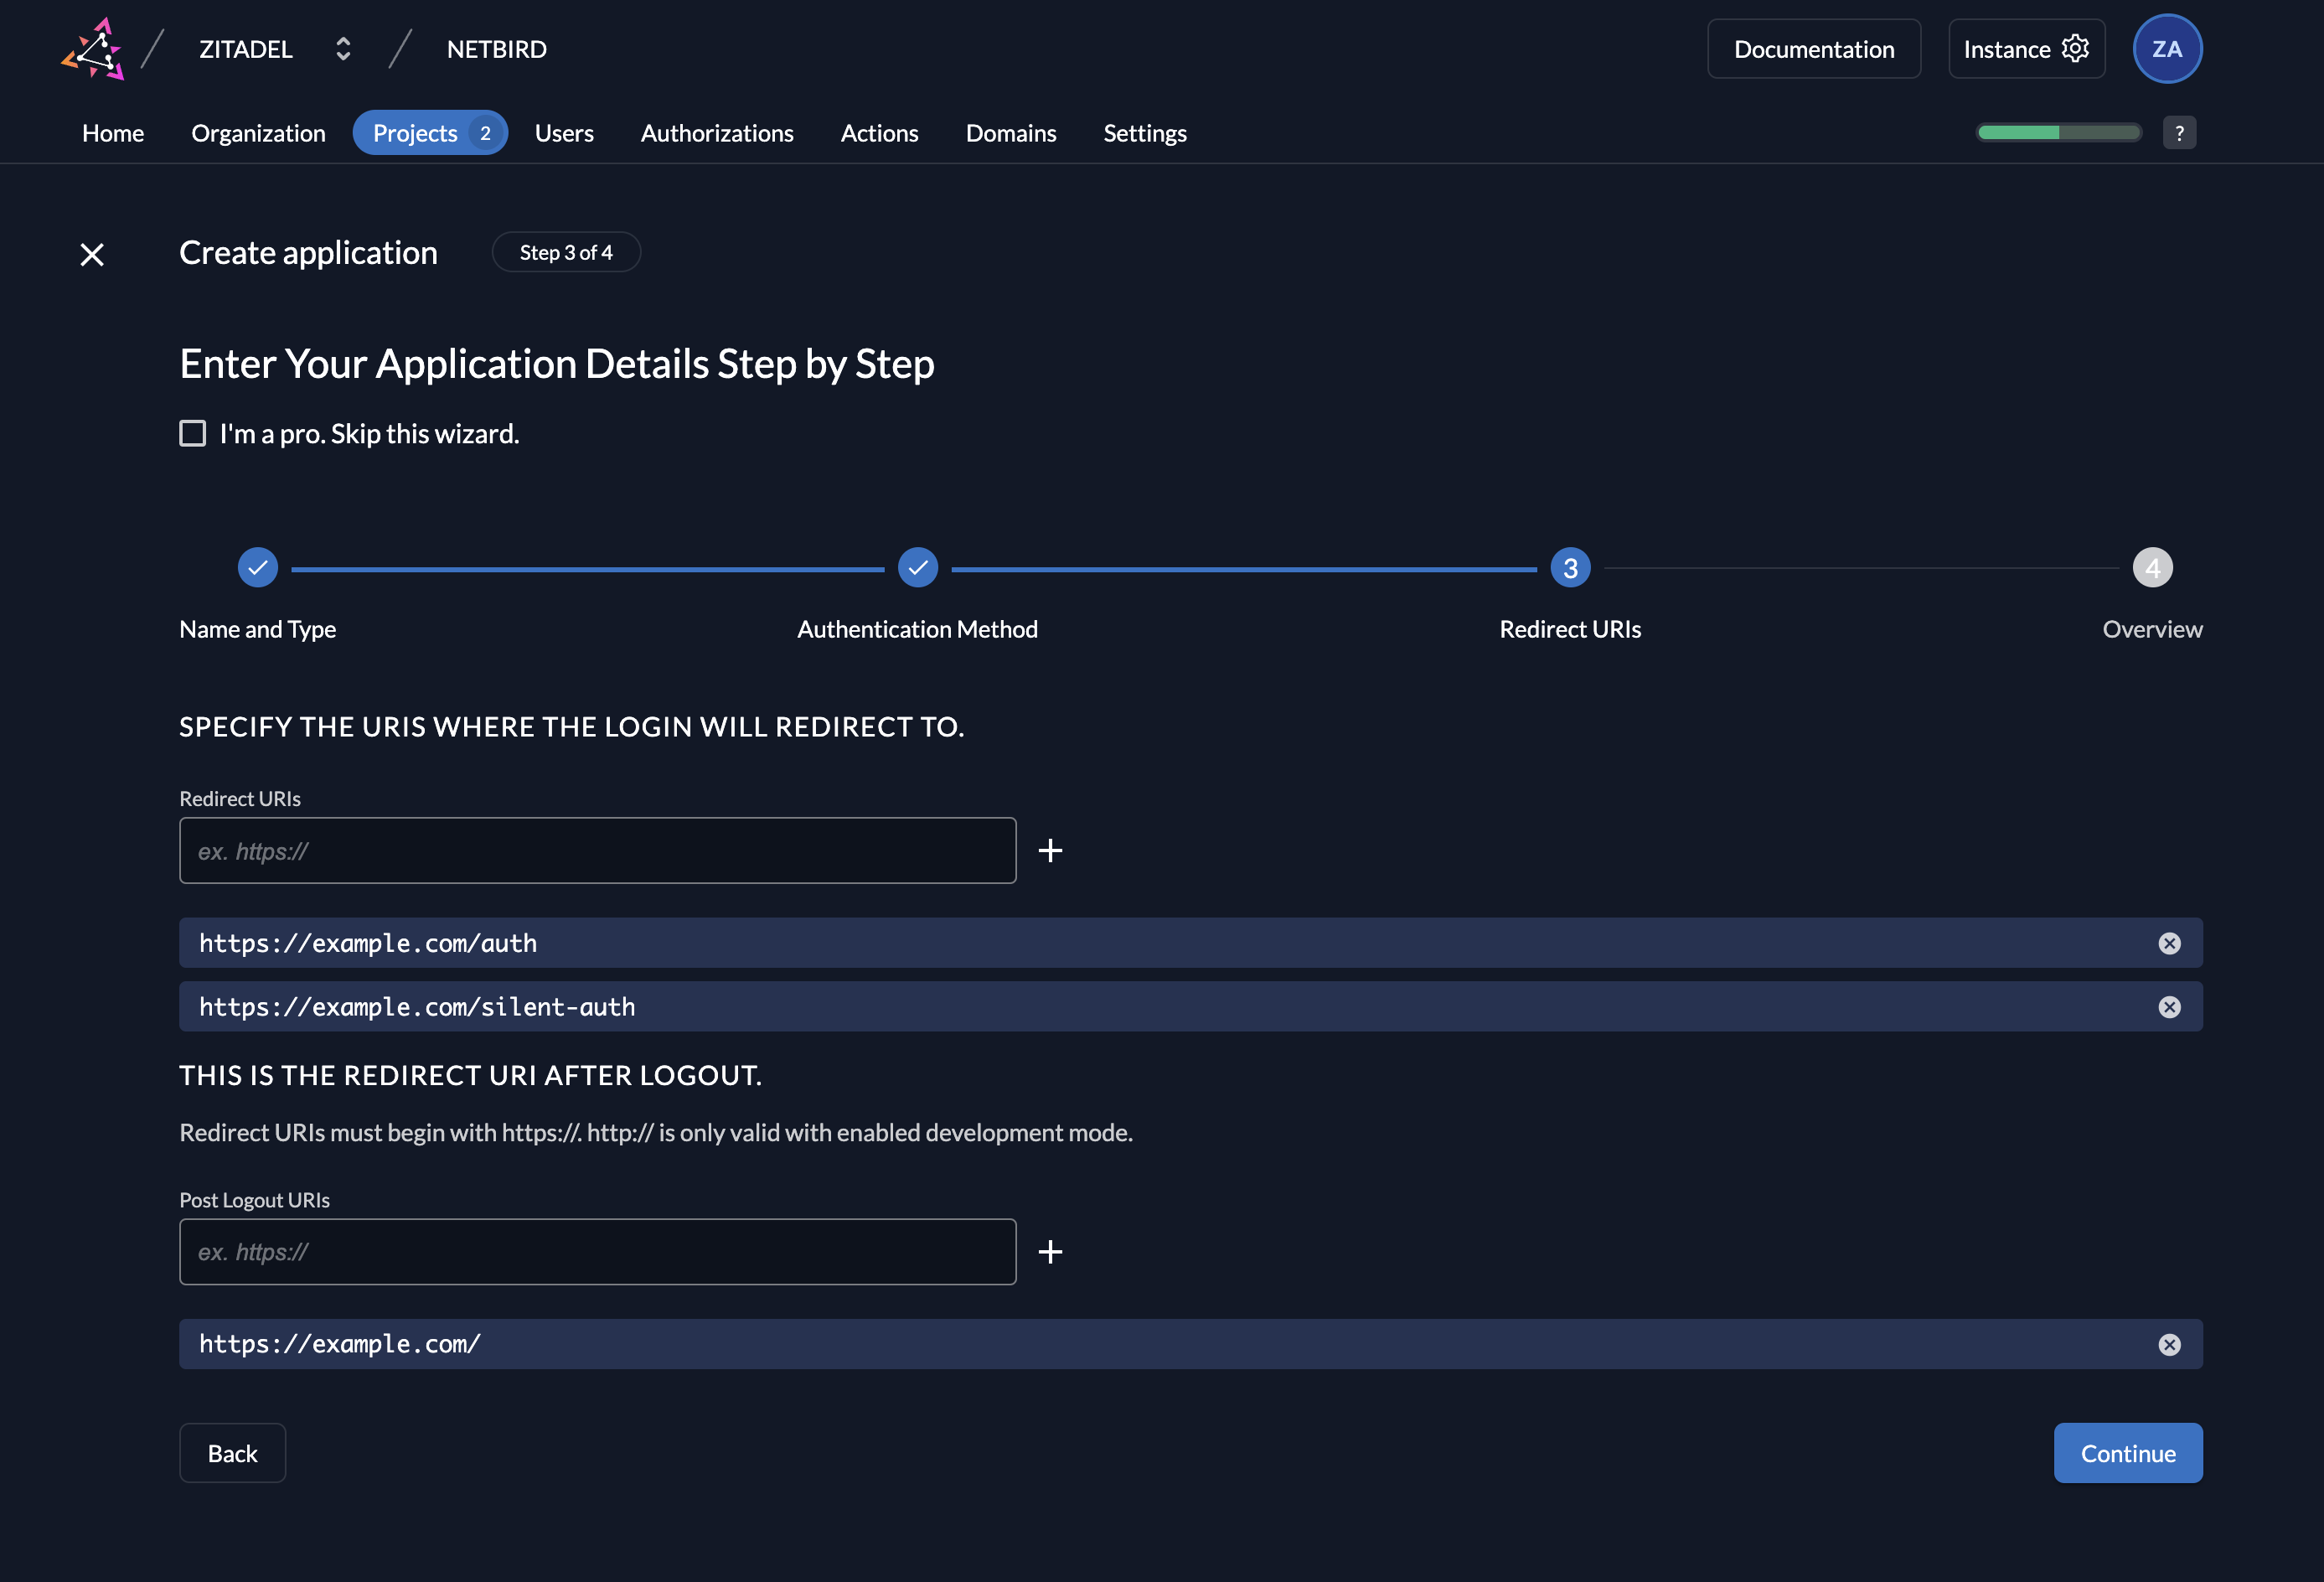
- Fill in the form with the following values and click
Continue - Redirect URIs:
https://<domain>/authand click+ - Redirect URIs:
https://<domain>/silent-authand click+ - Redirect URIs:
http://localhost:53000and click+ - Post Logout URIs:
https://<domain>/and click+
- Verify applications details and Click
Createand then clickClose - Under
Grant TypesselectAuthorization Code,Device CodeandRefresh Tokenand clicksave
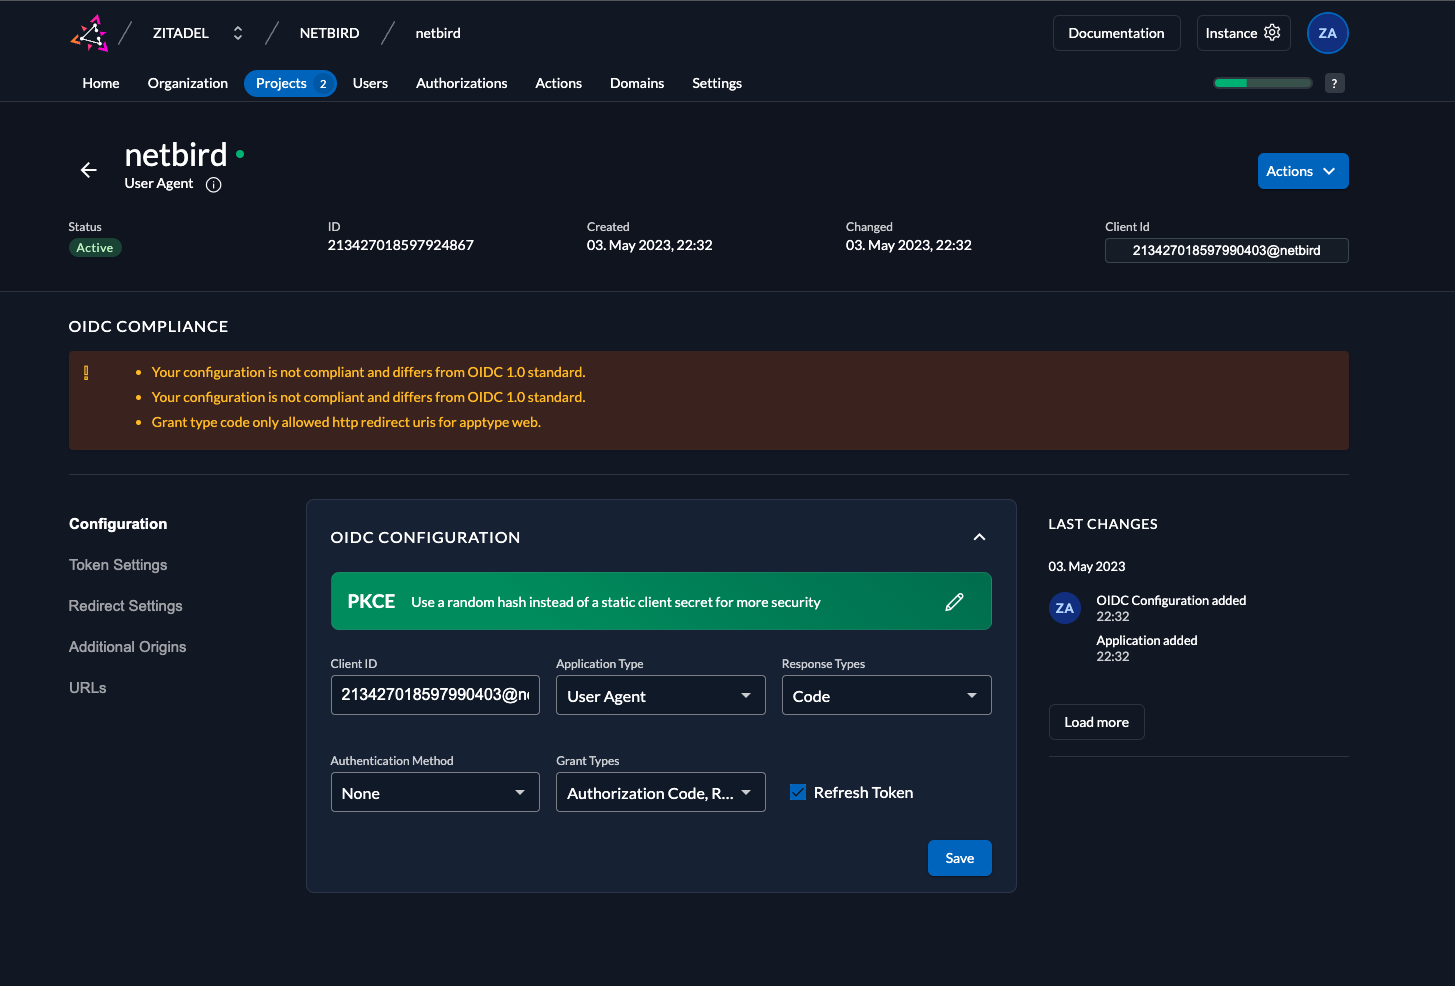
- Copy
Client IDwill be used later in thesetup.env
Step 2: Application Token Configuration
To configure netzilo application token you need to:
- Click
Projectsin the top menu and selectnetziloproject from the list - Select
netziloapplication fromAPPLICATIONSsection - Click
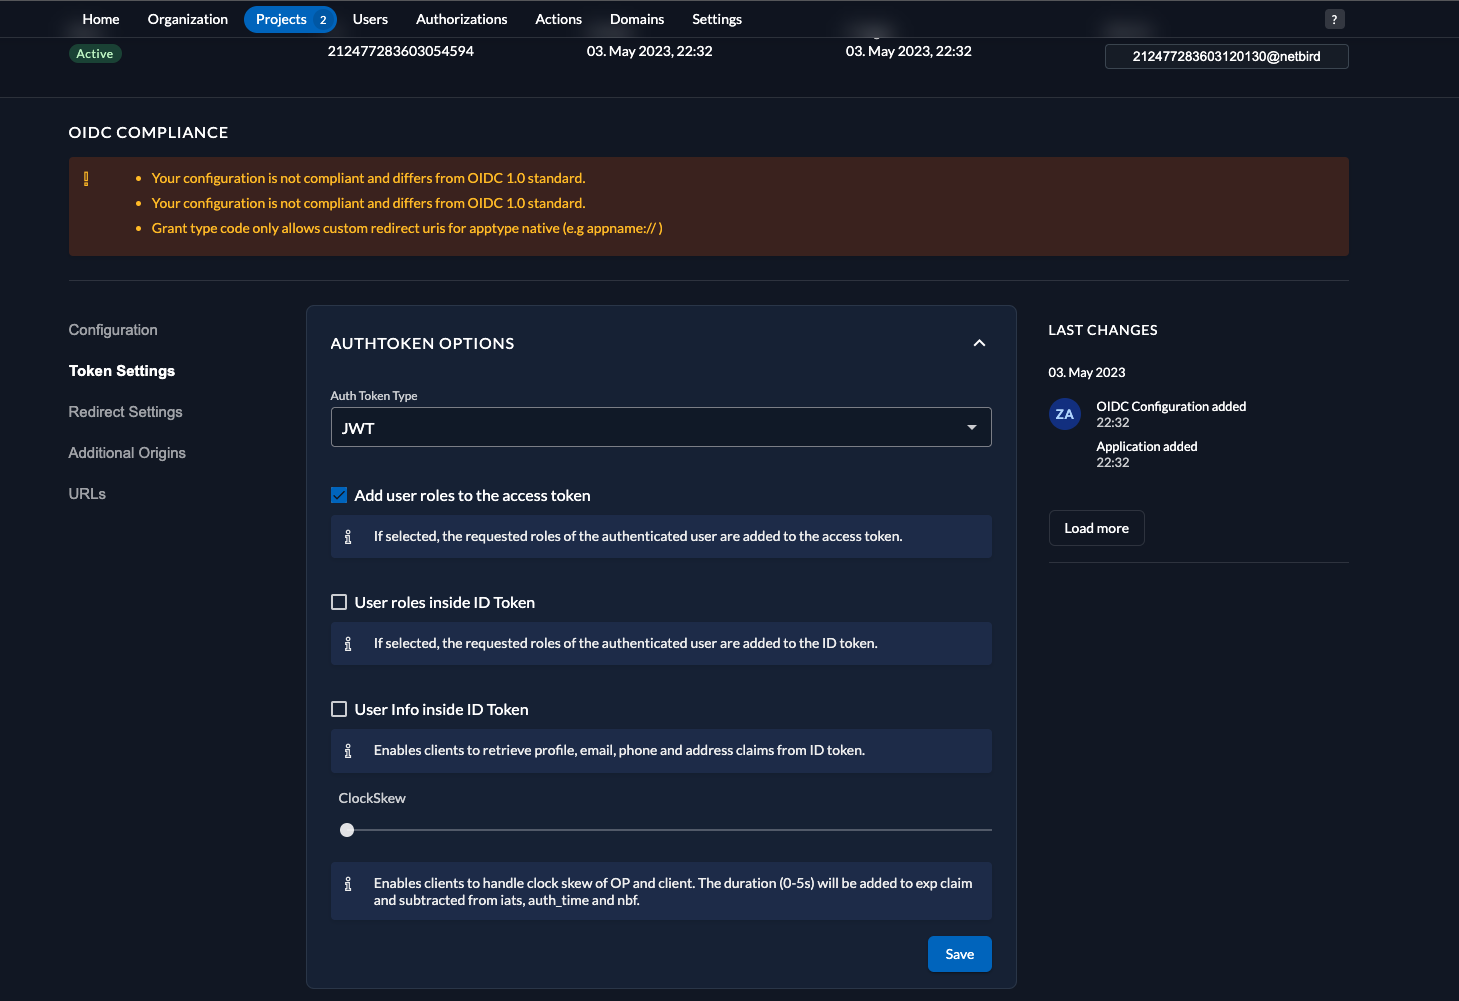
Token Settingsin the left menu - Fill in the form with the following values:
- Auth Token Type:
JWT - Check
Add user roles to the access tokencheckbox - Click
Save
Step 3: Application Redirect Configuration
This step is intended for setup running in development mode with no SSL
To configure netzilo application redirect you need to:
- Click
Projectsin the top menu and selectNETZILOproject from the list - Select
netziloapplication fromAPPLICATIONSsection - Click
Redirect Settingsin the left menu - Fill in the form with the following values:
- Toggle
Development Mode - Click
Save

Step 4: Create a Service User
In this step we will create a netzilo service user.
- Click
Usersin the top menu - Select
Service Userstab - Click
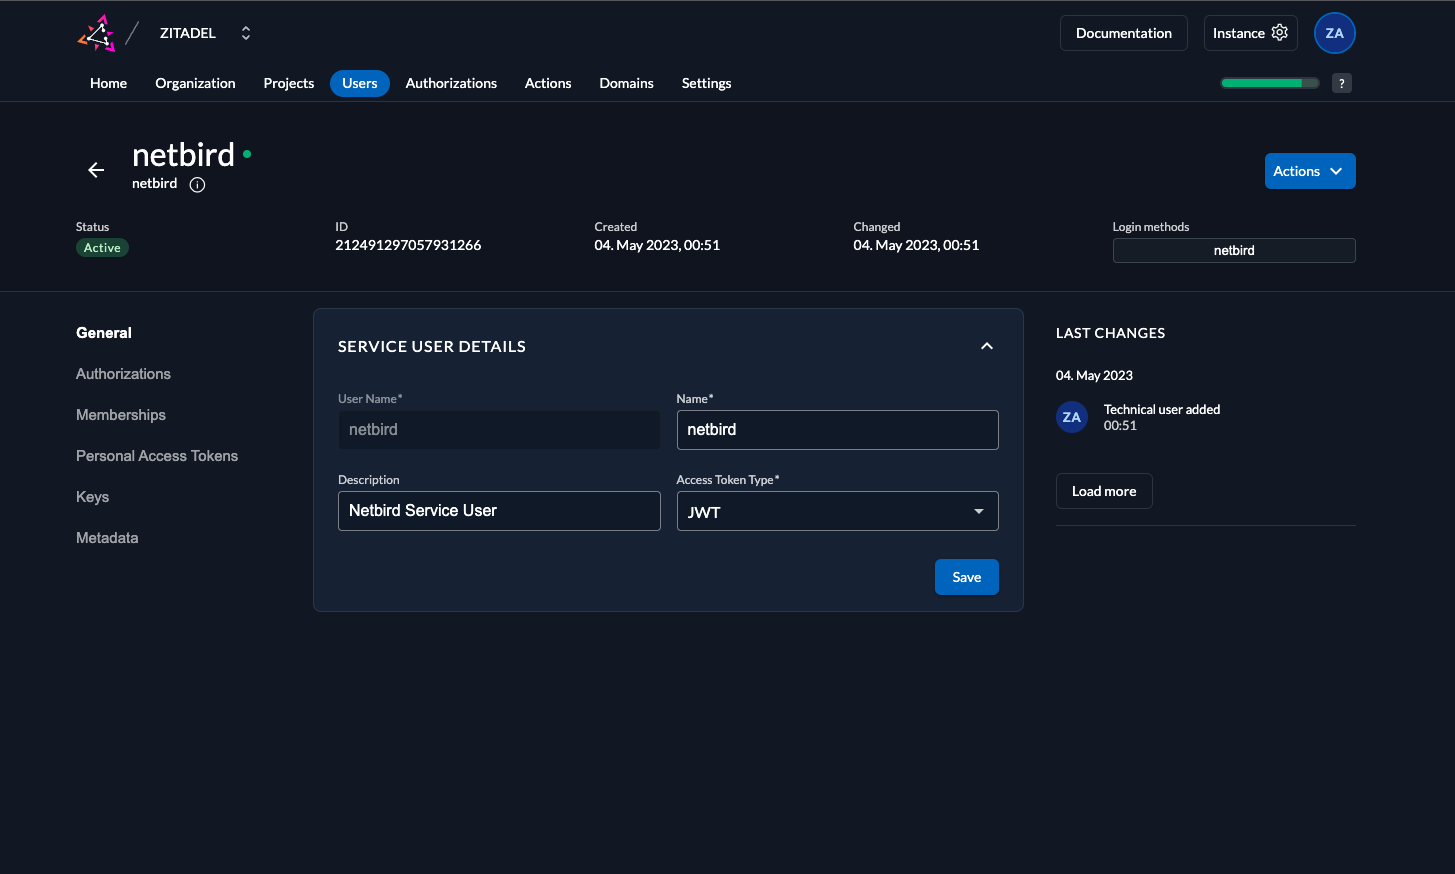
New - Fill in the form with the following values:
- User Name:
netzilo - Name:
netzilo - Description:
Netzilo Service User - Access Token Type:
JWT - Click
Create
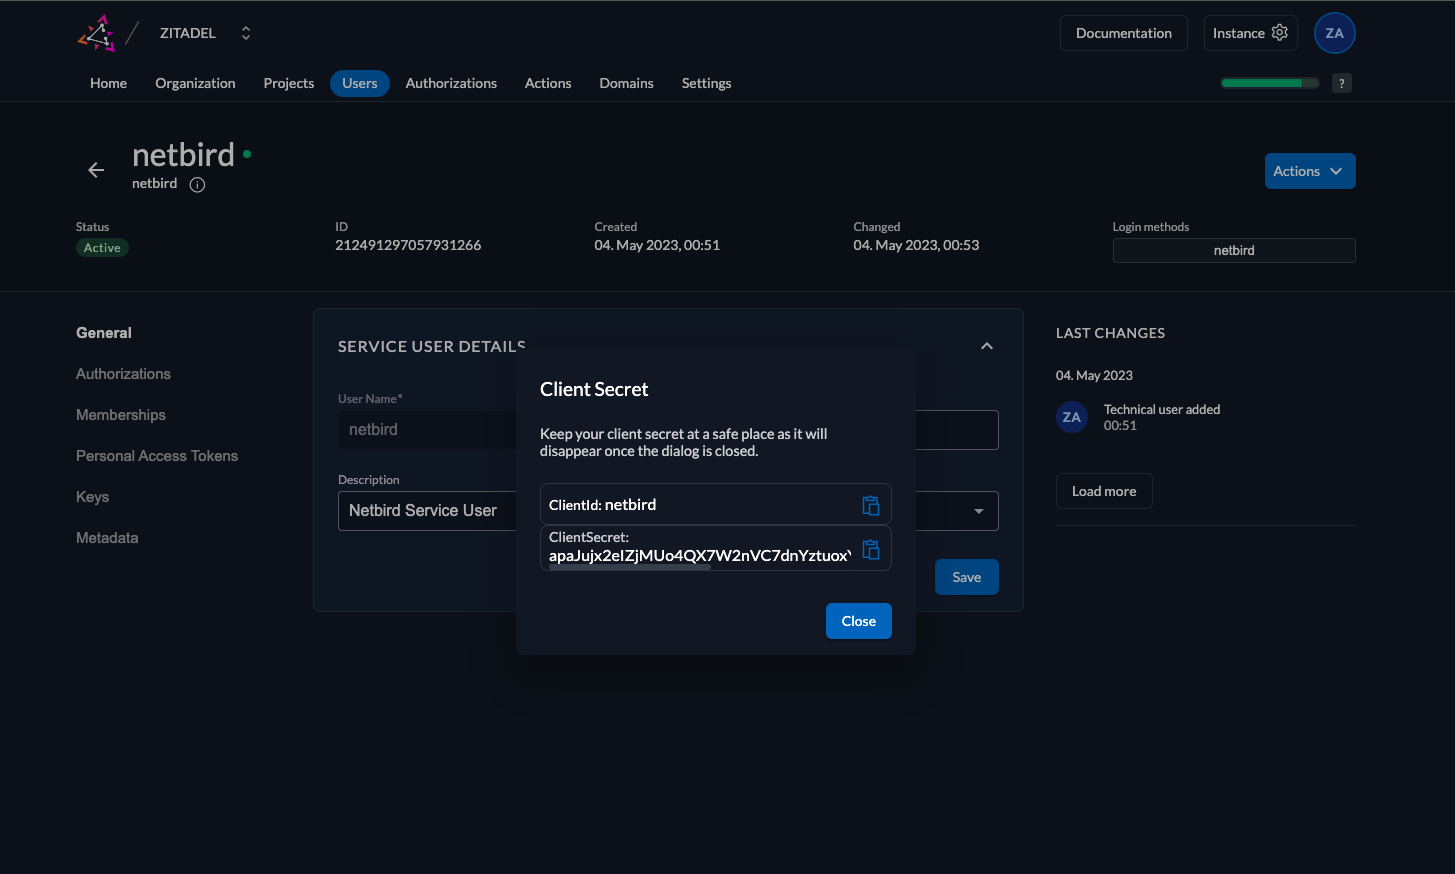
In this step we will generate ClientSecret for the netzilo service user.
- Click
Actionsin the top right corner and clickGenerate Client Secret - Copy
ClientSecretfrom the dialog will be used later to setNETZILO_IDP_MGMT_CLIENT_SECRETin thesetup.env
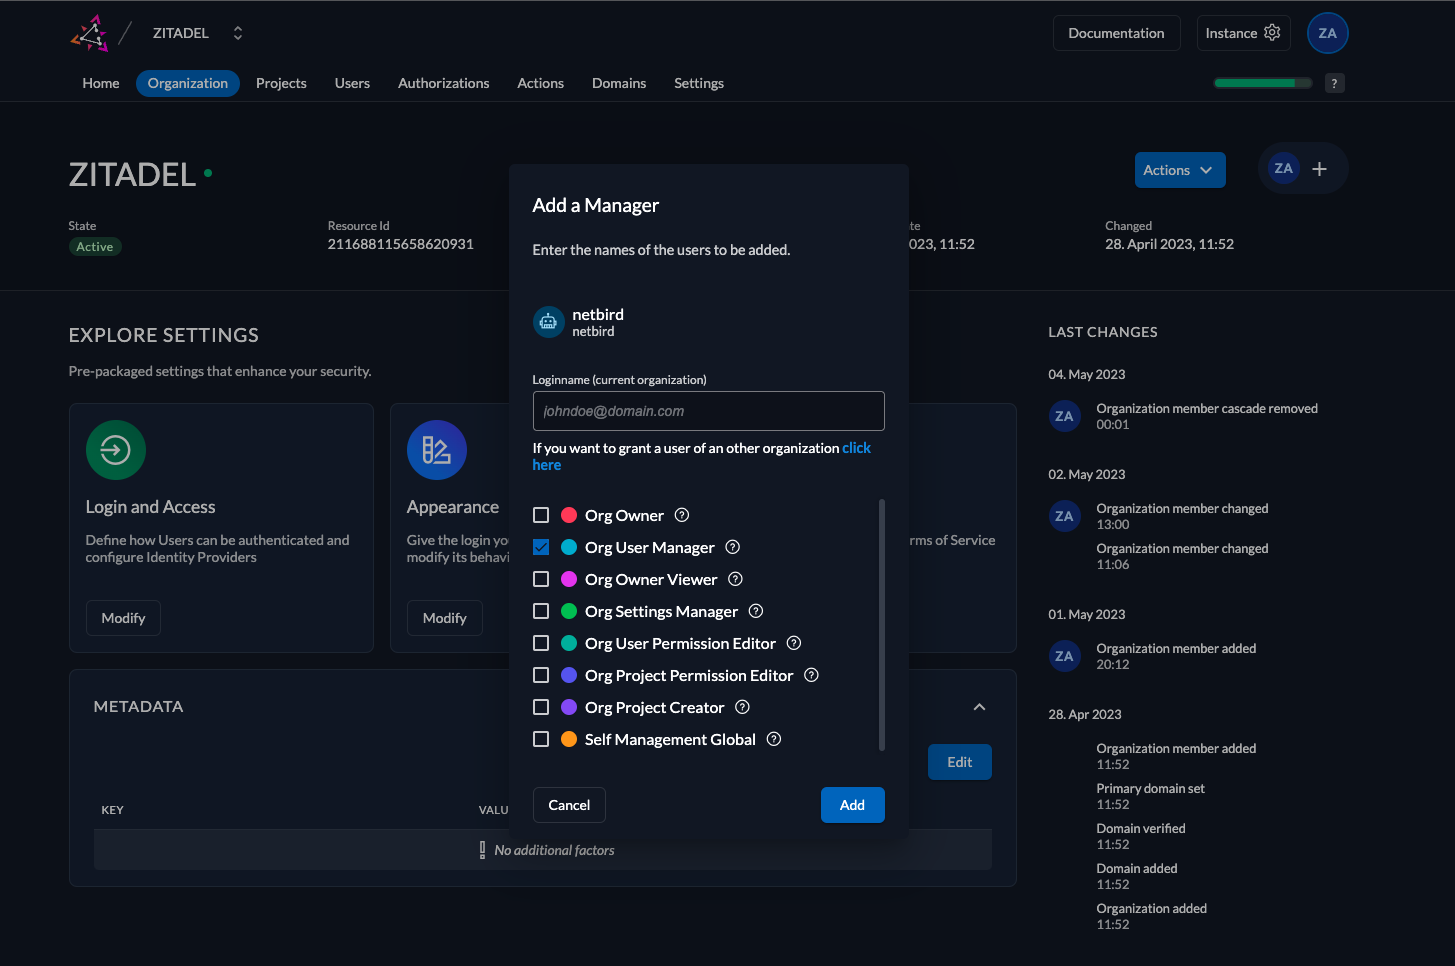
Step 5: Grant manage-users role to netzilo service user
In this step we will grant Org User Manager role to netzilo service user.
- Click
Organizationin the top menu - Click
+in the top right corner - Search for
netziloservice user - Check
Org User Managercheckbox - Click
Add
Your authority OIDC configuration will be available under:
https://<YOUR_ZITADEL_HOST_AND_PORT>/.well-known/openid-configuration
:::caution Double-check if the endpoint returns a JSON response by calling it from your browser. :::
- Set properties in the
setup.envfile:
NETZILO_AUTH_OIDC_CONFIGURATION_ENDPOINT="https://<YOUR_ZITADEL_HOST_AND_PORT>/.well-known/openid-configuration"
NETZILO_USE_AUTH0=false
NETZILO_AUTH_CLIENT_ID="<CLIENT_ID>"
NETZILO_AUTH_SUPPORTED_SCOPES="openid profile email offline_access api"
NETZILO_AUTH_AUDIENCE="<CLIENT_ID>"
NETZILO_AUTH_REDIRECT_URI="/auth"
NETZILO_AUTH_SILENT_REDIRECT_URI="/silent-auth"

NETZILO_AUTH_DEVICE_AUTH_PROVIDER="hosted"
NETZILO_AUTH_DEVICE_AUTH_CLIENT_ID="<CLIENT_ID>"
NETZILO_AUTH_DEVICE_AUTH_AUDIENCE="<CLIENT_ID>"

NETZILO_MGMT_IDP="zitadel"
NETZILO_IDP_MGMT_CLIENT_ID="netzilo"
NETZILO_IDP_MGMT_CLIENT_SECRET="<CLIENT_SECRET>"
NETZILO_IDP_MGMT_EXTRA_MANAGEMENT_ENDPOINT="https://<YOUR_ZITADEL_HOST_AND_PORT>/management/v1"
NETZILO_MGMT_IDP_SIGNKEY_REFRESH=true
Step 6: Continue with the Netzilo Self-hosting Guide
You've configured all required resources in Zitadel. You can now continue with the Netzilo Self-hosting Guide.
Keycloak
This guide is a part of the Netzilo Self-hosting Guide and explains how to integrate self-hosted Netzilo with Keycloak.
Keycloak is an open source software product to allow single sign-on with Identity and Access Management aimed at modern applications and services.
If you prefer not to self-host an Identity and Access Management solution, then you could use a managed alternative like Auth0.
The following guide is an adapted version of the original Keycloak on Docker guide from the official website.
Expected Result
After completing this guide, you can log in to your self-hosted Netzilo Dashboard and add your machines to your network using the Interactive SSO Login feature over Keycloak.

Step 1: Check your Keycloak Instance
For this guide, you need a fully configured Keycloak instance running with SSL.
We assume that your Keycloak instance is available at https://YOUR-KEYCLOAK-HOST-AND_PORT.
Feel free to change the port if you have configured Keycloak with a different one.
Most of the OIDC software requires SSL for production use. We encourage you to comply with this requirement to make the world more secure 😊.
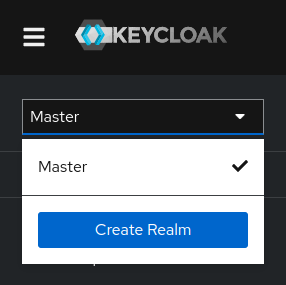
Step 2: Create a realm
To create a realm you need to:
- Open the Keycloak Admin Console
- Hover the mouse over the dropdown in the top-left corner where it says
Master, then click onCreate Realm - Fill in the form with the following values:
- Realm name:
netzilo - Click
Create
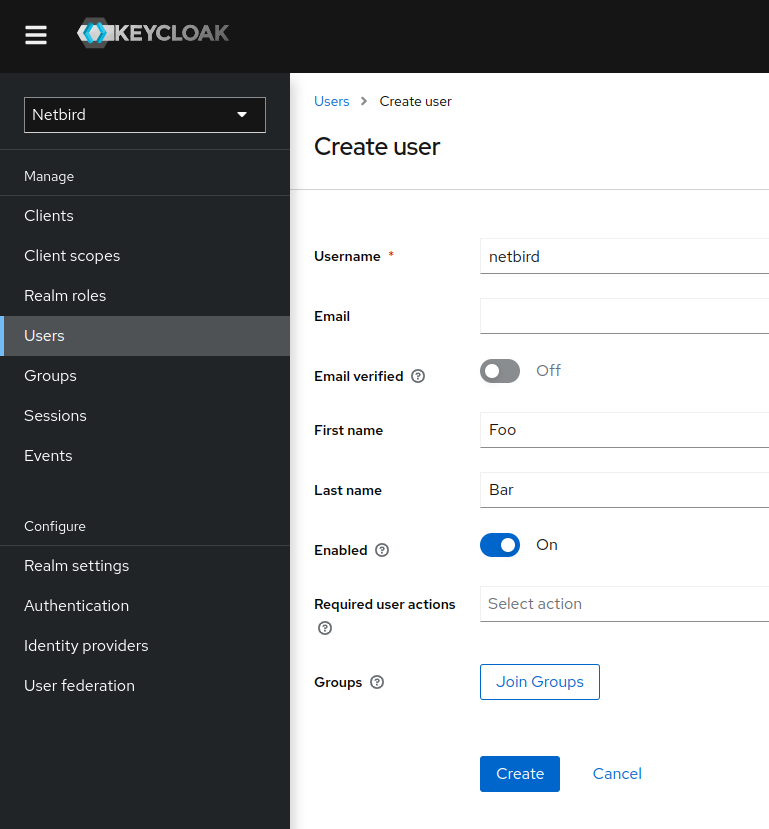
Step 3: Create a user
In this step we will create a Netzilo administrator user.
- Open the Keycloak Admin Console
- Make sure, that the selected realm is
Netzilo - Click
Users(left-hand menu) - Click
Create new user - Fill in the form with the following values:
- Username:
netzilo - Click
Create
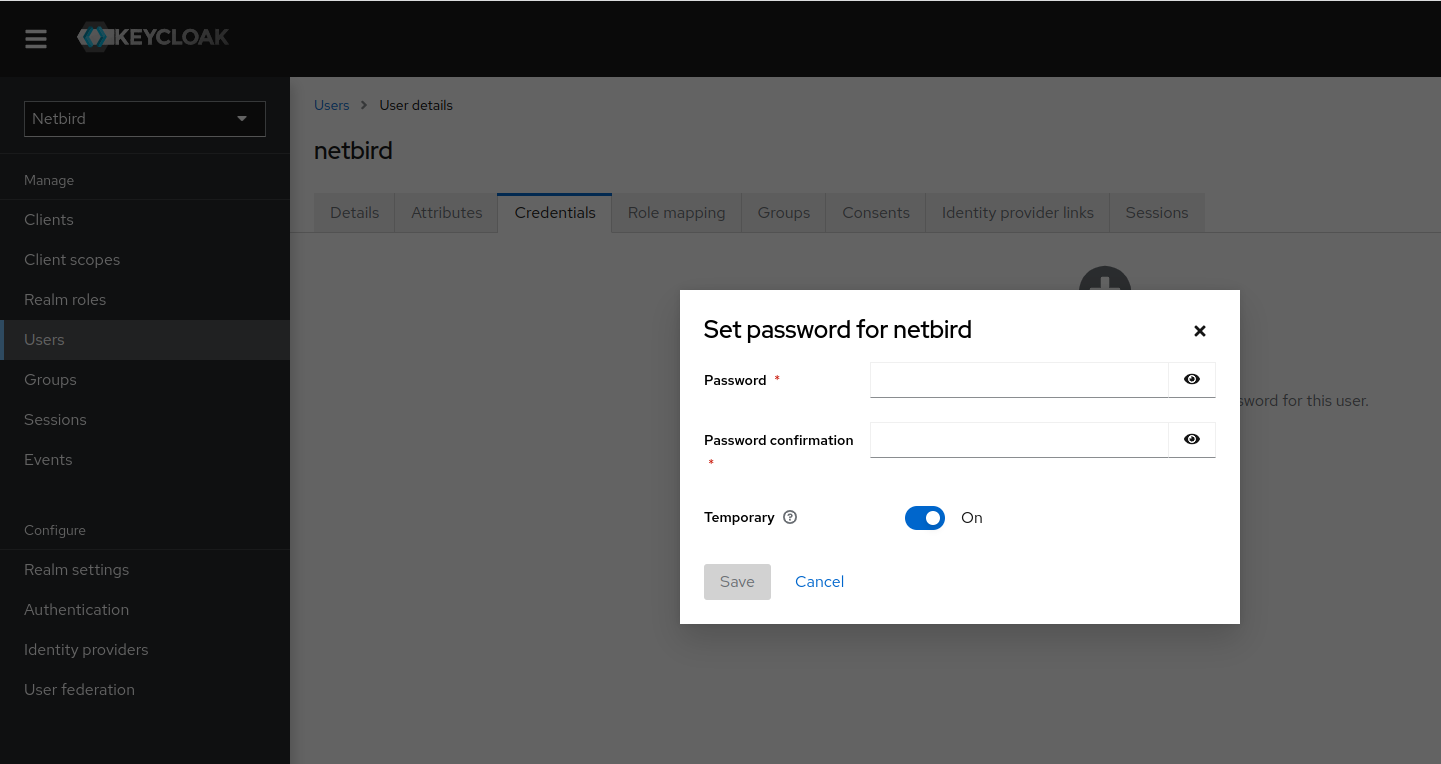
The user will need an initial password set to be able to log in. To do this:
- Click
Credentialstab - Click
Set passwordbutton - Fill in the password form with a password
- Set the
Temporaryfield toOffto prevent having to update password on first login - Click
Save
Step 4: Create a Netzilo client
In this step we will create Netzilo application client and register with the Keycloak instance.
- Open the Keycloak Admin Console
- Make sure, that the selected realm is
Netzilo - Click
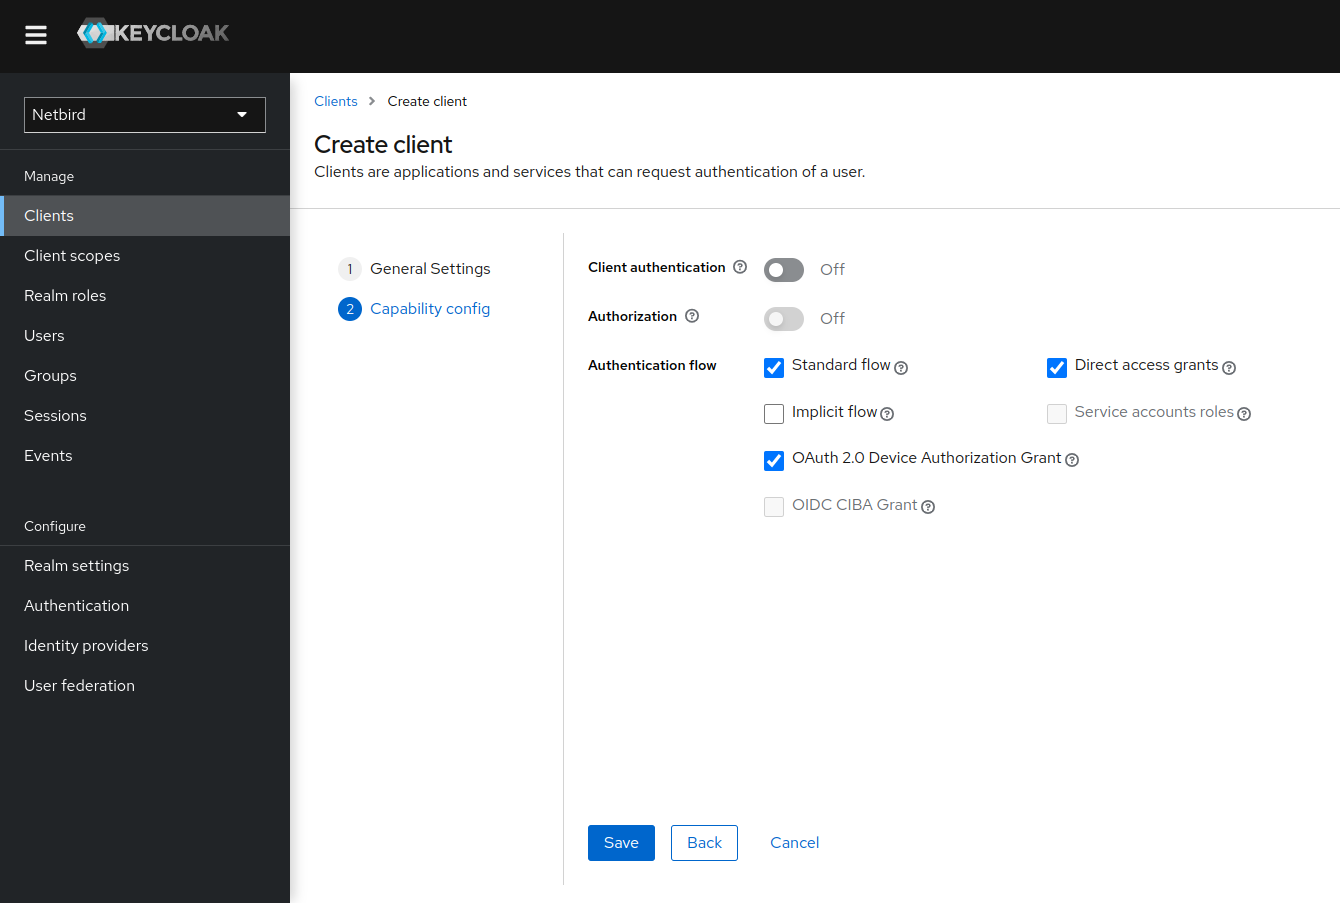
Clients - Click
Create clientbutton - Fill in the form with the following values and click Next:
- Client Type:
OpenID Connect - Client ID:
netzilo-client - Your newly client
netzilo-clientwill be used later to setNETZILO_AUTH_CLIENT_IDin thesetup.env

- Check the checkboxes as on the screenshot below and click Save
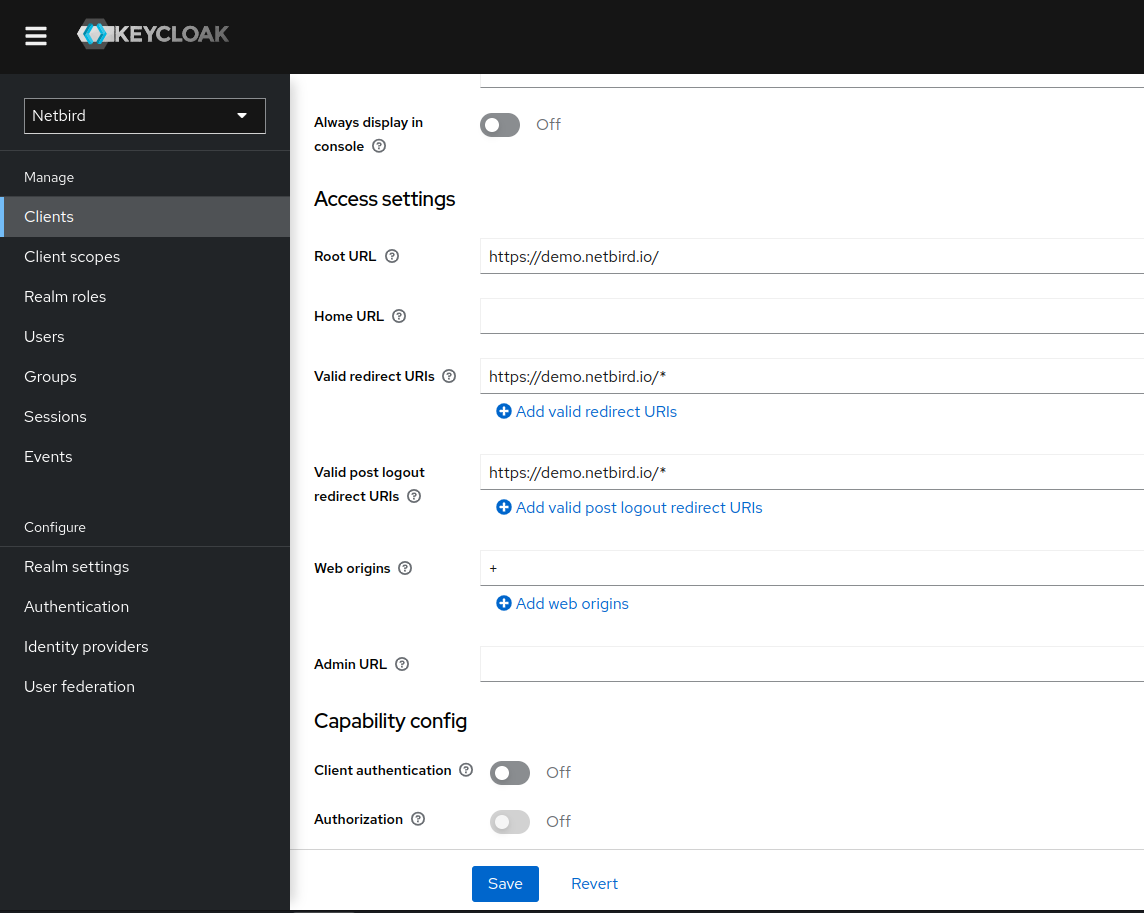
Step 5: Adjust Netzilo client access settings
In this step we will configure Netzilo application client access with the Netzilo URLs.
- Open the Keycloak Admin Console
- Make sure, that the selected realm is
Netzilo - Click
Clients - Choose
netzilo-clientfrom the list - Go to
Access Settingssection - Fill in the fields with the following values:
- Root URL:
https://YOUR DOMAIN/(this is the Netzilo Dashboard root URL) - Valid redirect URIs:
https://YOUR DOMAIN/*andhttp://localhost:53000 - Valid post logout redirect URIs:
https://YOUR DOMAIN/* - Web origins:
+ - Click
Save
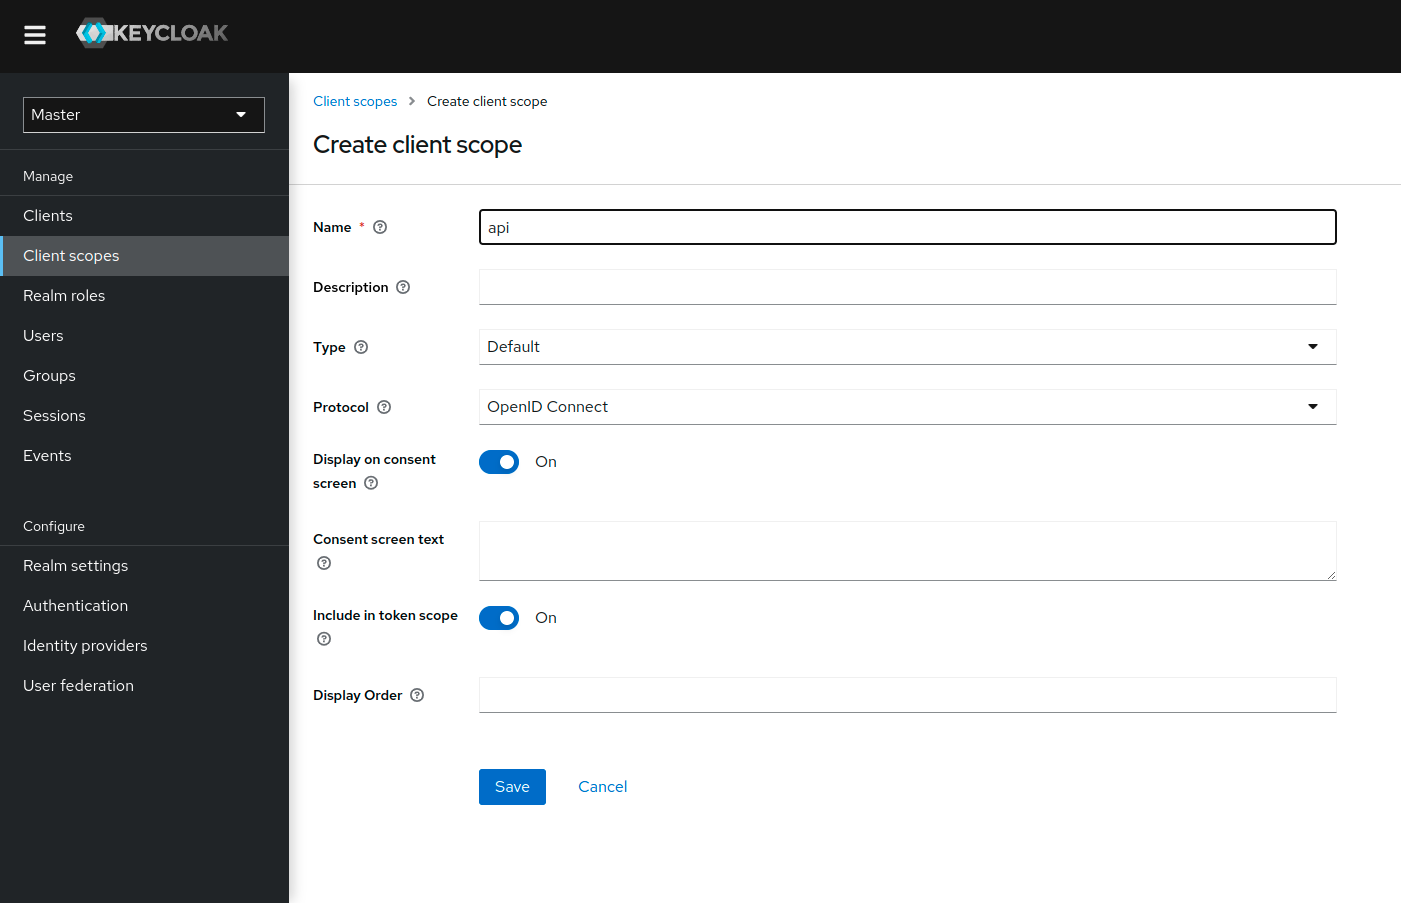
Step 6: Create a Netzilo client scope
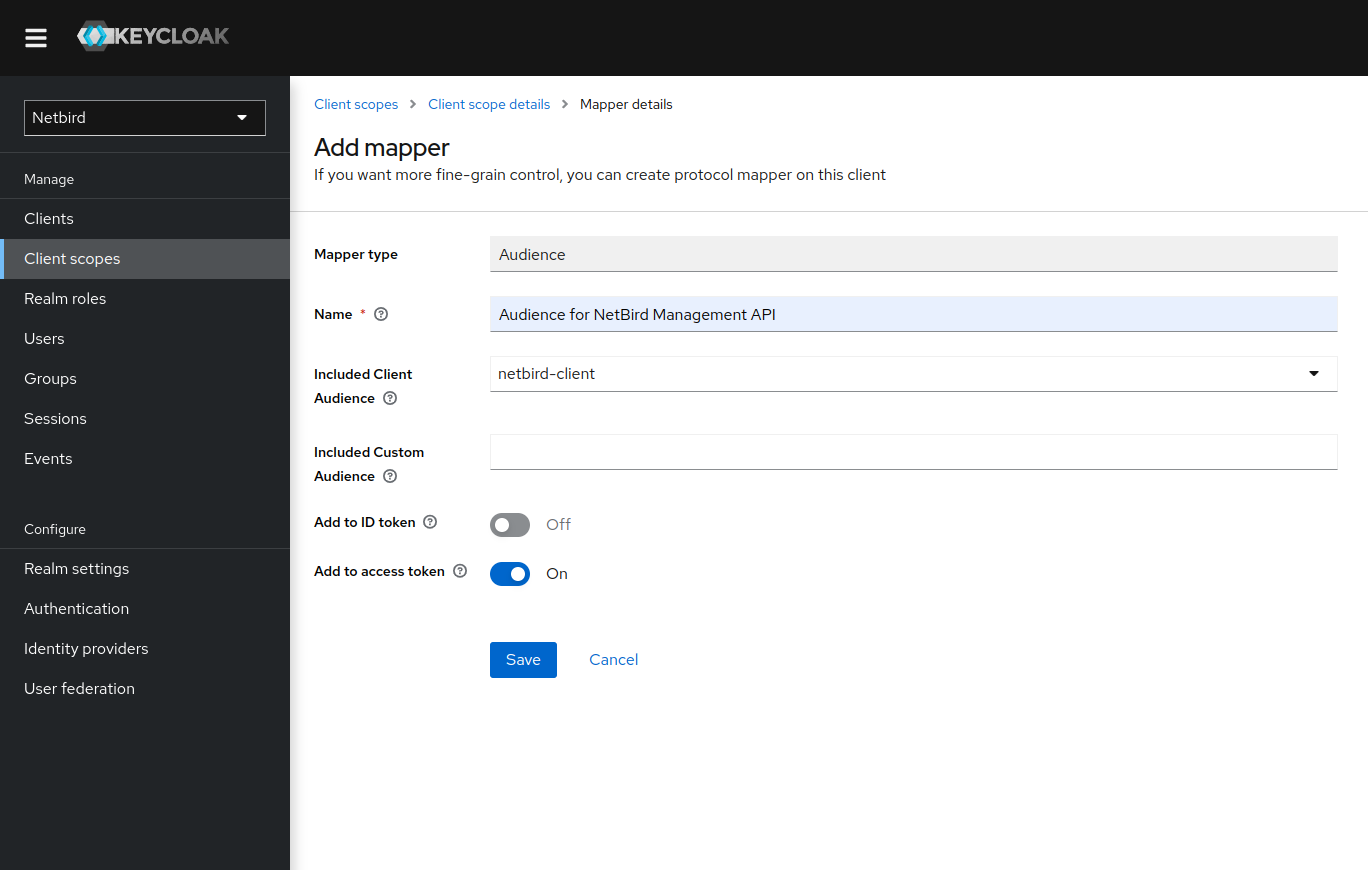
In this step, we will create and configure the Netzilo client audience for Keycloak to add it to the generated JWT tokens.
- Open the Keycloak Admin Console
- Make sure, that the selected realm is
Netzilo - Click
Client scopes(left-hand menu) - Click
Create client scopebutton - Fill in the form with the following values:
- Name:
api - Type:
Default - Protocol:
OpenID Connect - Click
Save
- While in the newly created Client Scope, switch to the
Mapperstab - Click
Configure a new mapper - Choose the
Audiencemapping
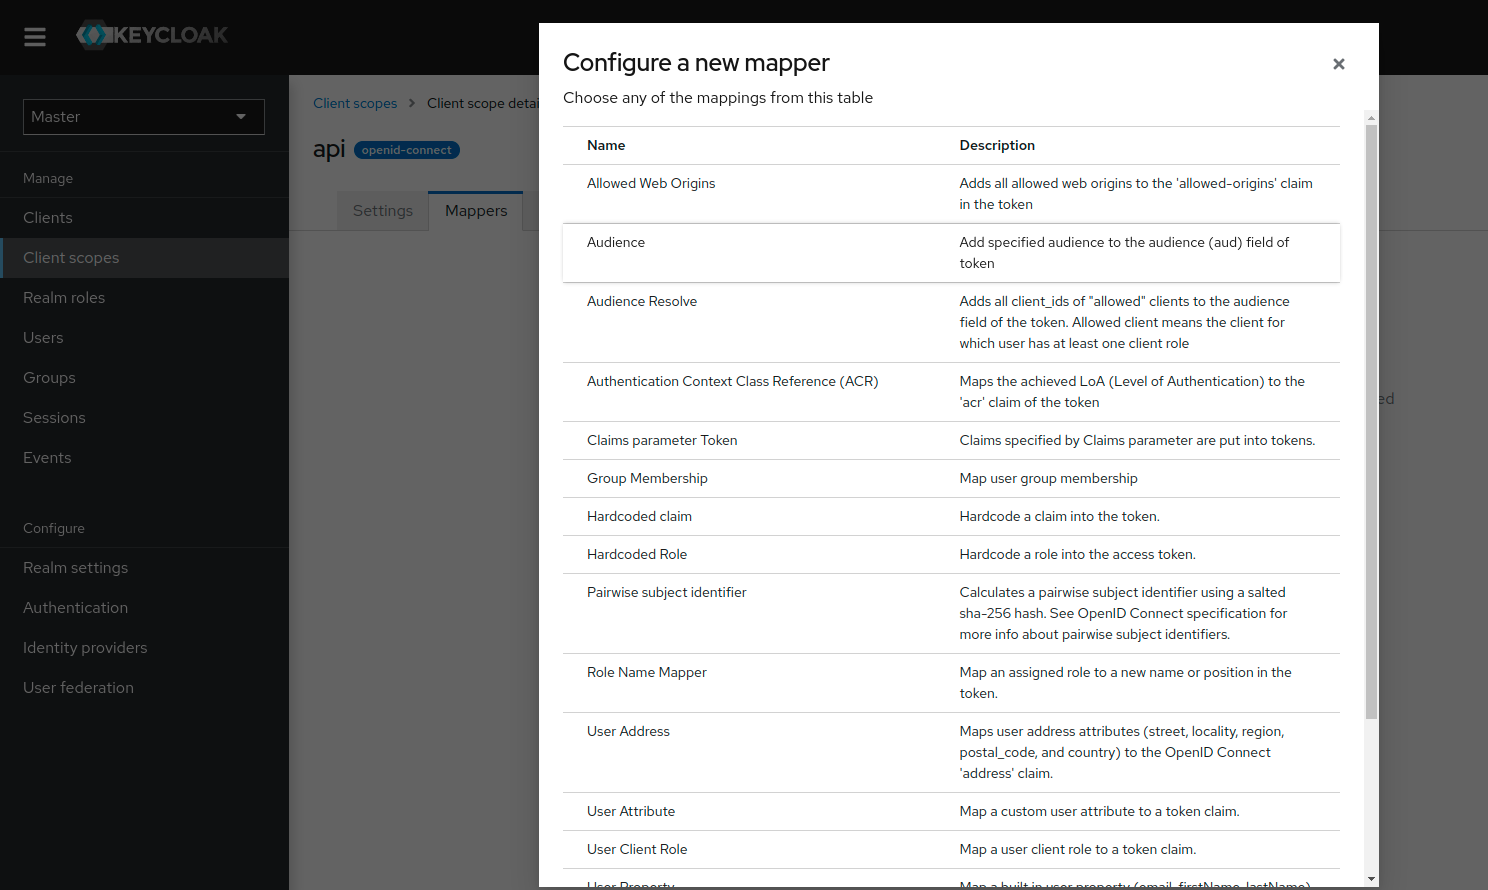
- Fill in the form with the following values:
- Name:
Audience for Netzilo Management API - Included Client Audience:
netzilo-client - Add to access token:
On - Click
Save
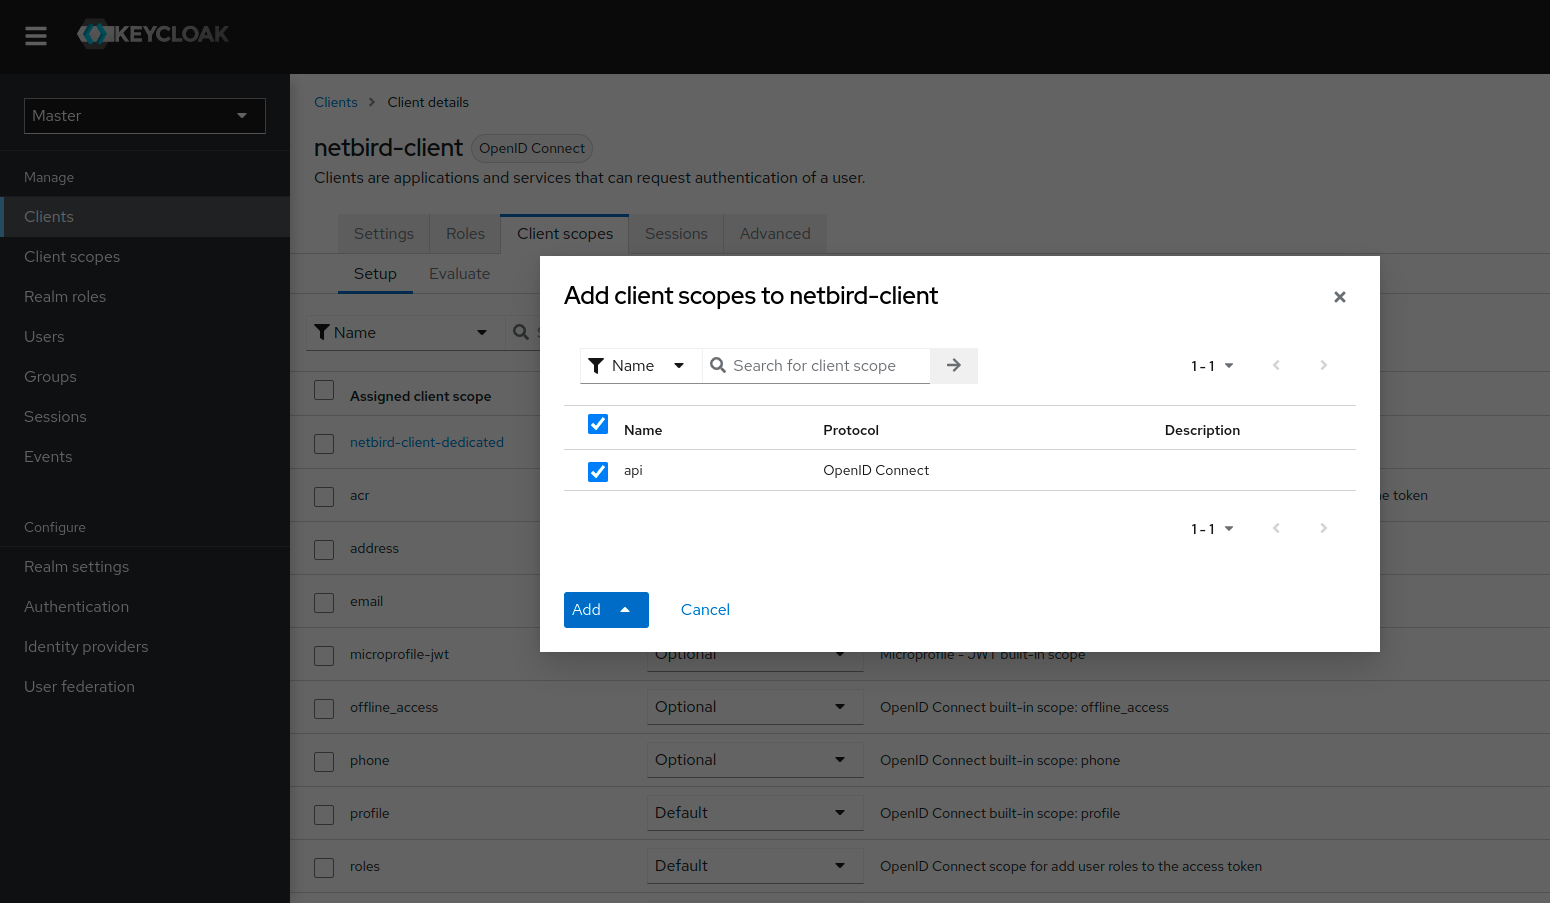
Step 7: Add client scope to Netzilo client
- Open the Keycloak Admin Console
- Make sure, that the selected realm is
Netzilo - Click
Clients - Choose
netzilo-clientfrom the list - Switch to
Client scopestab - Click
Add client scopebutton - Choose
api - Click
AddchoosingDefault - The value
netzilo-clientwill be used as audience
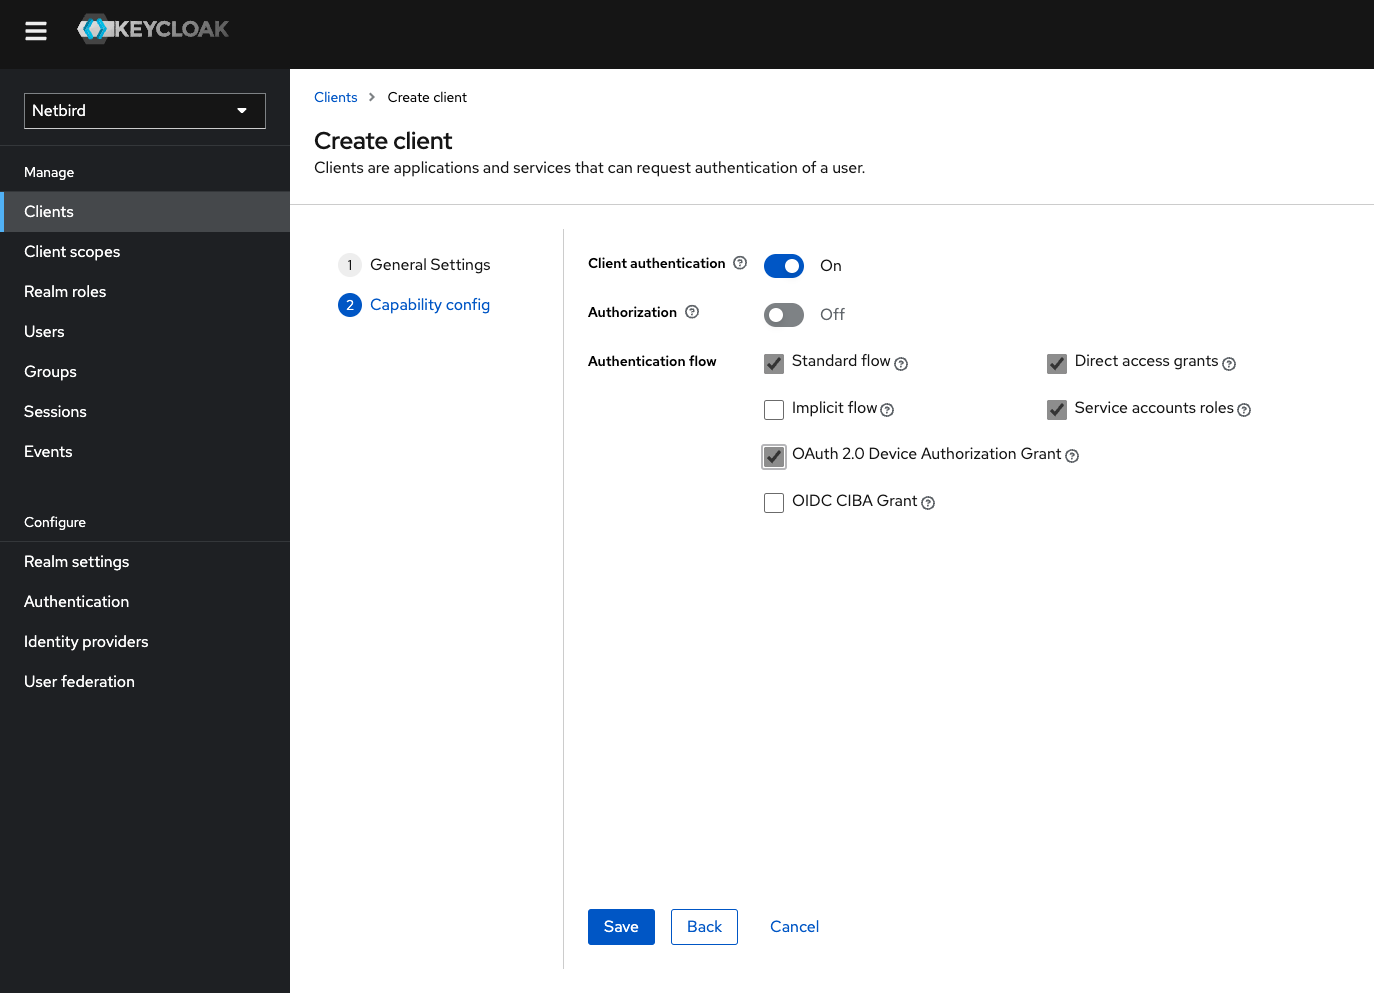
Step 8: Create a Netzilo-Backend client
In this step we will create Netzilo backend client and register with the Keycloak instance.
- Open the Keycloak Admin Console
- Make sure, that the selected realm is
Netzilo - Click
Clients - Click
Create clientbutton - Fill in the form with the following values and click Next:
- Client Type:
OpenID Connect - Client ID:
netzilo-backend - Your newly client
netzilo-backendwill be used later to setNETZILO_IDP_MGMT_CLIENT_IDin thesetup.env
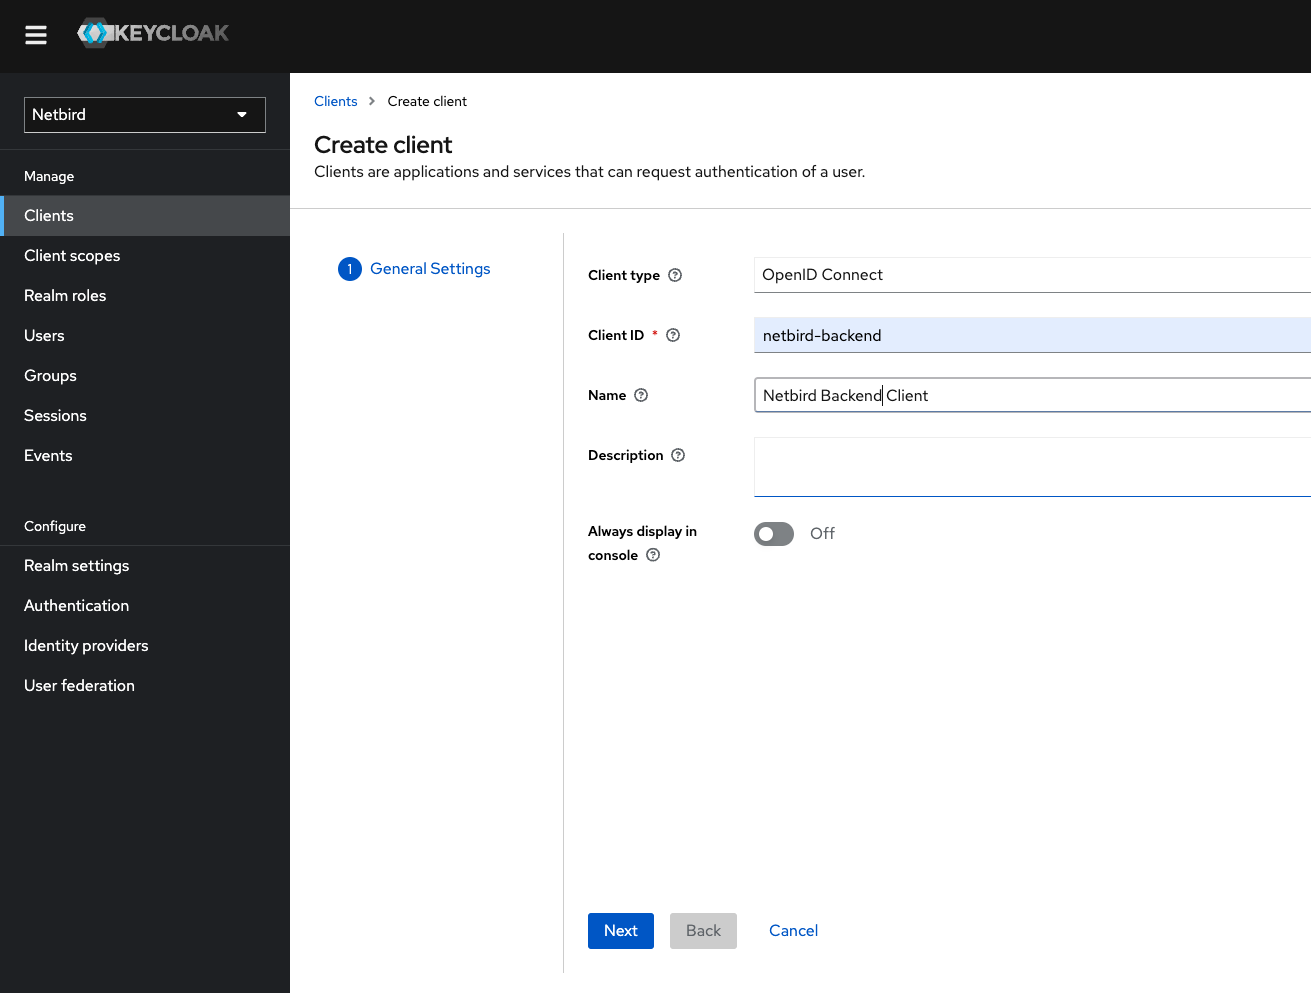
- Check the checkboxes as on the screenshot below and click Save
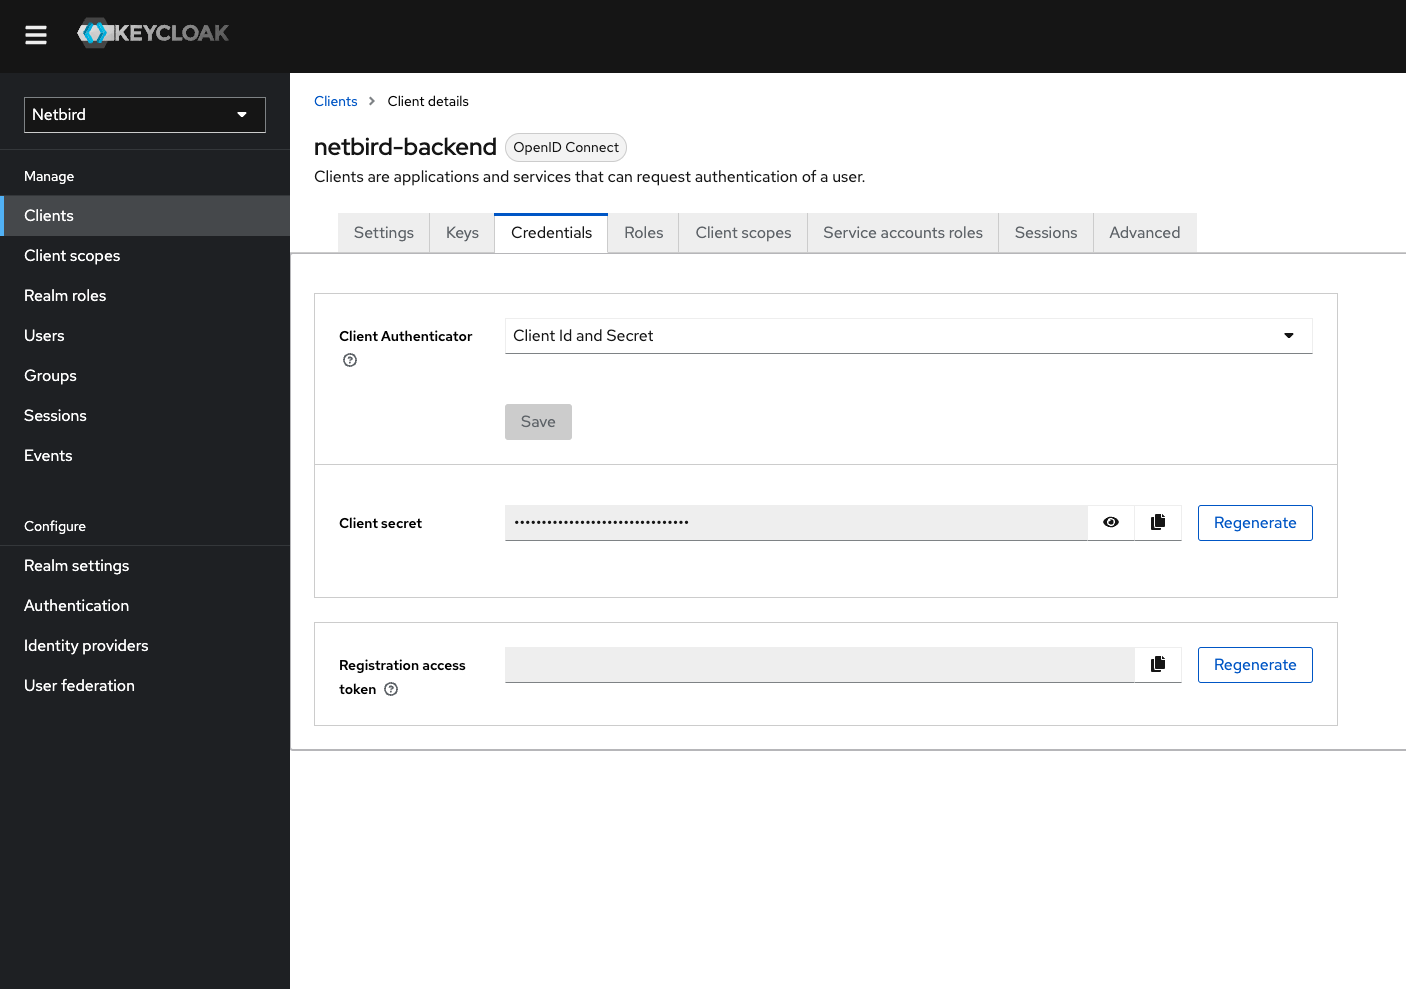
The client will need secret to authenticate. To do this:
- Click
Credentialstab - Copy
client secretwill be used later to setNETZILO_IDP_MGMT_CLIENT_SECRETin thesetup.env
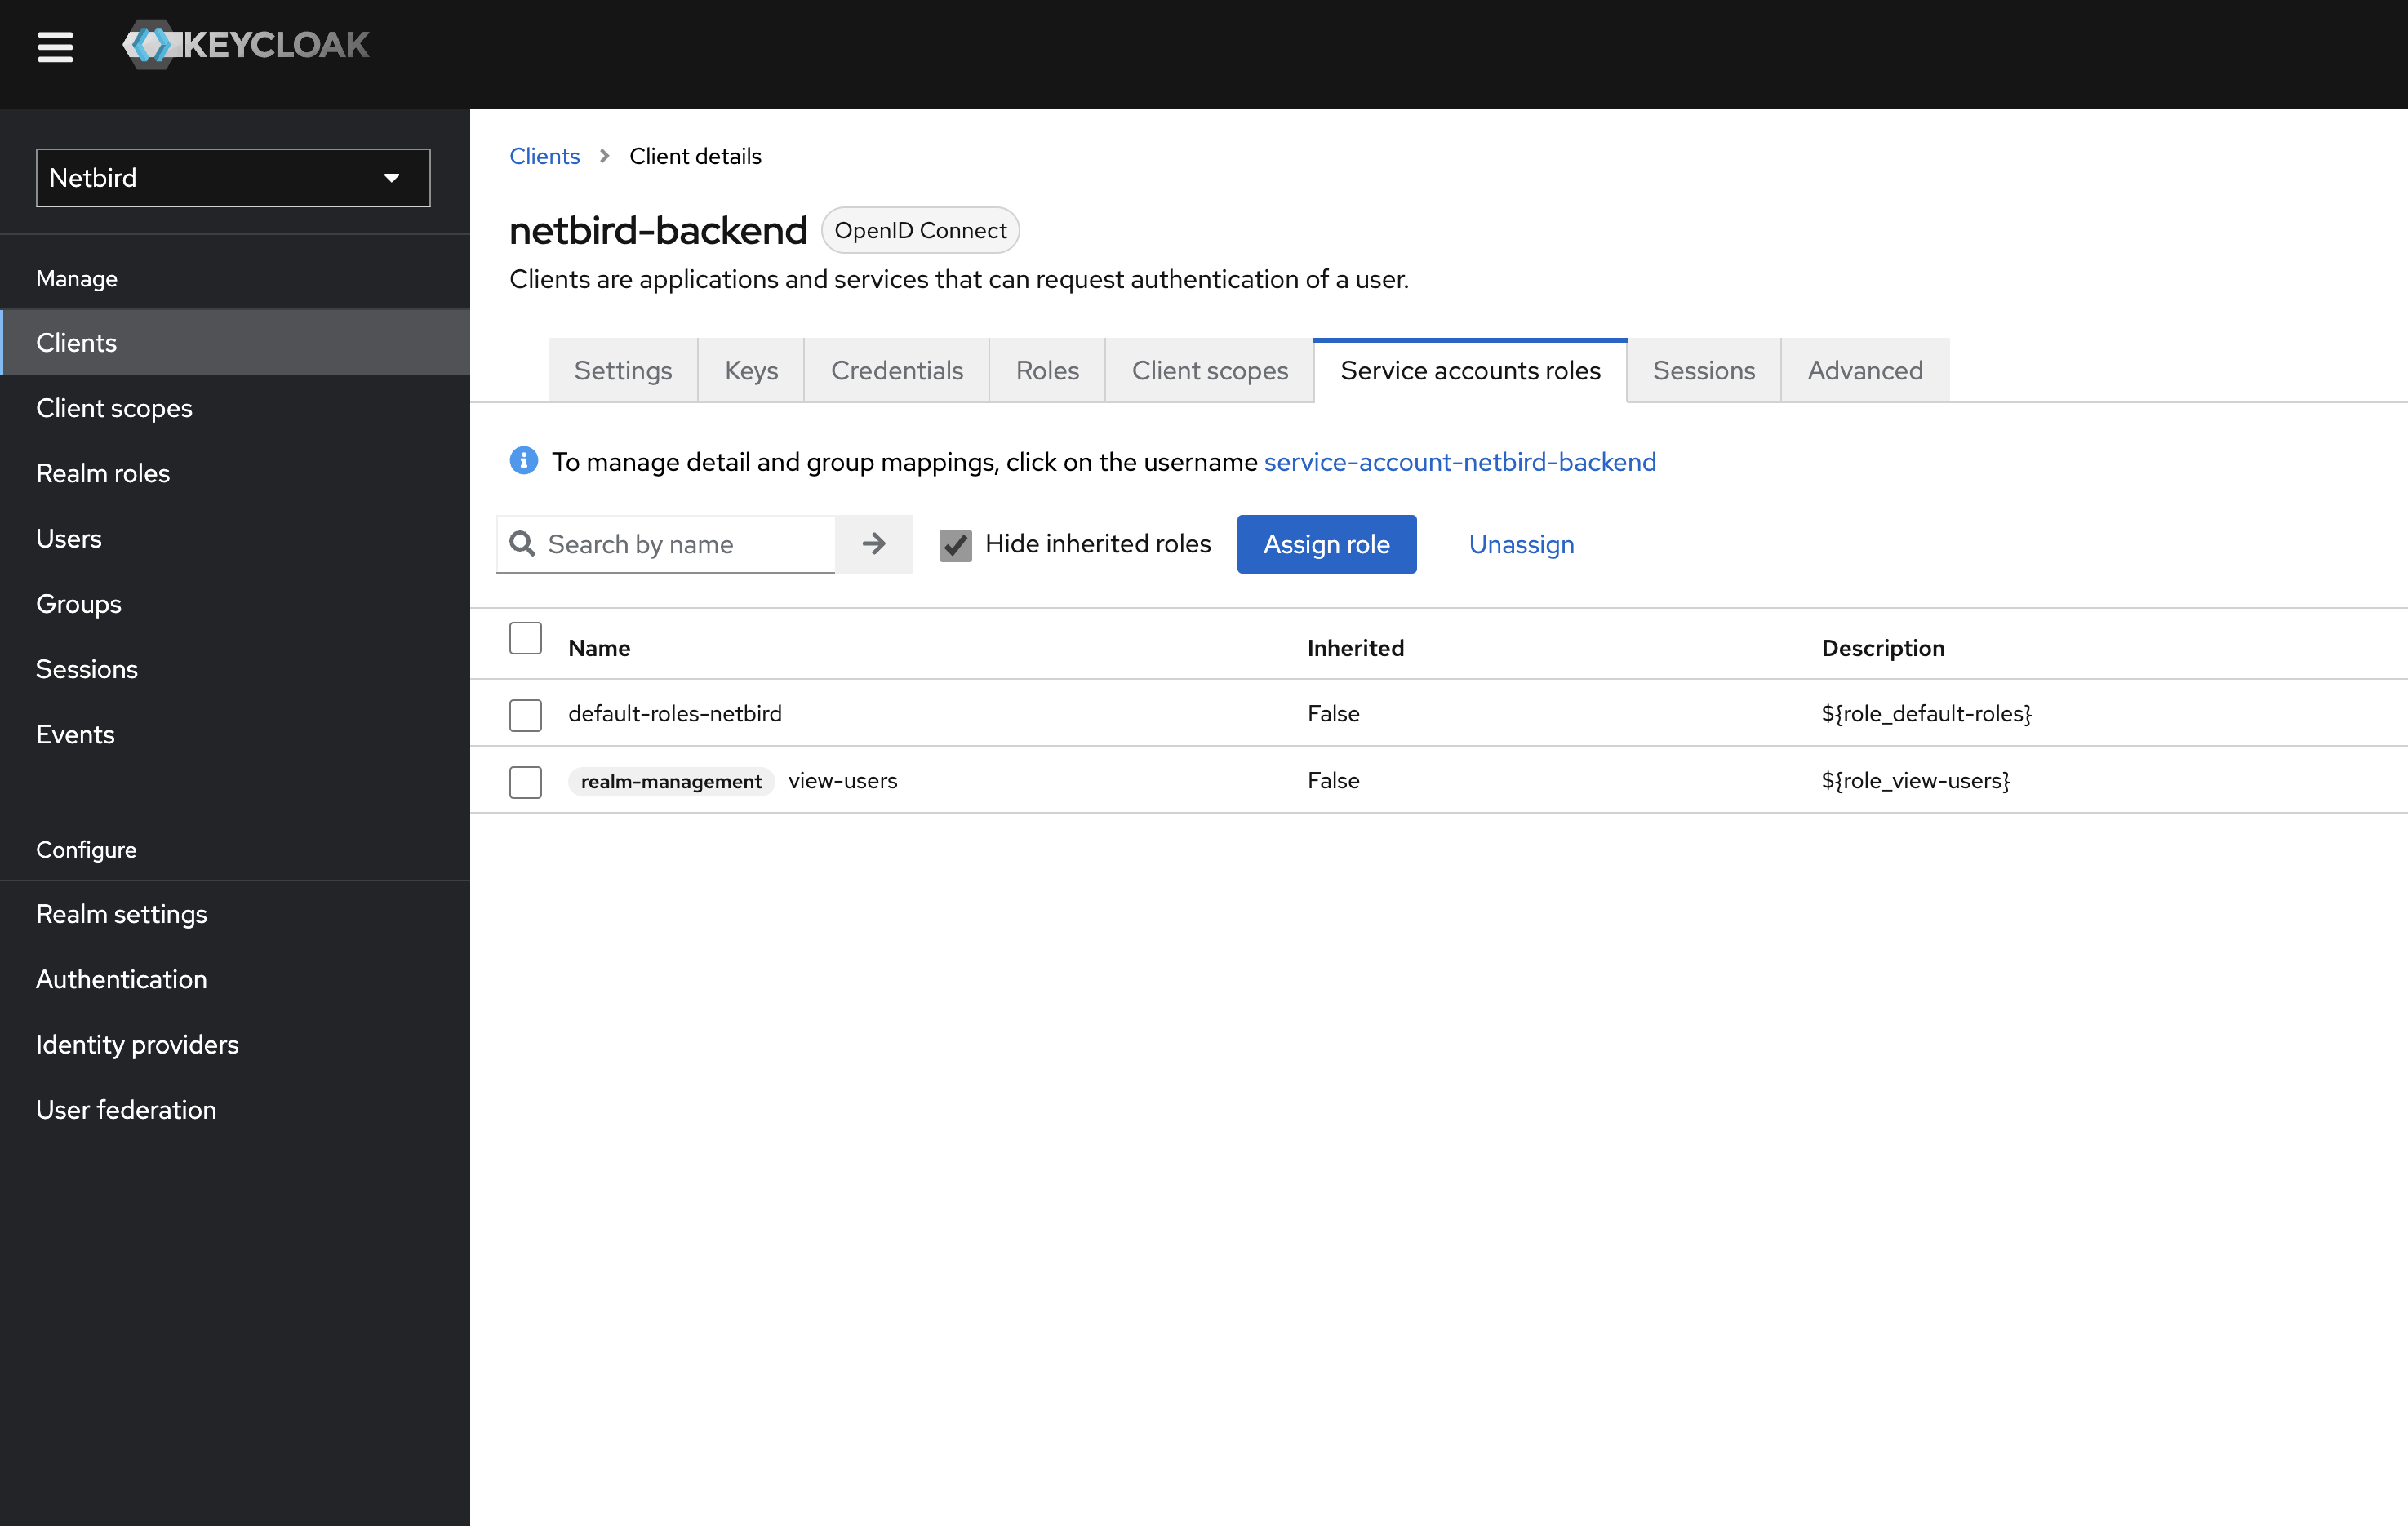
Step 9: Add view-users role to netzilo-backend
- Open the Keycloak Admin Console
- Make sure, that the selected realm is
Netzilo - Click
Clients - Choose
netzilo-backendfrom the list - Switch to
Service accounts rolestab - Click
Assign rolesbutton - Select
Filter by clientsand search forview-users
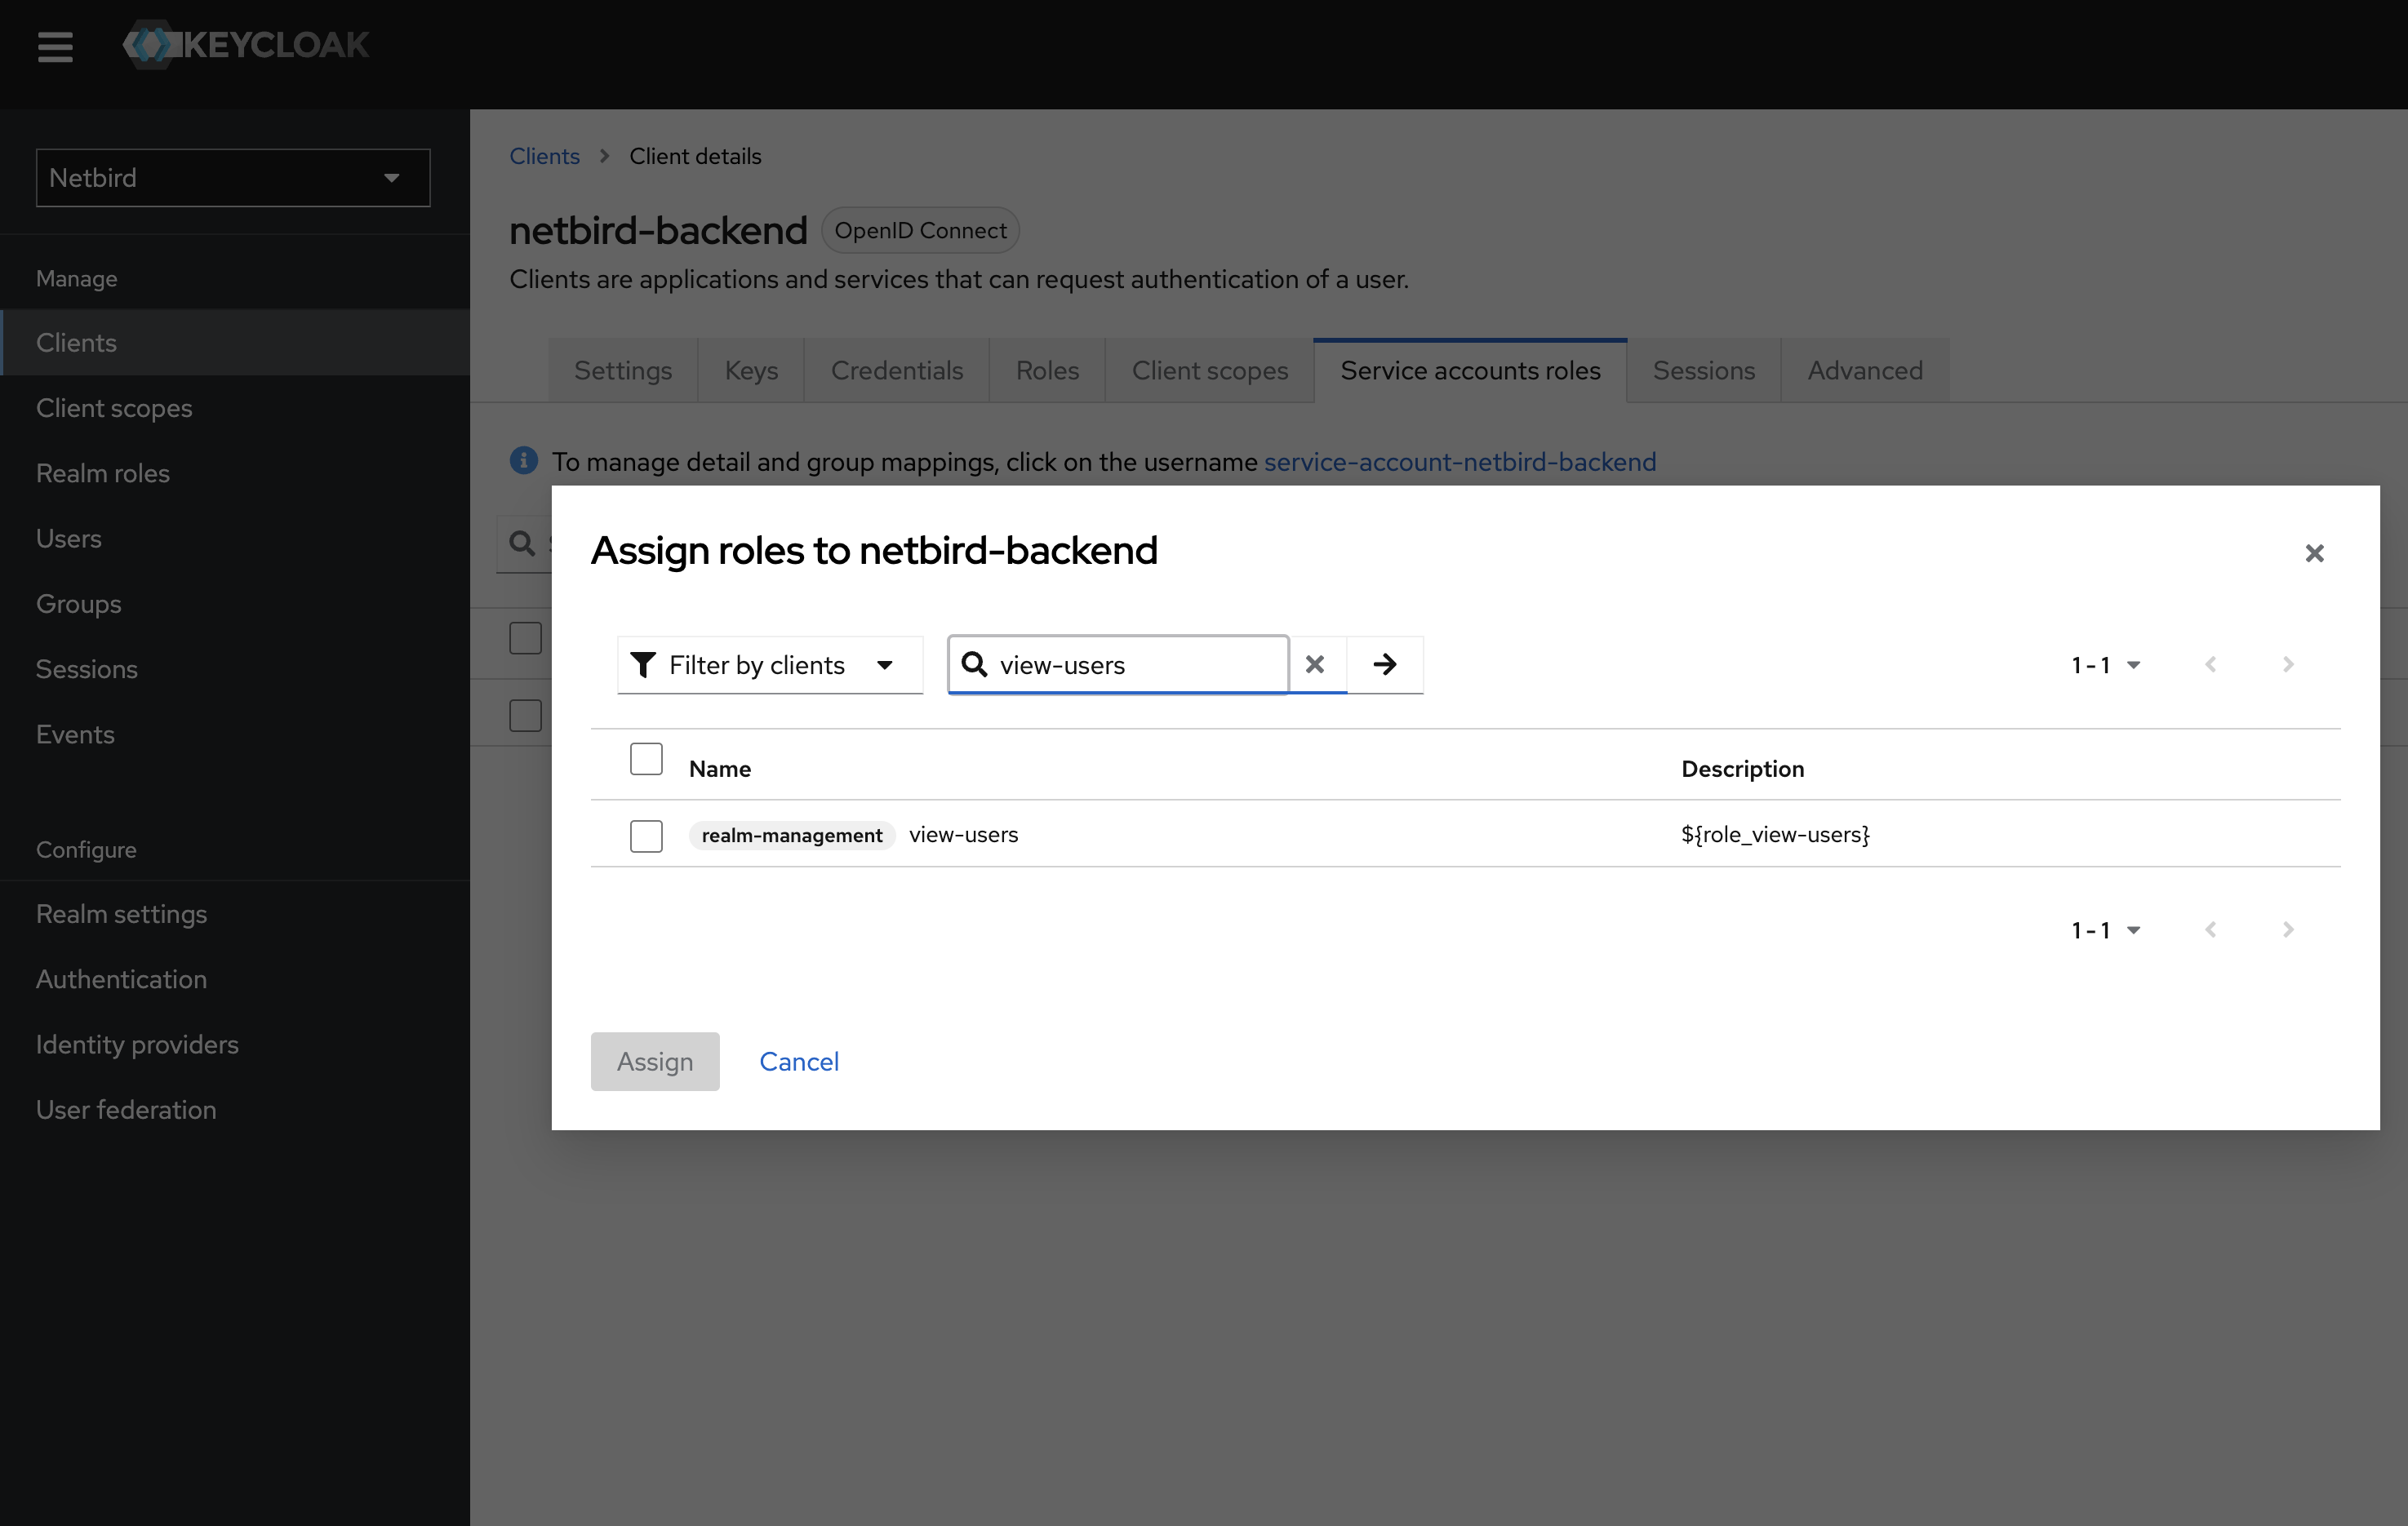
- Check the role checkbox and click assign
Optional
Netzilo offers the ability to automatically delete a user from the Keycloak side when the user is deleted from the associated account.
To enable this functionality, simply include the --user-delete-from-idp flag in the management startup command within your Docker Compose configuration. If you choose to enable this feature,
please ensure that you assign the manage-users role to the netzilo-backend following the steps outlined above.
Your authority OIDC configuration will be available under:
https://<YOUR_KEYCLOAK_HOST_AND_PORT>/realms/netzilo/.well-known/openid-configuration
Double-check if the endpoint returns a JSON response by calling it from your browser.
- Set properties in the
setup.envfile:
NETZILO_AUTH_OIDC_CONFIGURATION_ENDPOINT=`https://<YOUR_KEYCLOAK_HOST_AND_PORT>/realms/netzilo/.well-known/openid-configuration`.
NETZILO_USE_AUTH0=false
NETZILO_AUTH_CLIENT_ID=`netzilo-client`
NETZILO_AUTH_SUPPORTED_SCOPES="openid profile email offline_access api"
NETZILO_AUTH_AUDIENCE=`netzilo-client`

NETZILO_AUTH_DEVICE_AUTH_CLIENT_ID=`netzilo-client`

NETZILO_MGMT_IDP="keycloak"
NETZILO_IDP_MGMT_CLIENT_ID="netzilo-backend"
NETZILO_IDP_MGMT_CLIENT_SECRET="<NETZILO_BACKEND_CLIENT_SECRET>"
NETZILO_IDP_MGMT_EXTRA_ADMIN_ENDPOINT="https://<YOUR_KEYCLOAK_HOST_AND_PORT>/admin/realms/netzilo"
Make sure that your Keycloak instance use HTTPS. Otherwise, the setup won't work.
Step 10: Continue with the Netzilo Self-hosting Guide
You've configured all required resources in Keycloak. You can now continue with the Netzilo Self-hosting Guide.
Authentik
This guide is a part of the Netzilo Self-hosting Guide and explains how to integrate self-hosted Netzilo with Authentik.
If you prefer not to self-host an Identity and Access Management solution, then you could use a managed alternative like Auth0.
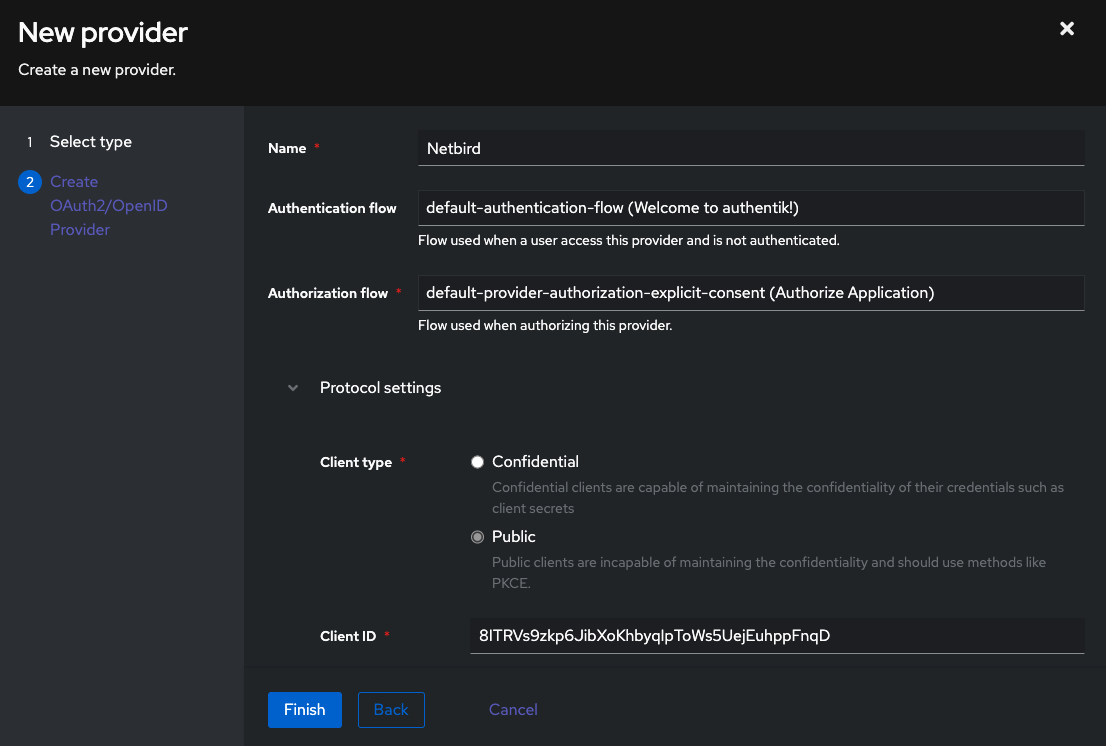
Step 1: Create OAuth2/OpenID Provider
In this step, we will create OAuth2/OpenID Provider in Authentik.
- Navigate to authentik admin interface
- Click
Applicationson the left menu, then clickProviders - Click
Createto create new provider - Fill in the form with the following values and click
Next- type:
OAuth2/OpenID Provider
- type:
- Fill in the form with the following values and click
Finish- Name:
Netzilo - Authentication Flow:
default-authentication-flow (Welcome to authentik!) - Authorization Flow:
default-provider-authorization-explicit-consent (Authorize Application) - Protocol Settings:
- Client type:
Public - Redirect URIs/Origins (RegEx):
https://<domain>,https://<domain>.*,http://localhost:53000(Each URI should be entered on a new line) - Signing Key: Must be selected! Can be any cert present, e.g.
authentik Self-signed Certificate
- Client type:
- Advanced protocol settings:
- Access code validity:
minutes=10 - Subject mode:
Based on the User's ID
- Access code validity:
- Name:
Take note of Client ID, we will use it later
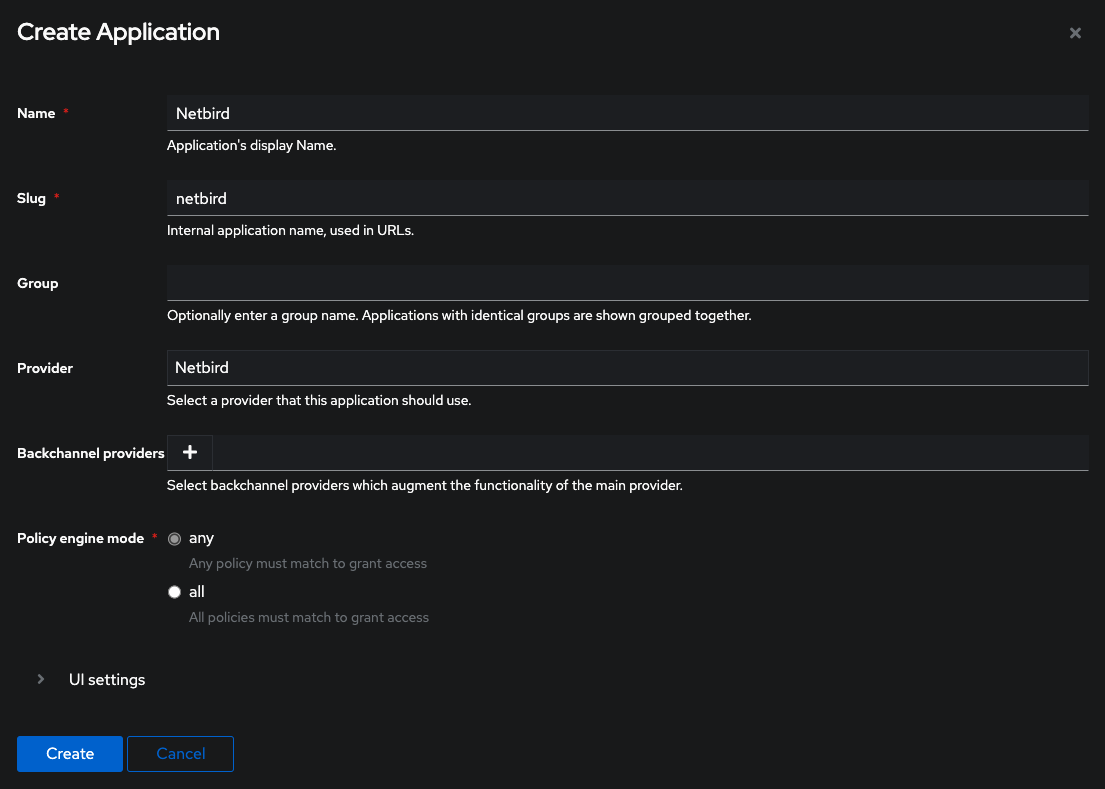
Step 2: Create external applications
In this step, we will create external applications in Authentik.
- Navigate to authentik admin interface
- Click
Applicationson the left menu, then clickApplications - Click
Createto create new application - Fill in the form with the following values and click
Create- Name:
Netzilo - Slug:
Netzilo - Provider:
Netzilo
- Name:
Step 3: Create service account
In this step, we will create service account.
- Navigate to authentik admin interface
- Click
Directoryon the left menu, then clickUsers - Click
Create Service Accountto create service account - Fill in the form with the following values and click
Create- Username:
Netzilo - Create Group:
Disable
- Username:
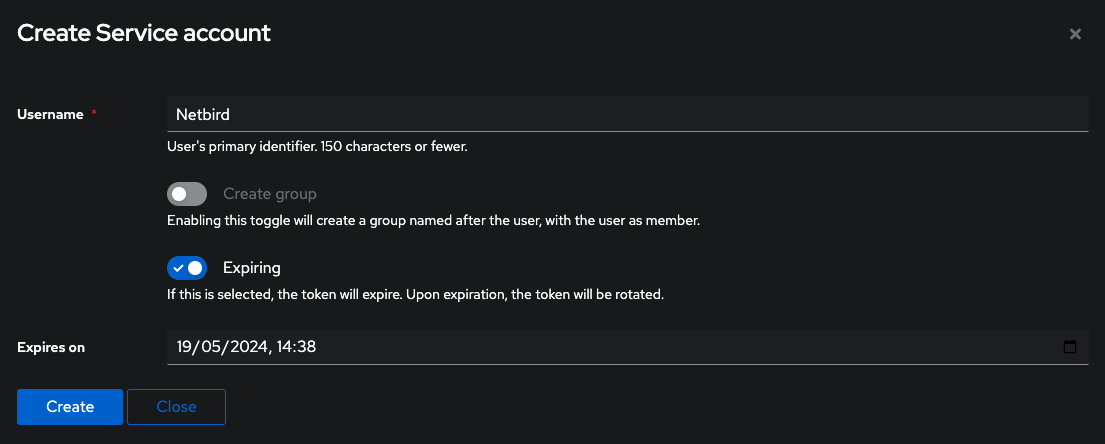
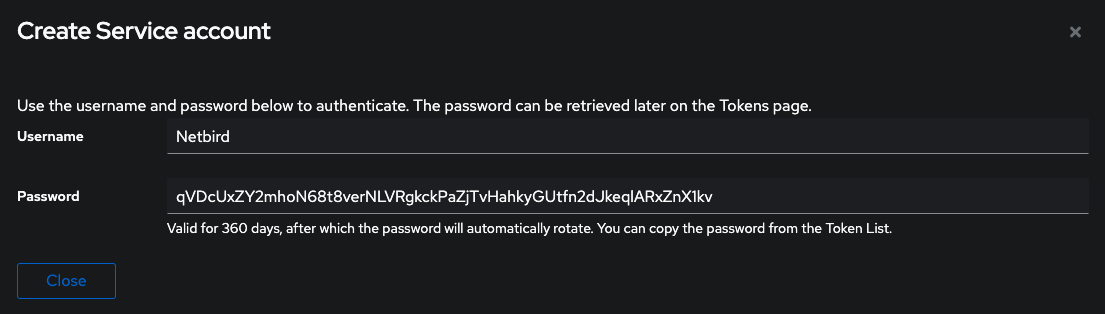
- Take note of service account
usernameandpassword, we will need it later
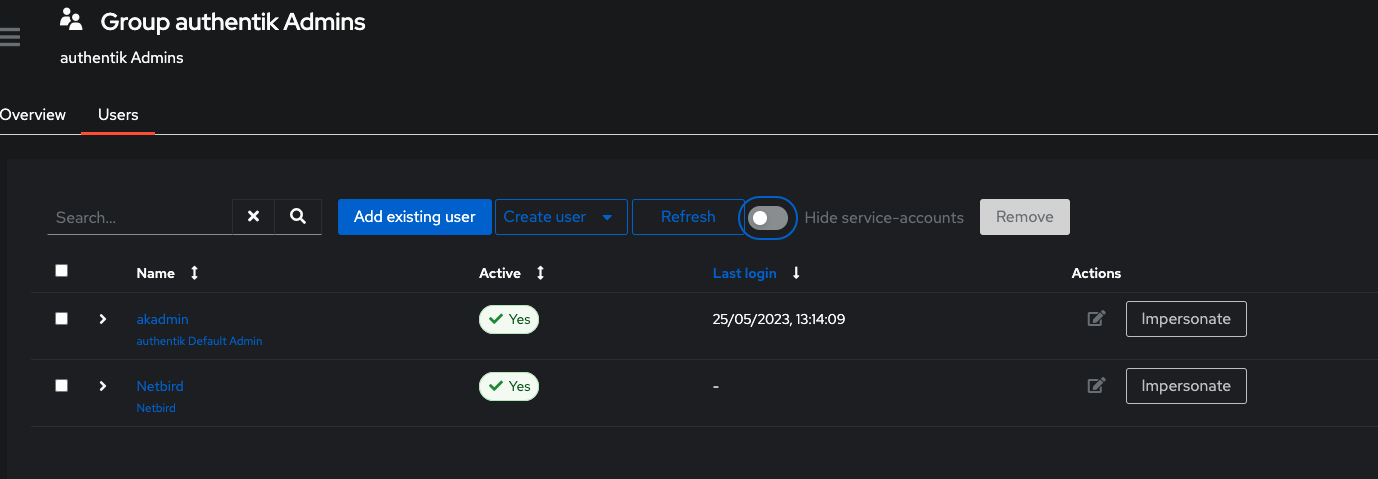
Step 4: Add service account to admin group
In this step, we will add Netzilo service account to authentik Admins group.
- Navigate to authentik admin interface
- Click
Directoryon the left menu, then clickGroups - Click
authentik Adminsfrom list of groups and selectUserstab at the top - Click
Add existing userand click+button to add user - Select
Netziloand clickAdd - Disable
Hide service-accountsand verify if userNetzilois added to the group
Your authority OIDC configuration will be available under:
https://< YOUR_AUTHENTIK_HOST_AND_PORT >/application/o/netzilo/.well-known/openid-configuration
Double-check if the endpoint returns a JSON response by calling it from your browser.
- Set properties in the
setup.envfile:
NETZILO_AUTH_OIDC_CONFIGURATION_ENDPOINT="https://<YOUR_AUTHENTIK_HOST_AND_PORT>/application/o/netzilo/.well-known/openid-configuration"
NETZILO_USE_AUTH0=false
NETZILO_AUTH_CLIENT_ID="<PROVIDER_CLIENT_ID>"
NETZILO_AUTH_SUPPORTED_SCOPES="openid profile email offline_access api"
NETZILO_AUTH_AUDIENCE="<PROVIDER_CLIENT_ID>"
NETZILO_AUTH_DEVICE_AUTH_CLIENT_ID="<PROVIDER_CLIENT_ID>"
NETZILO_AUTH_DEVICE_AUTH_AUDIENCE="<PROVIDER_CLIENT_ID>"

NETZILO_MGMT_IDP="authentik"
NETZILO_IDP_MGMT_CLIENT_ID="<PROVIDER_CLIENT_ID>"
NETZILO_IDP_MGMT_EXTRA_USERNAME="Netzilo"
NETZILO_IDP_MGMT_EXTRA_PASSWORD="<SERVICE_ACCOUNT_PASSWORD>"
Step 5: Continue with the Netzilo Self-hosting Guide
You've configured all required resources in Authentik. You can now continue with the Netzilo Self-hosting Guide.
Managed IDPs
Azure AD (Microsoft Entra ID)
This guide is a part of the Netzilo Self-hosting Guide and explains how to integrate self-hosted Netzilo with Azure AD.
Azure AD is a an enterprise identity service that provides single sign-on and multifactor authentication to your applications. It is a 3rd party managed service and can't be self-hosted.
If you prefer to have full control over authentication and authorization of your Netzilo network, there are good self-hosted alternatives to the managed Auth0 service like Keycloak.
Before you start creating and configuring an Azure AD application, ensure that you have the following:
-
An Azure account: To create an Azure AD application, you must have an Azure account. If you don't have one, sign up for a free account at https://azure.microsoft.com/free/.
-
User account with appropriate permissions: You must have an Azure AD user account with the appropriate permissions to create and manage Azure AD applications. If you don't have the required permissions, ask your Azure AD administrator to grant them to you.
Step 1. Create and configure Azure AD application
In this step, we will create and configure Netzilo application in azure AD.
- Navigate to Azure Active Directory
- Click
App Registrationsin the left menu then click on the+ New registrationbutton to create a new application. - Fill in the form with the following values and click Register
- Name:
Netzilo - Account Types:
Accounts in this organizational directory only (Default Directory only - Single tenant) - Redirect URI: select
Single-page application (SPA)and URI ashttps://<yournetzilodomain.com>/silent-auth
- Name:

Step 2. Platform configurations
- Click
Authenticationon the left side menu - Under the
Single-page applicationSection, add another URIhttps://<yournetzilodomain.com>/auth
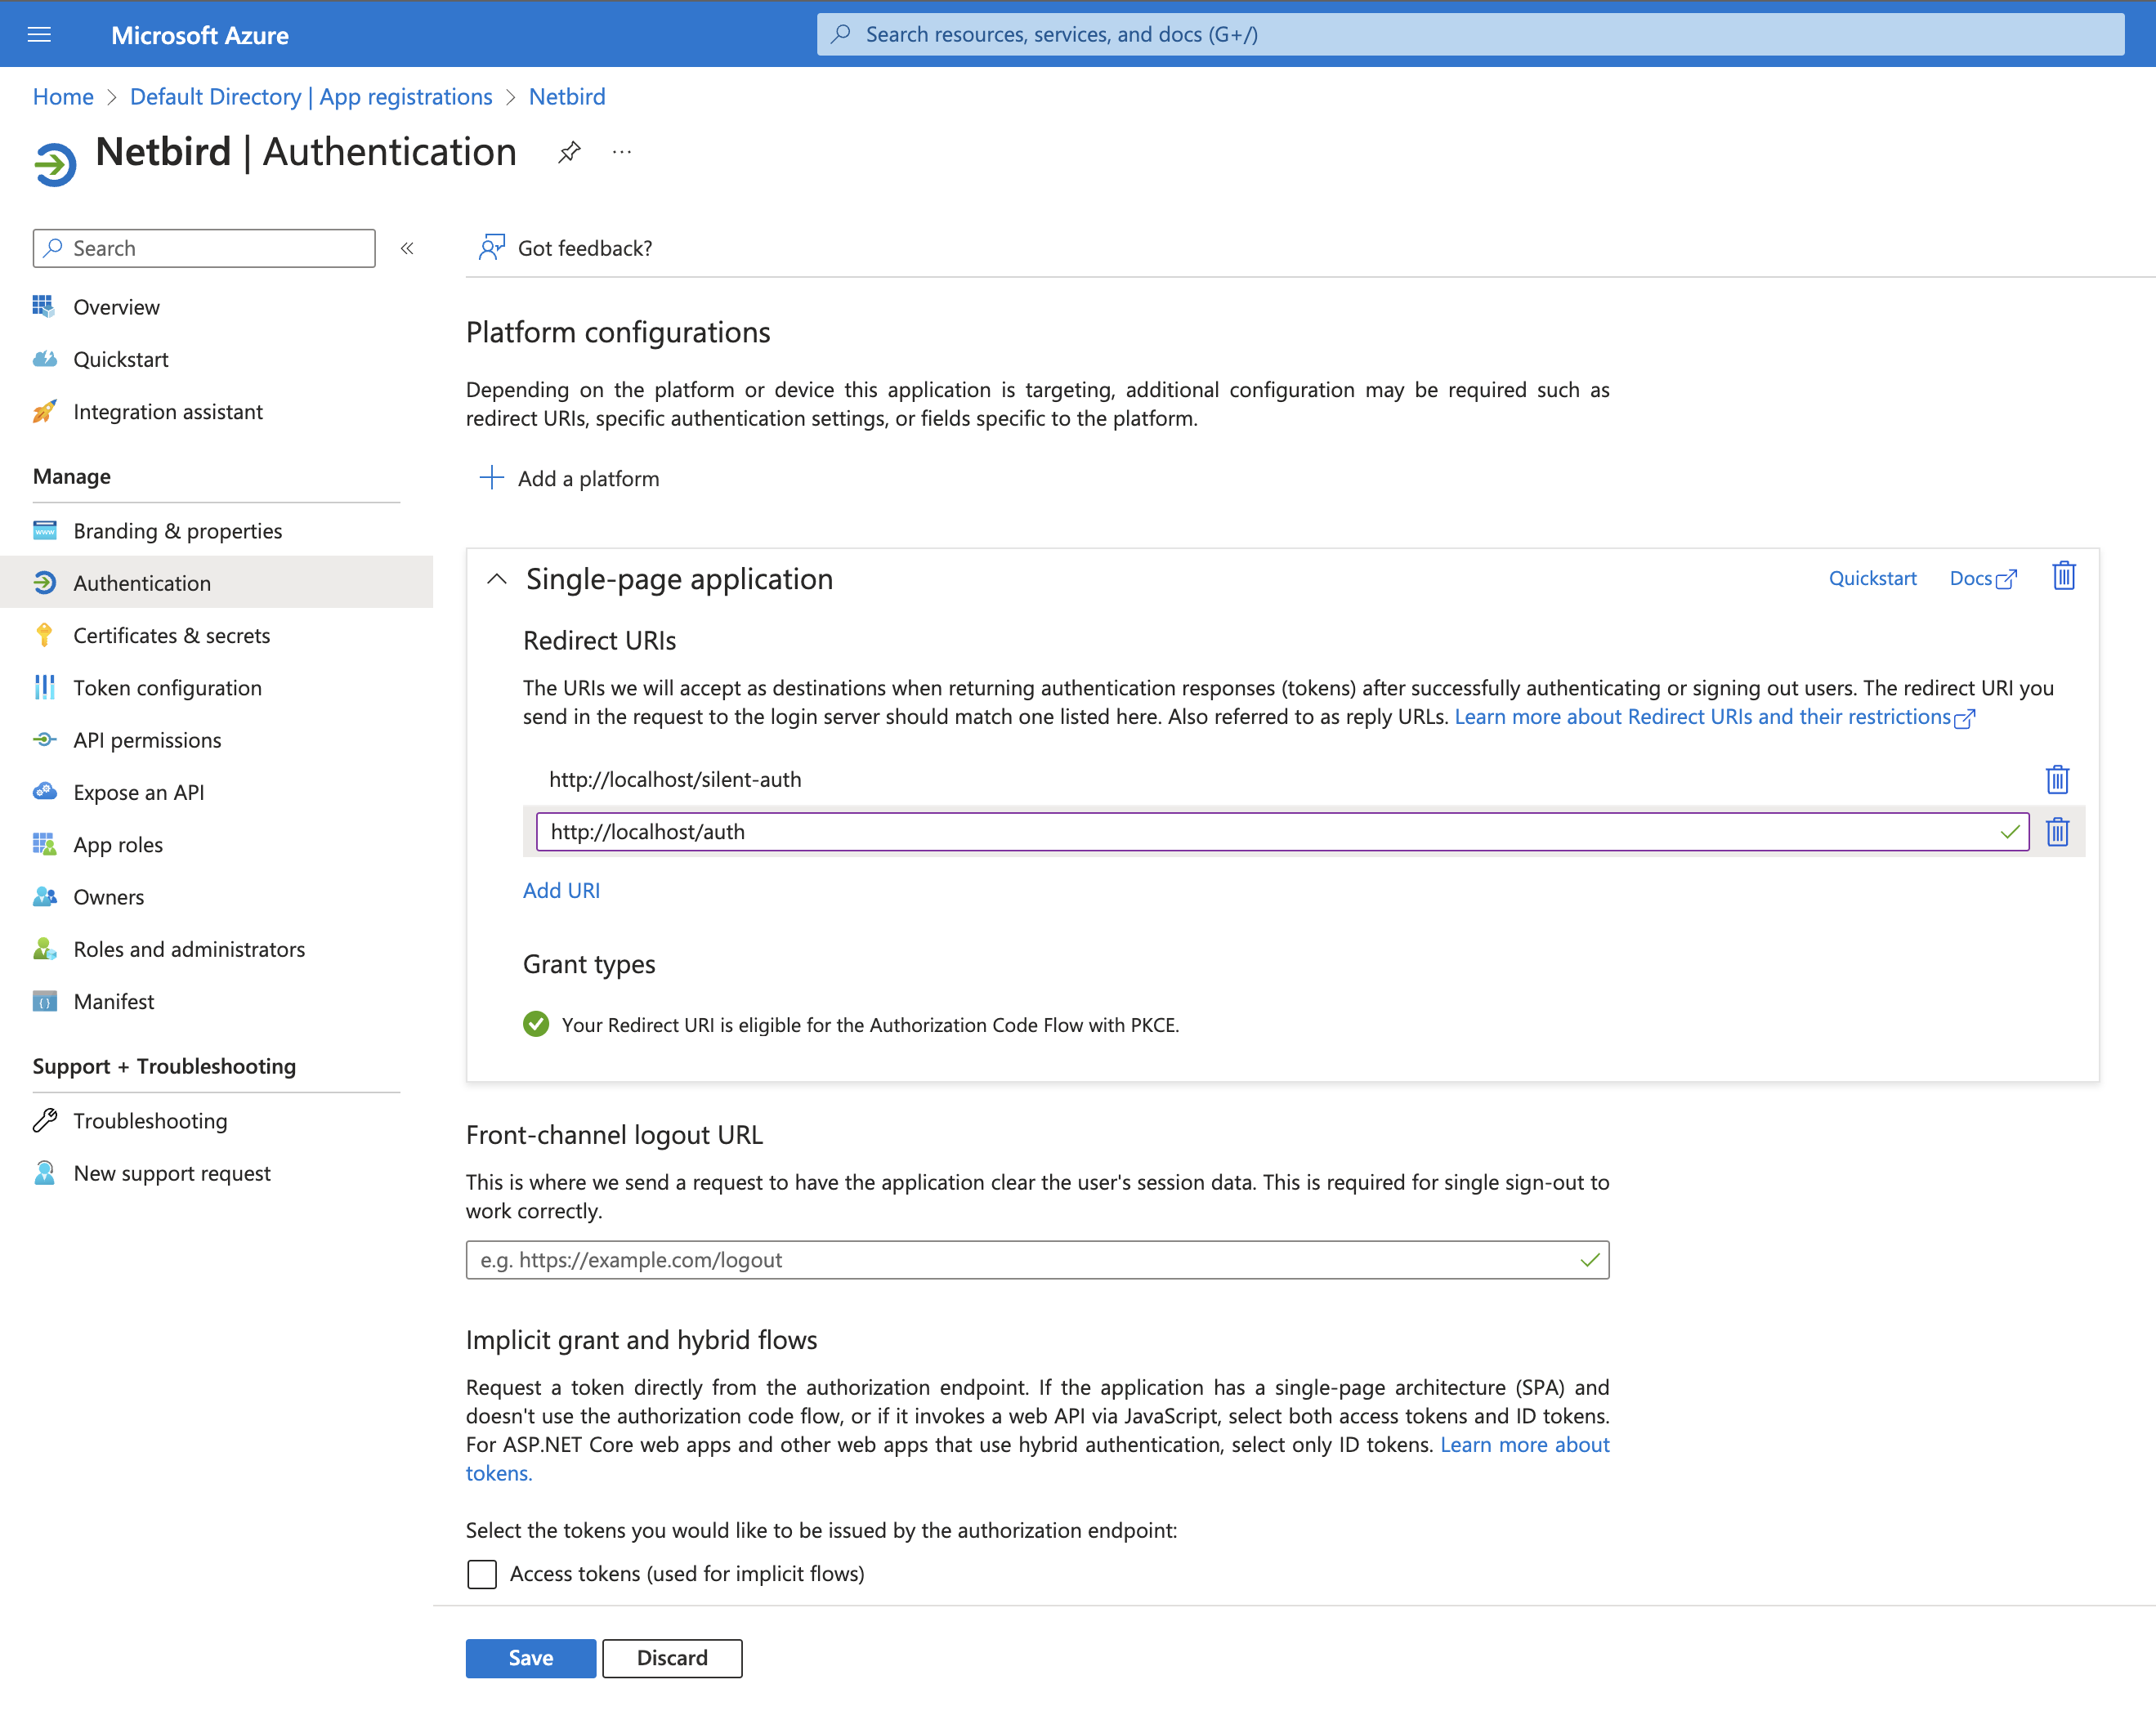
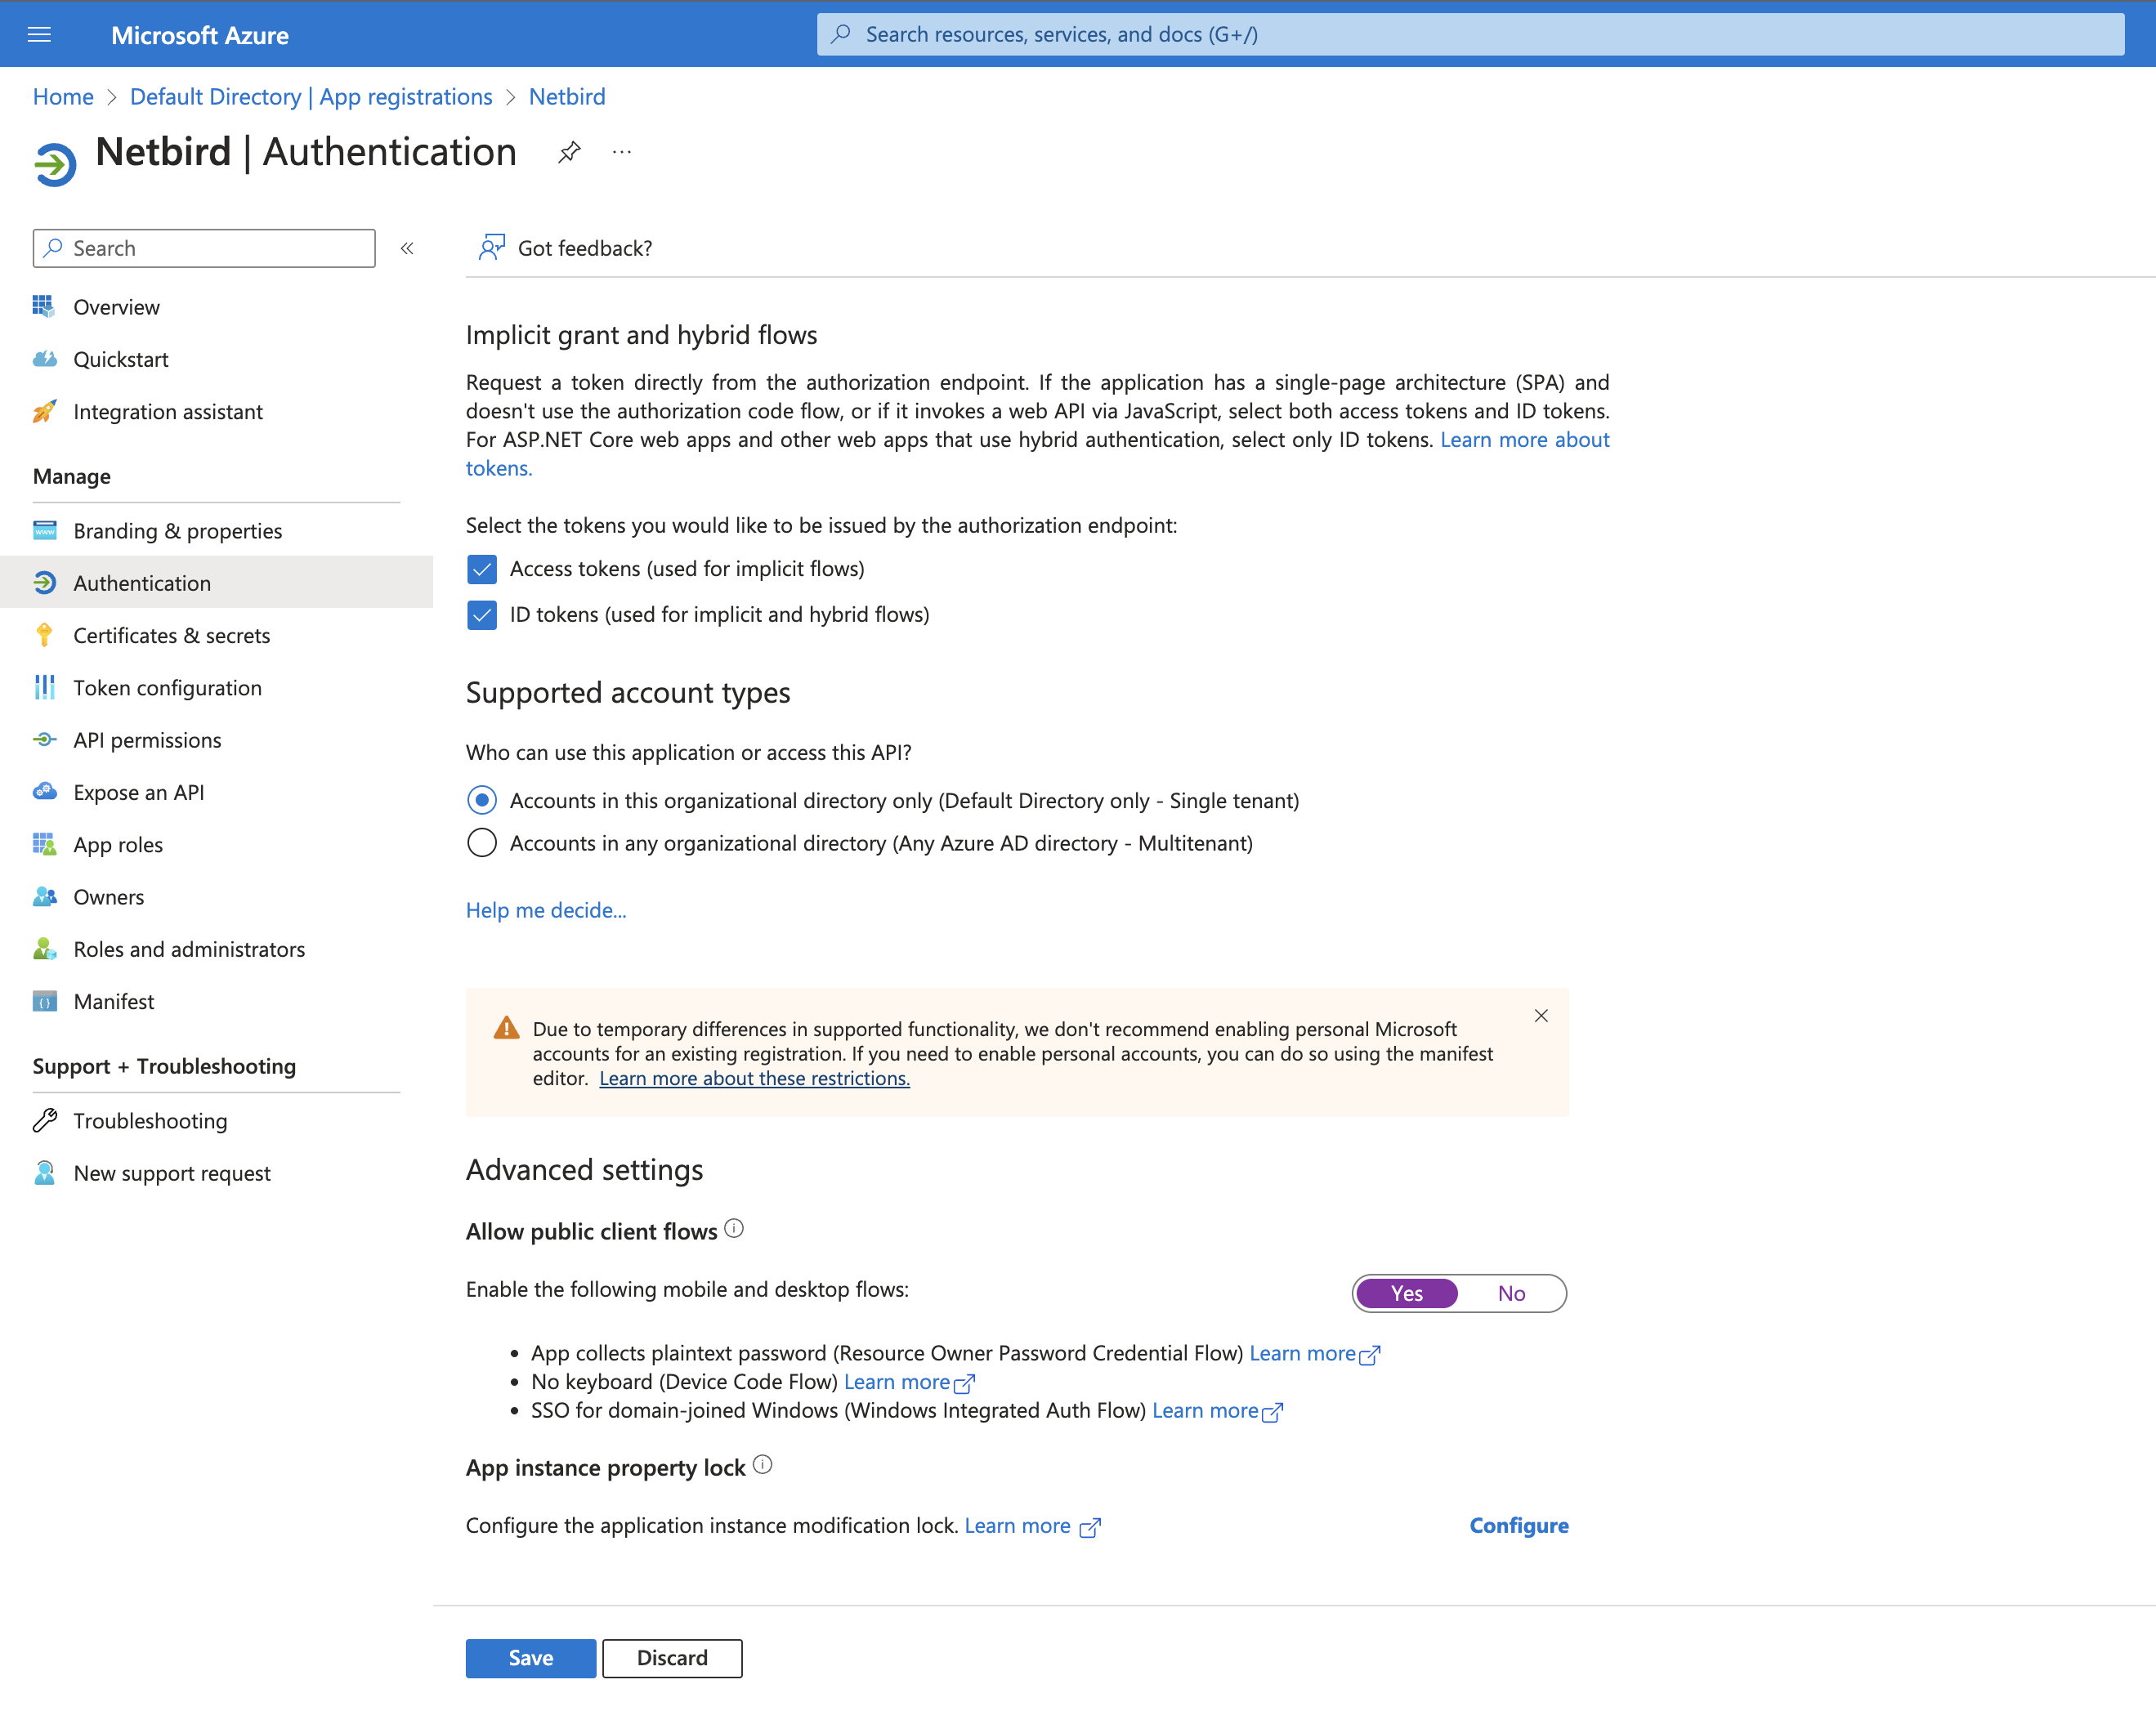
- Scroll down and setup other options as on the screenshot below and click Save
- Click
Add a Platformand selectMobile and desktop applications - Fill in the form with the following values and click Configure
- Custom redirect URIs:
http://localhost:53000
- Custom redirect URIs:
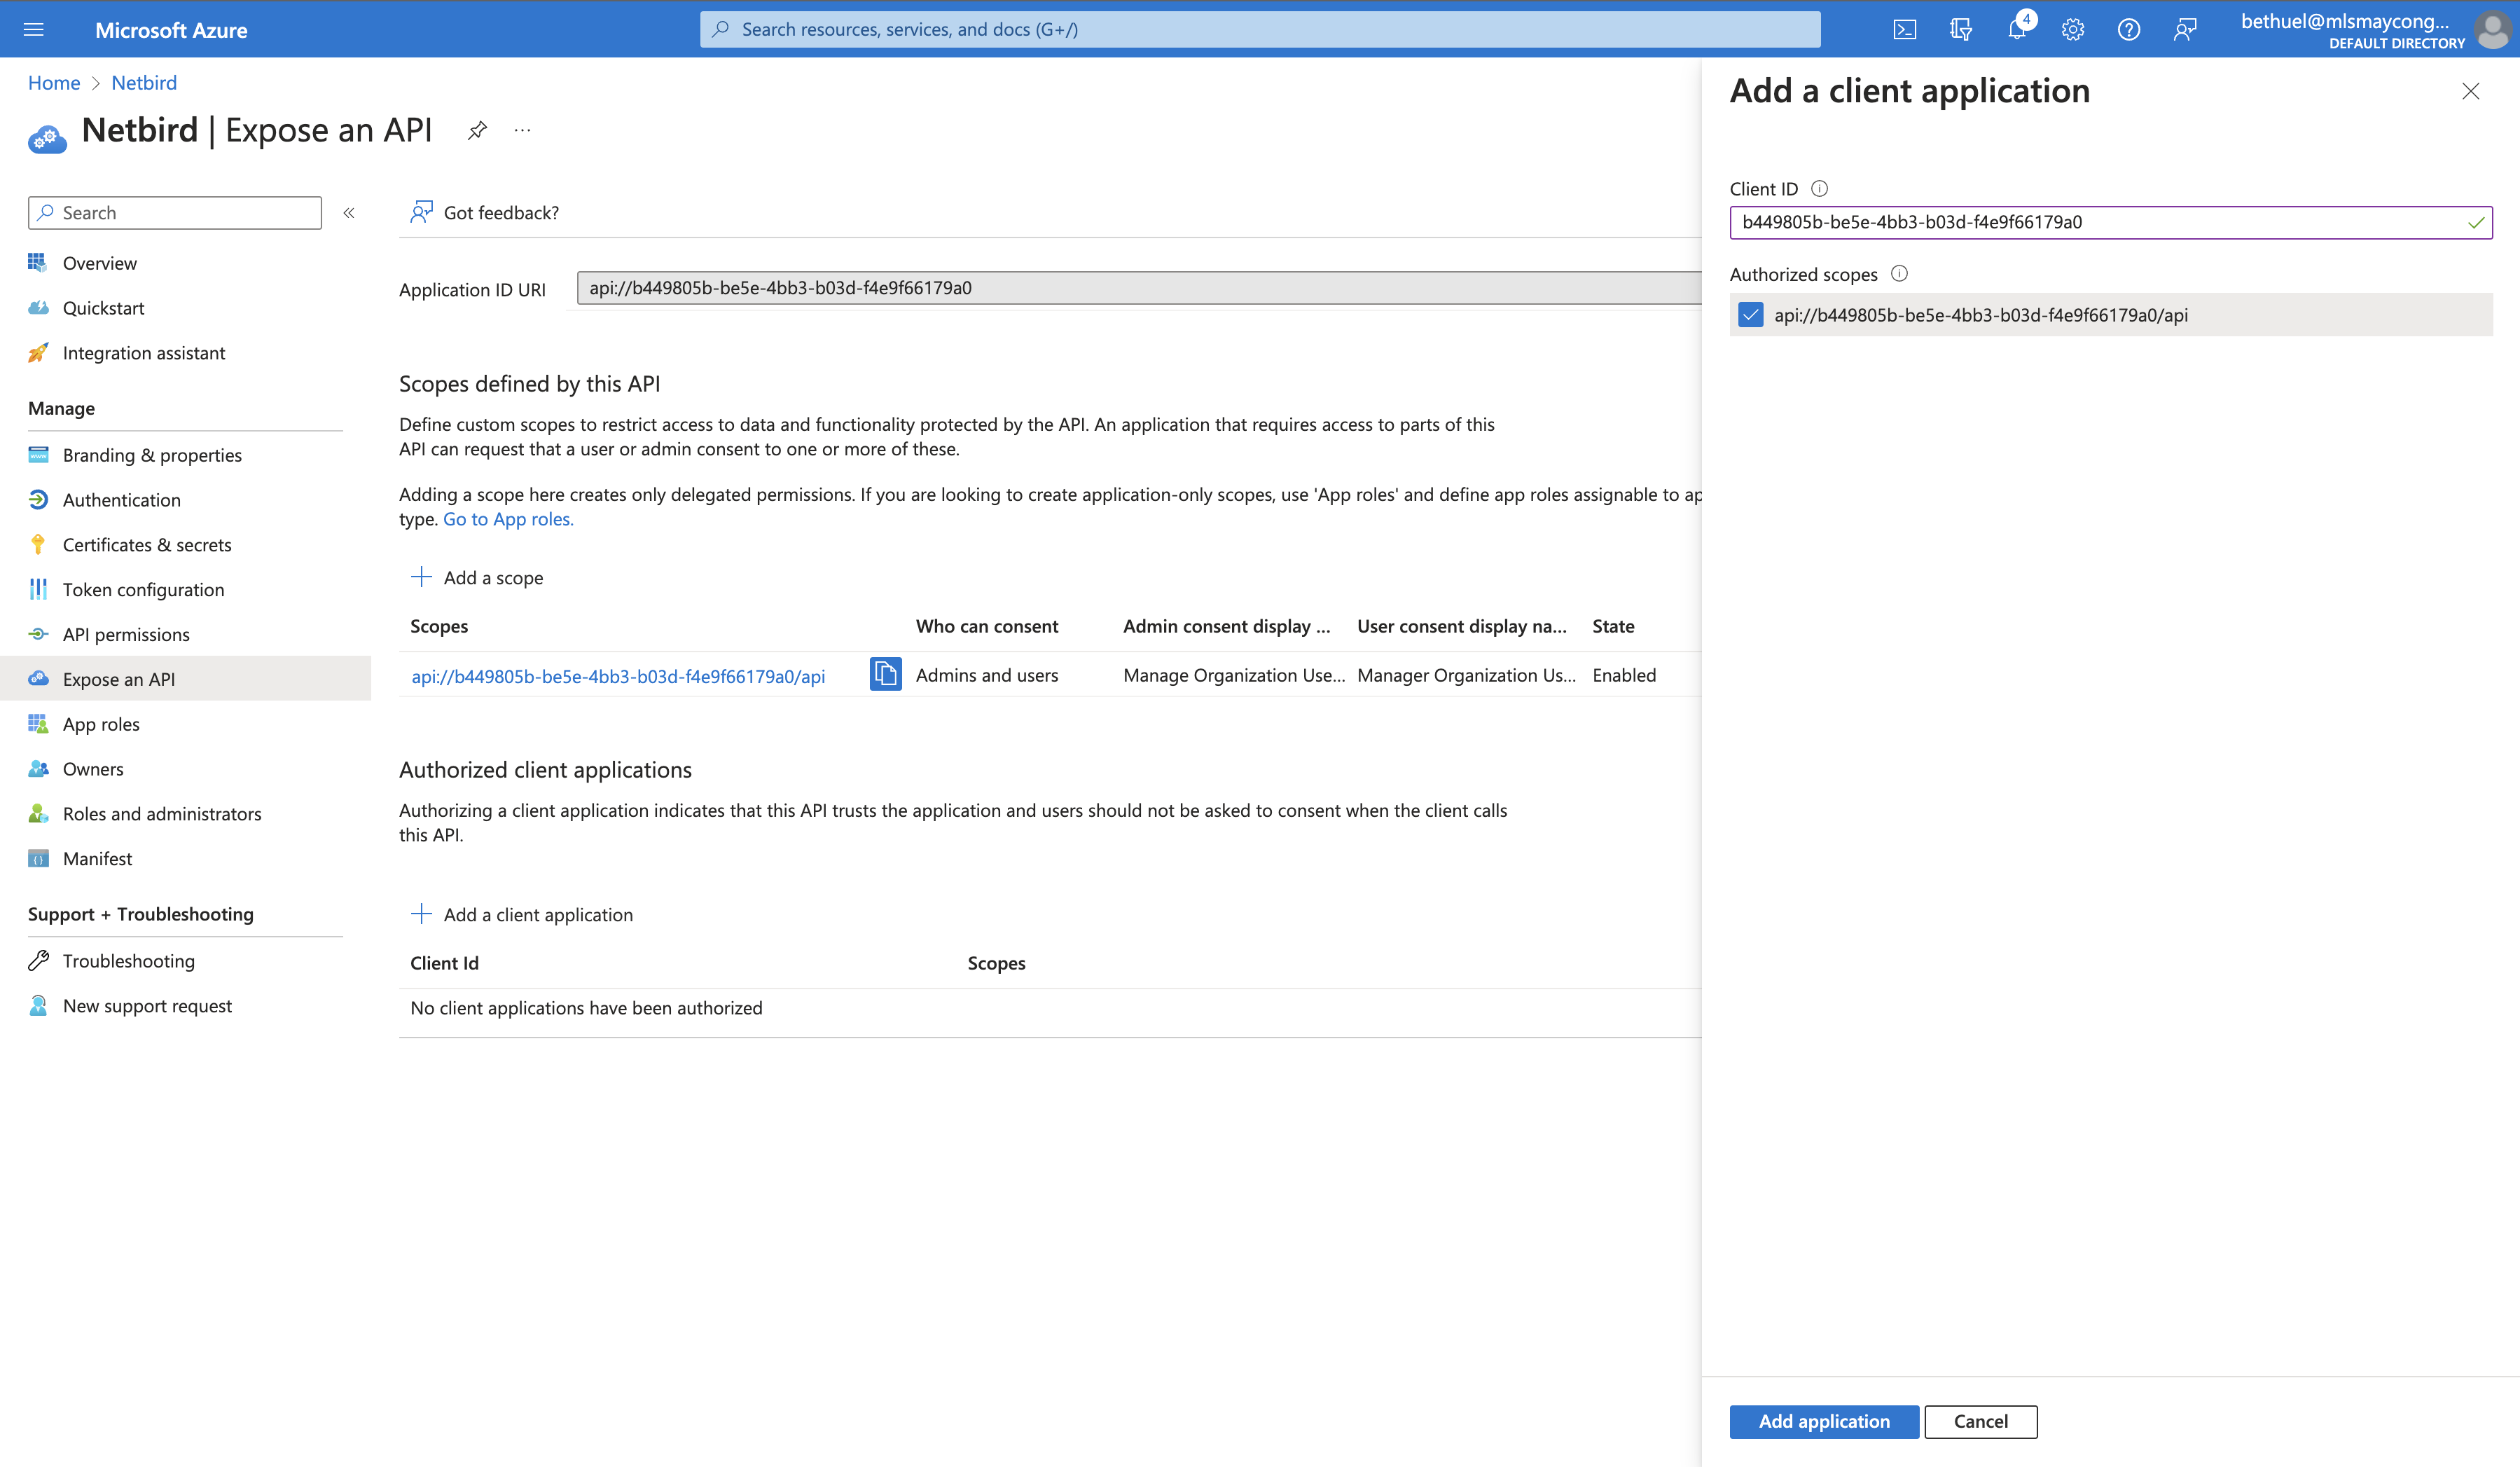
Step 3. Create a Netzilo application scope
- Click
Expose an APIon the left menu - Under
Application ID URIclickSetand thenSave - Click
+ Add a Scope - Fill in the form with the following values and click
Add scope - Scope name:
api
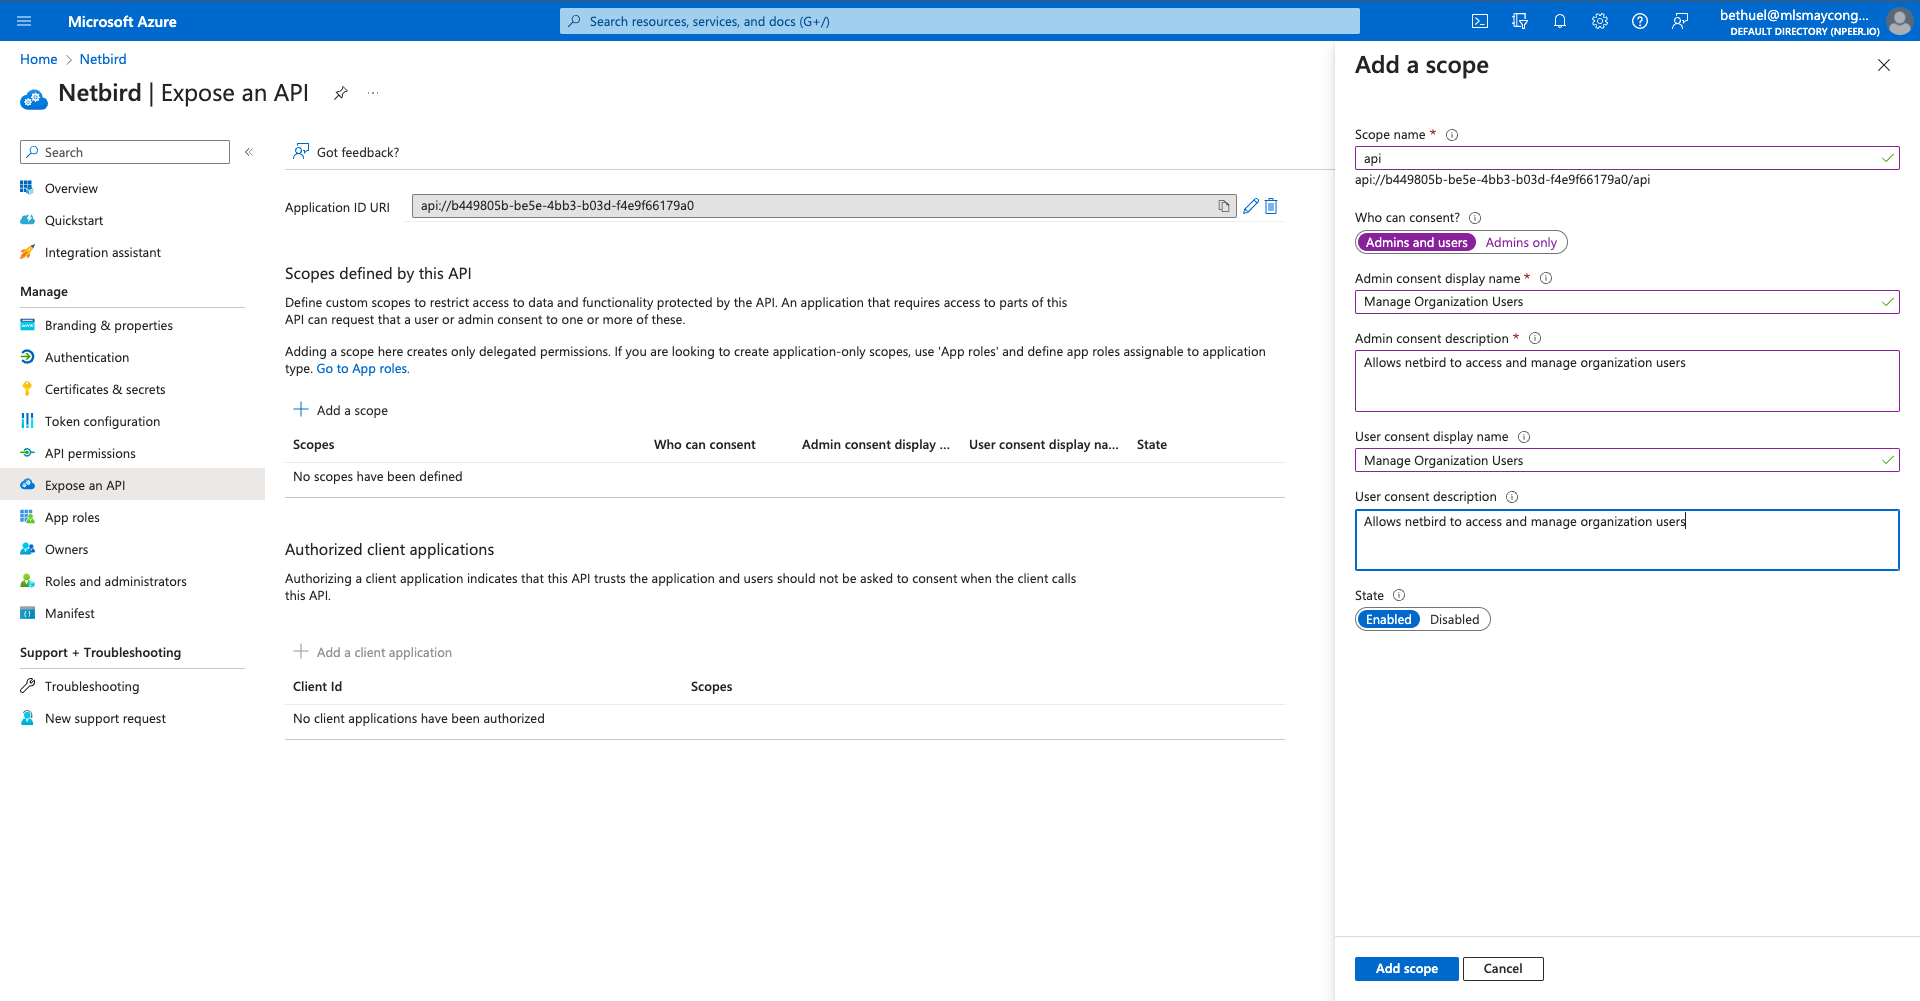
- Under
Authorized client Applications, click on+ add a client applicationand enter the following: - Fill in the form with the following values and click
Add application - Client ID: same as your Application ID URI minus the
api://
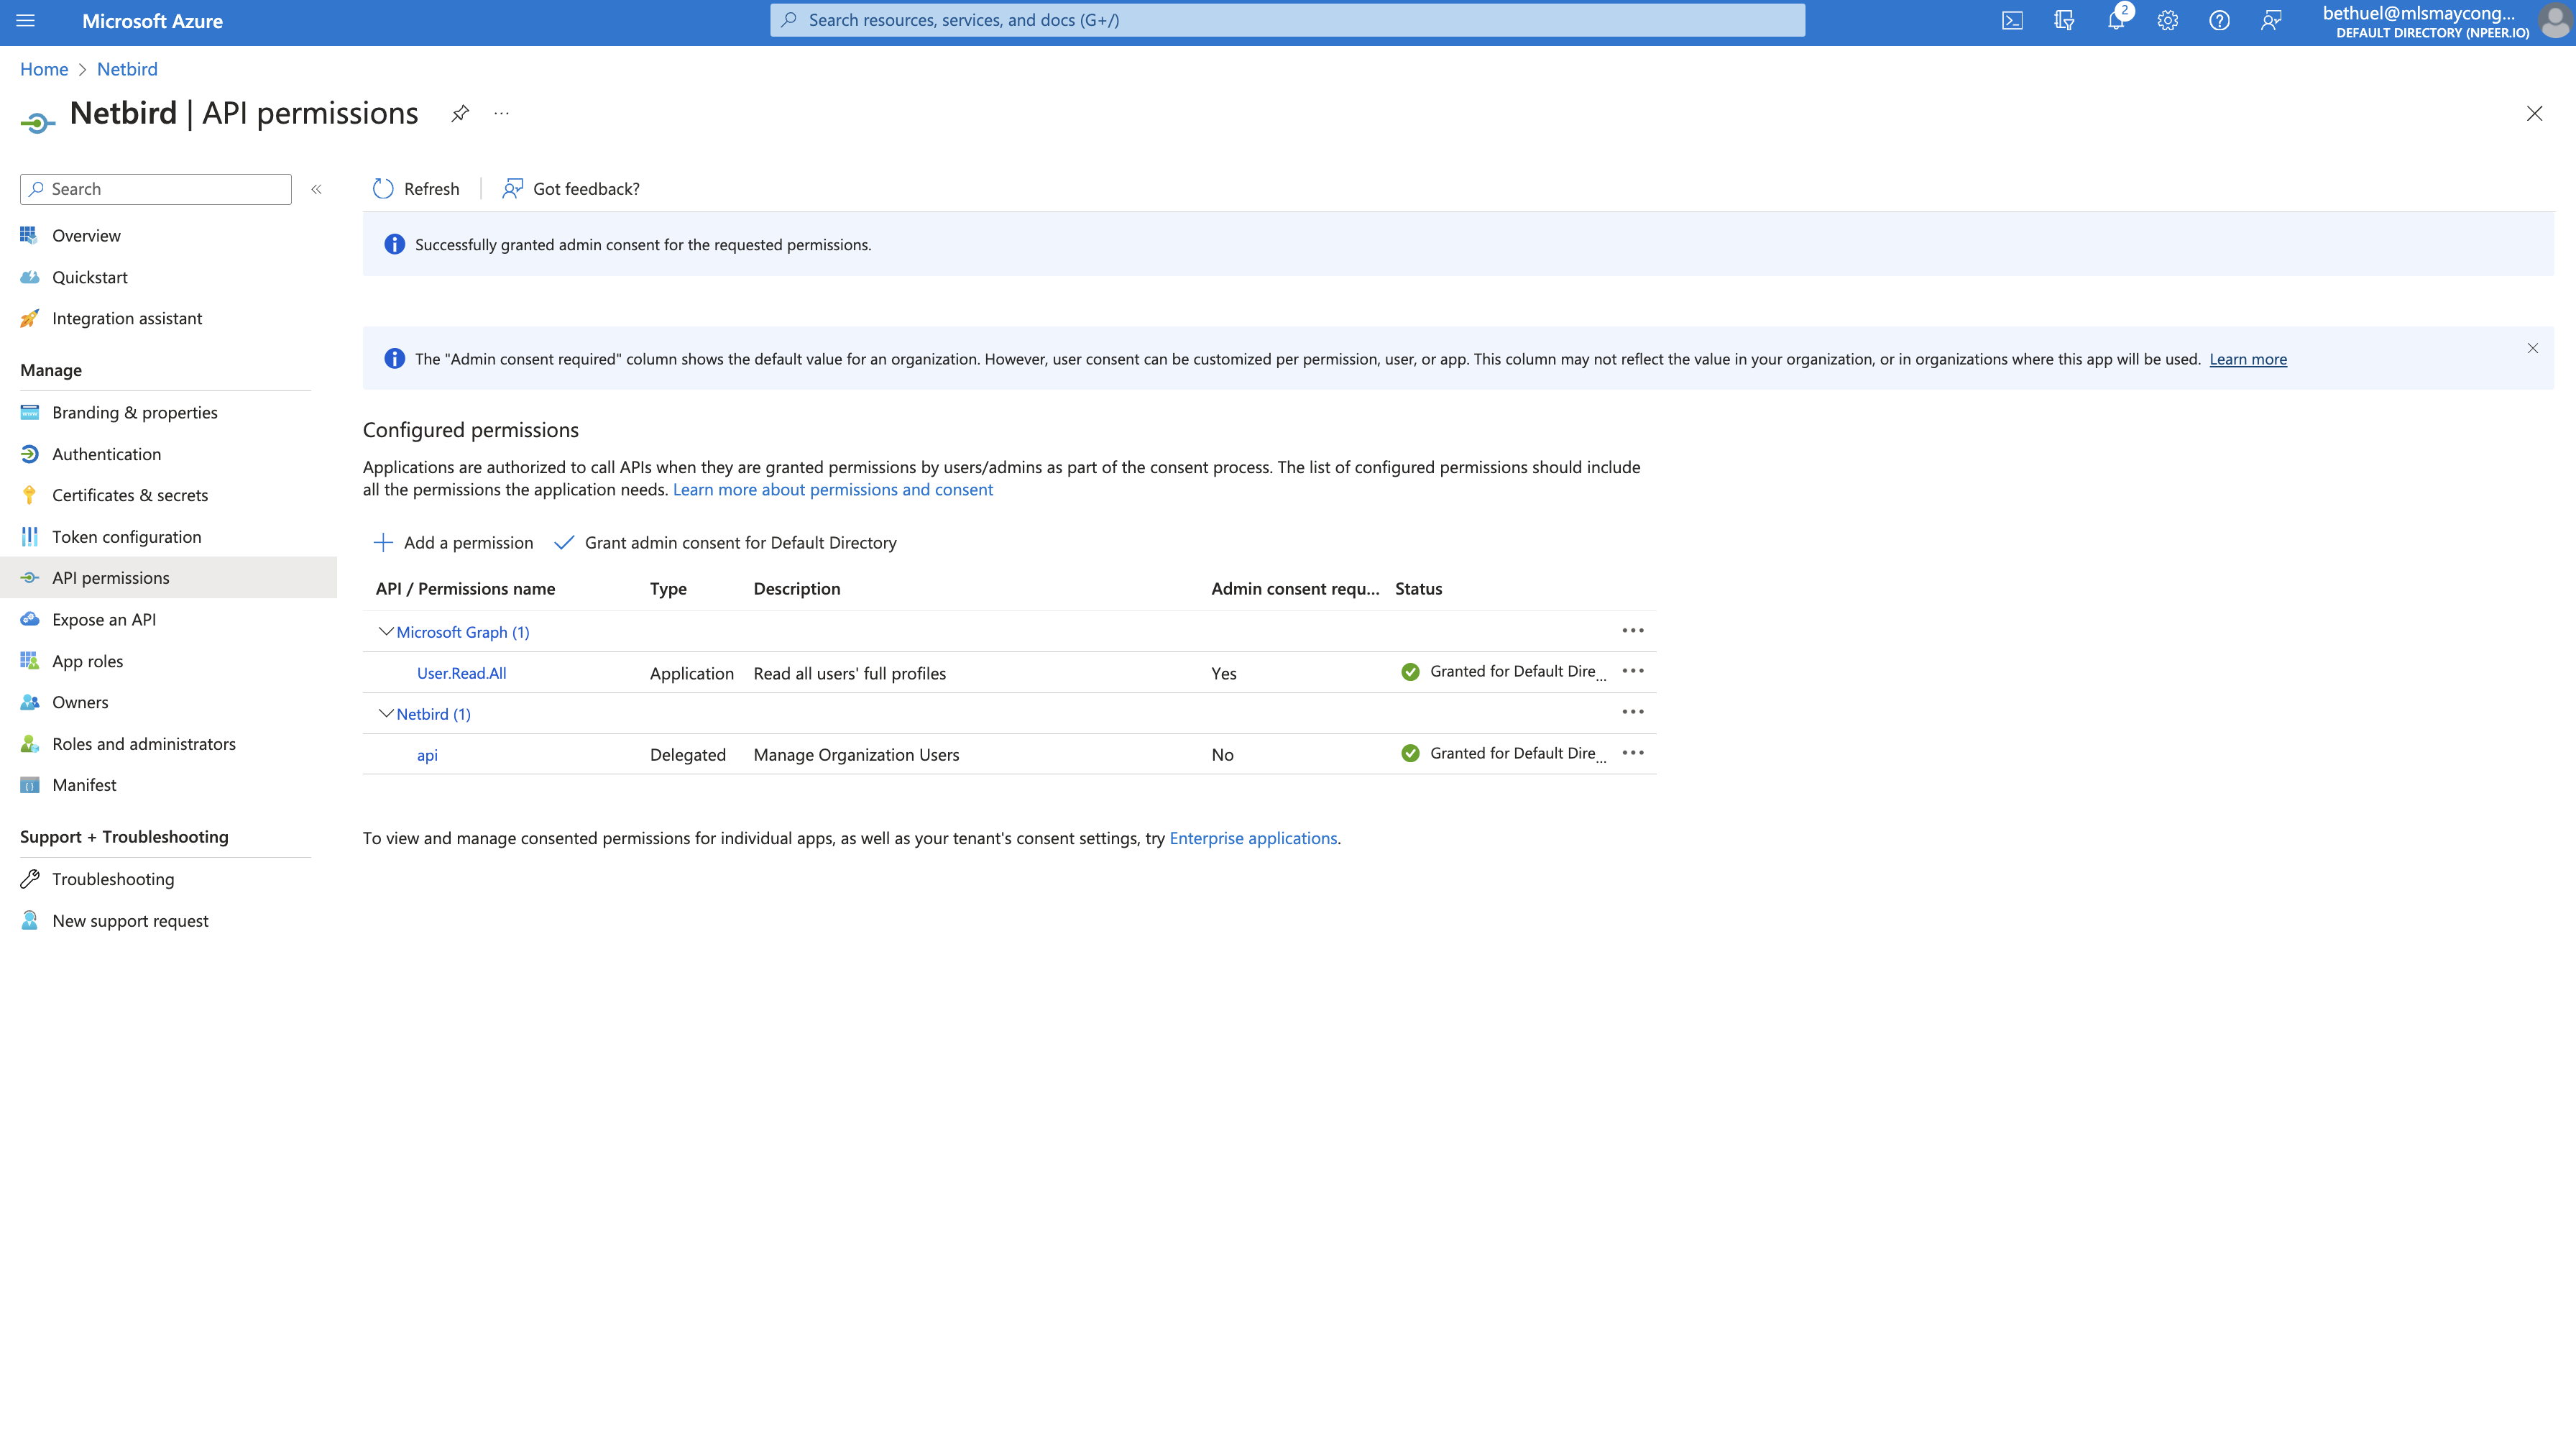
Step 4. Add API permissions
Add Netzilo permissions
- Click
API permissionson the left menu - Click
Add a permission - Click
My APIstab, and selectNetzilo. Next checkapipermission checkbox and clickAdd permissions.

Add Delegated permissions to Microsoft Graph
- Click
Add a permission - Click
Microsoft Graphand then clickApplication permissionstab - In
Select permissionssearch forUser.Readand under theUsersection selectUser.Read.Alland clickAdd permissions
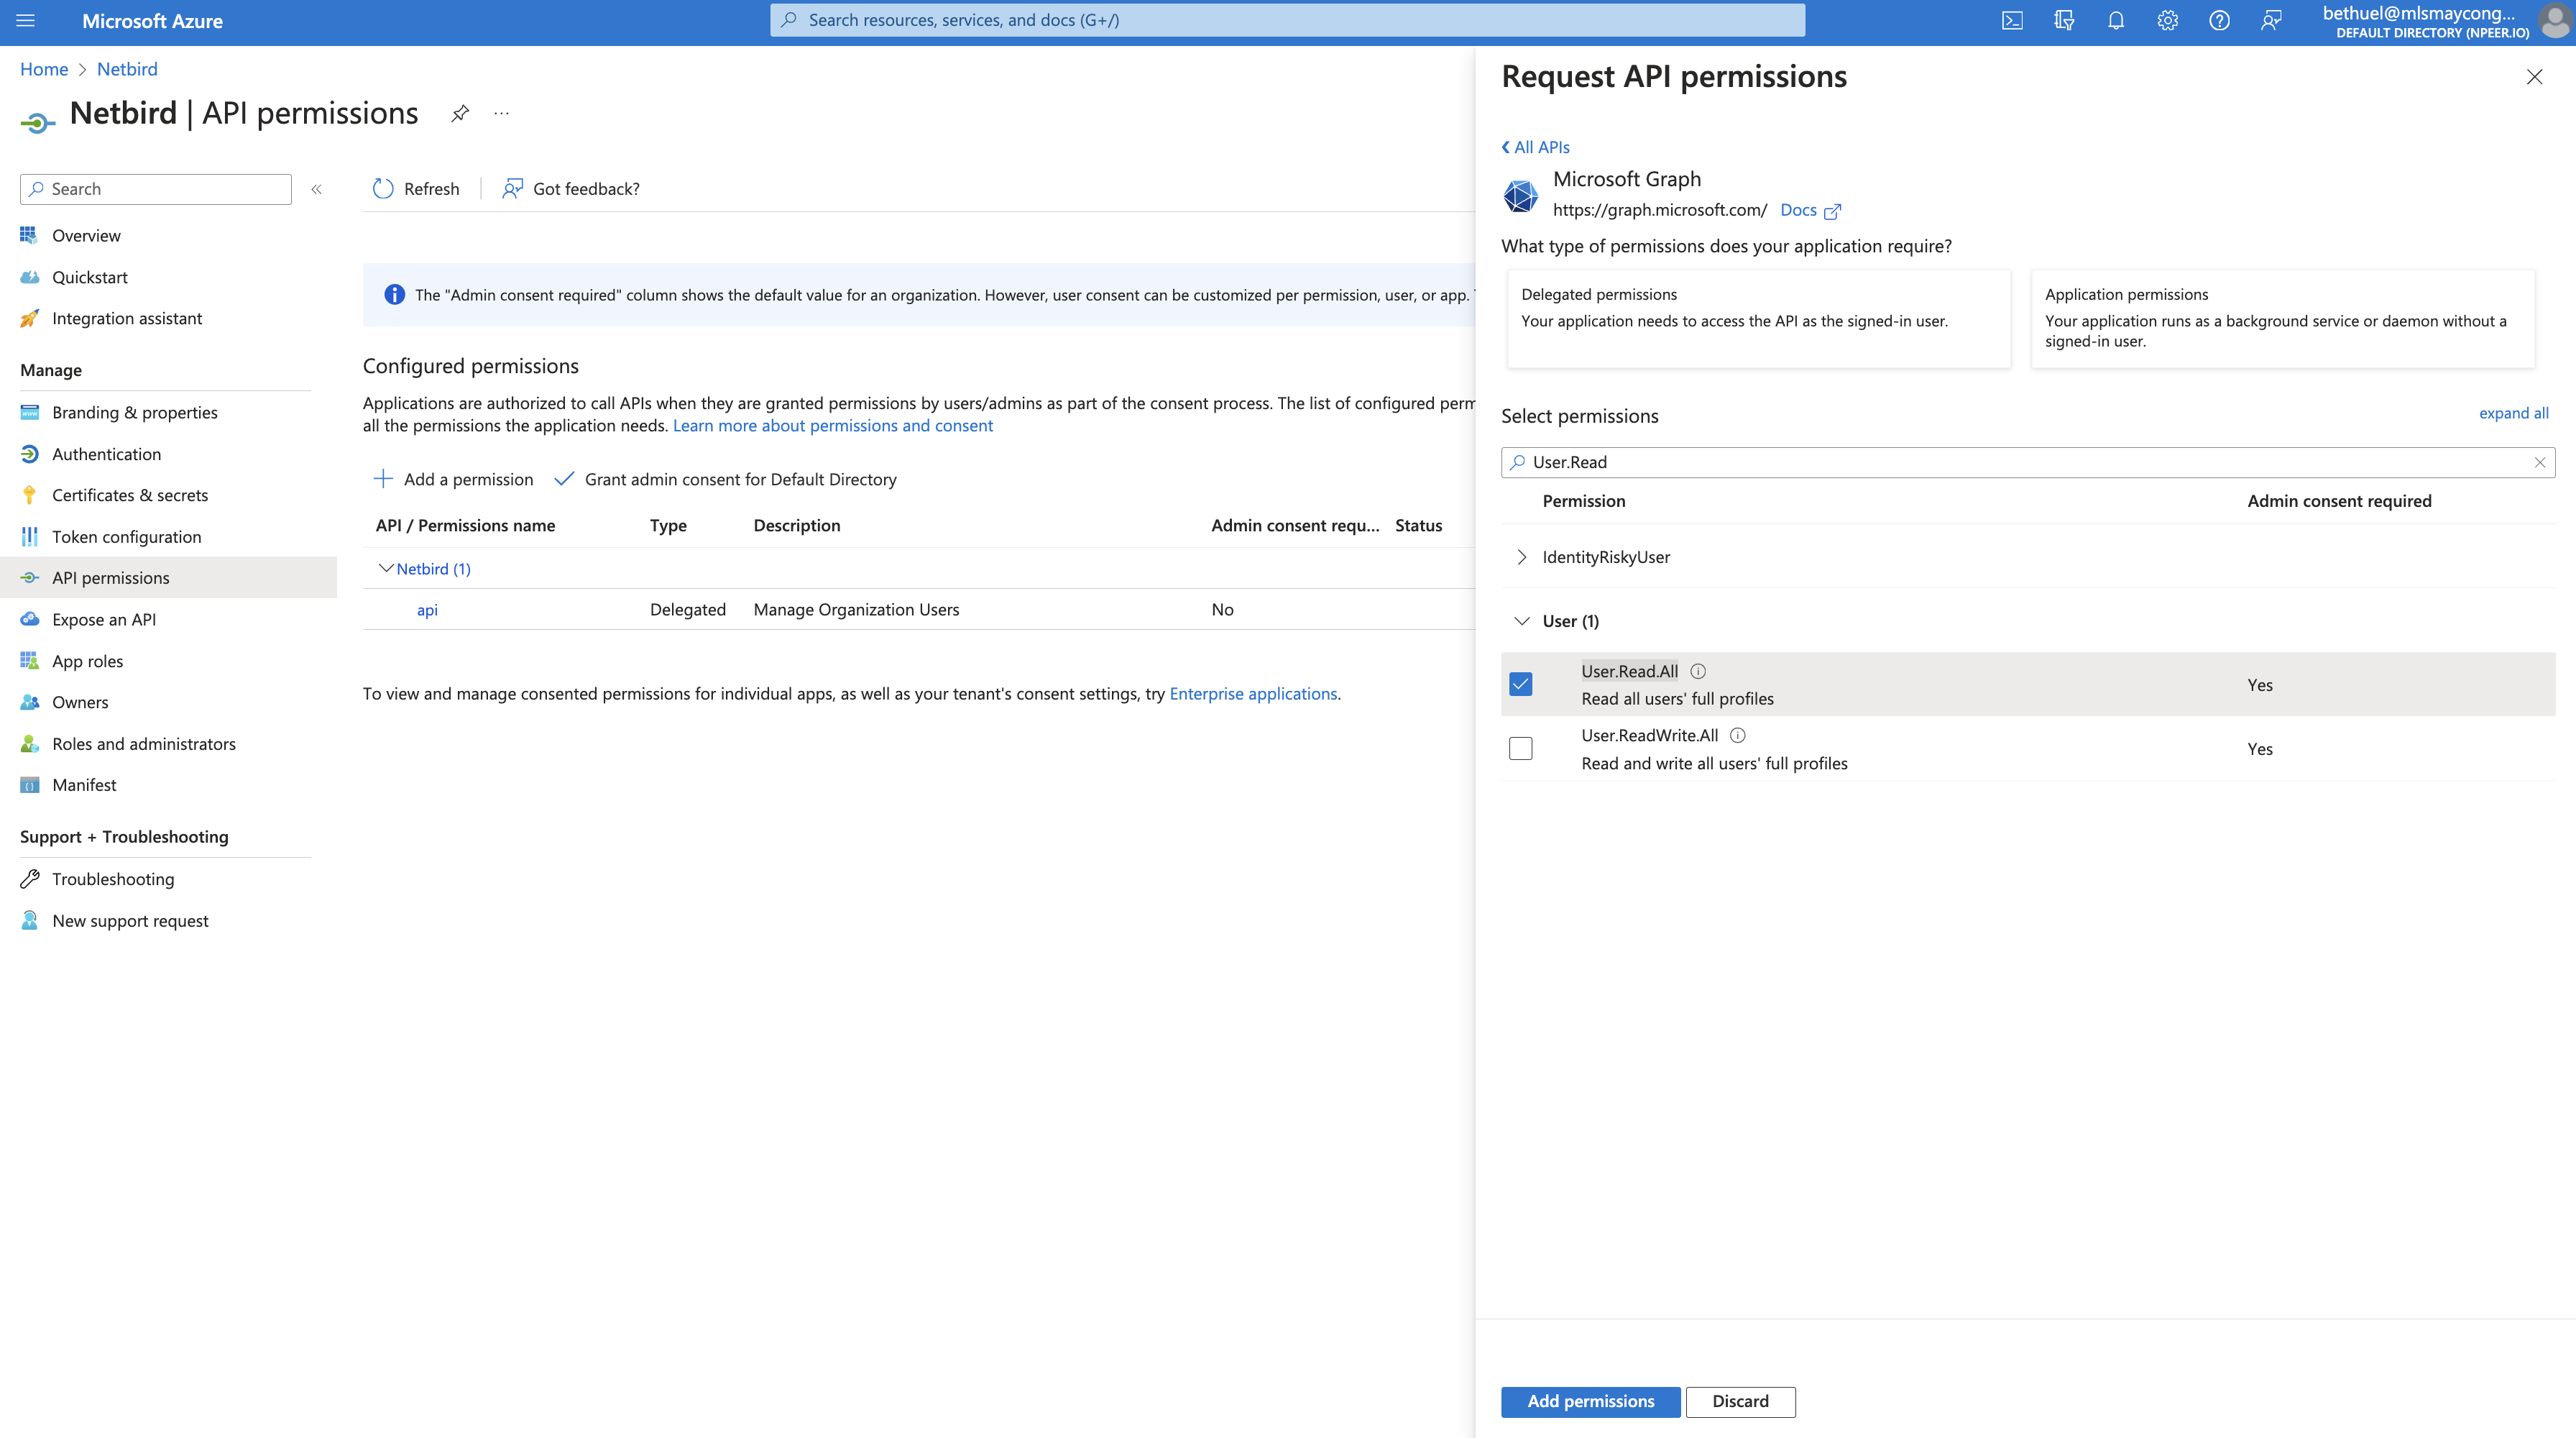
- Click
Grant admin consent for Default Directoryand clickYes
Step 5. Update token version
- Click
Manifeston left menu - Search for
accessTokenAcceptedVersionand change the value fromnullto2 - Click
Save
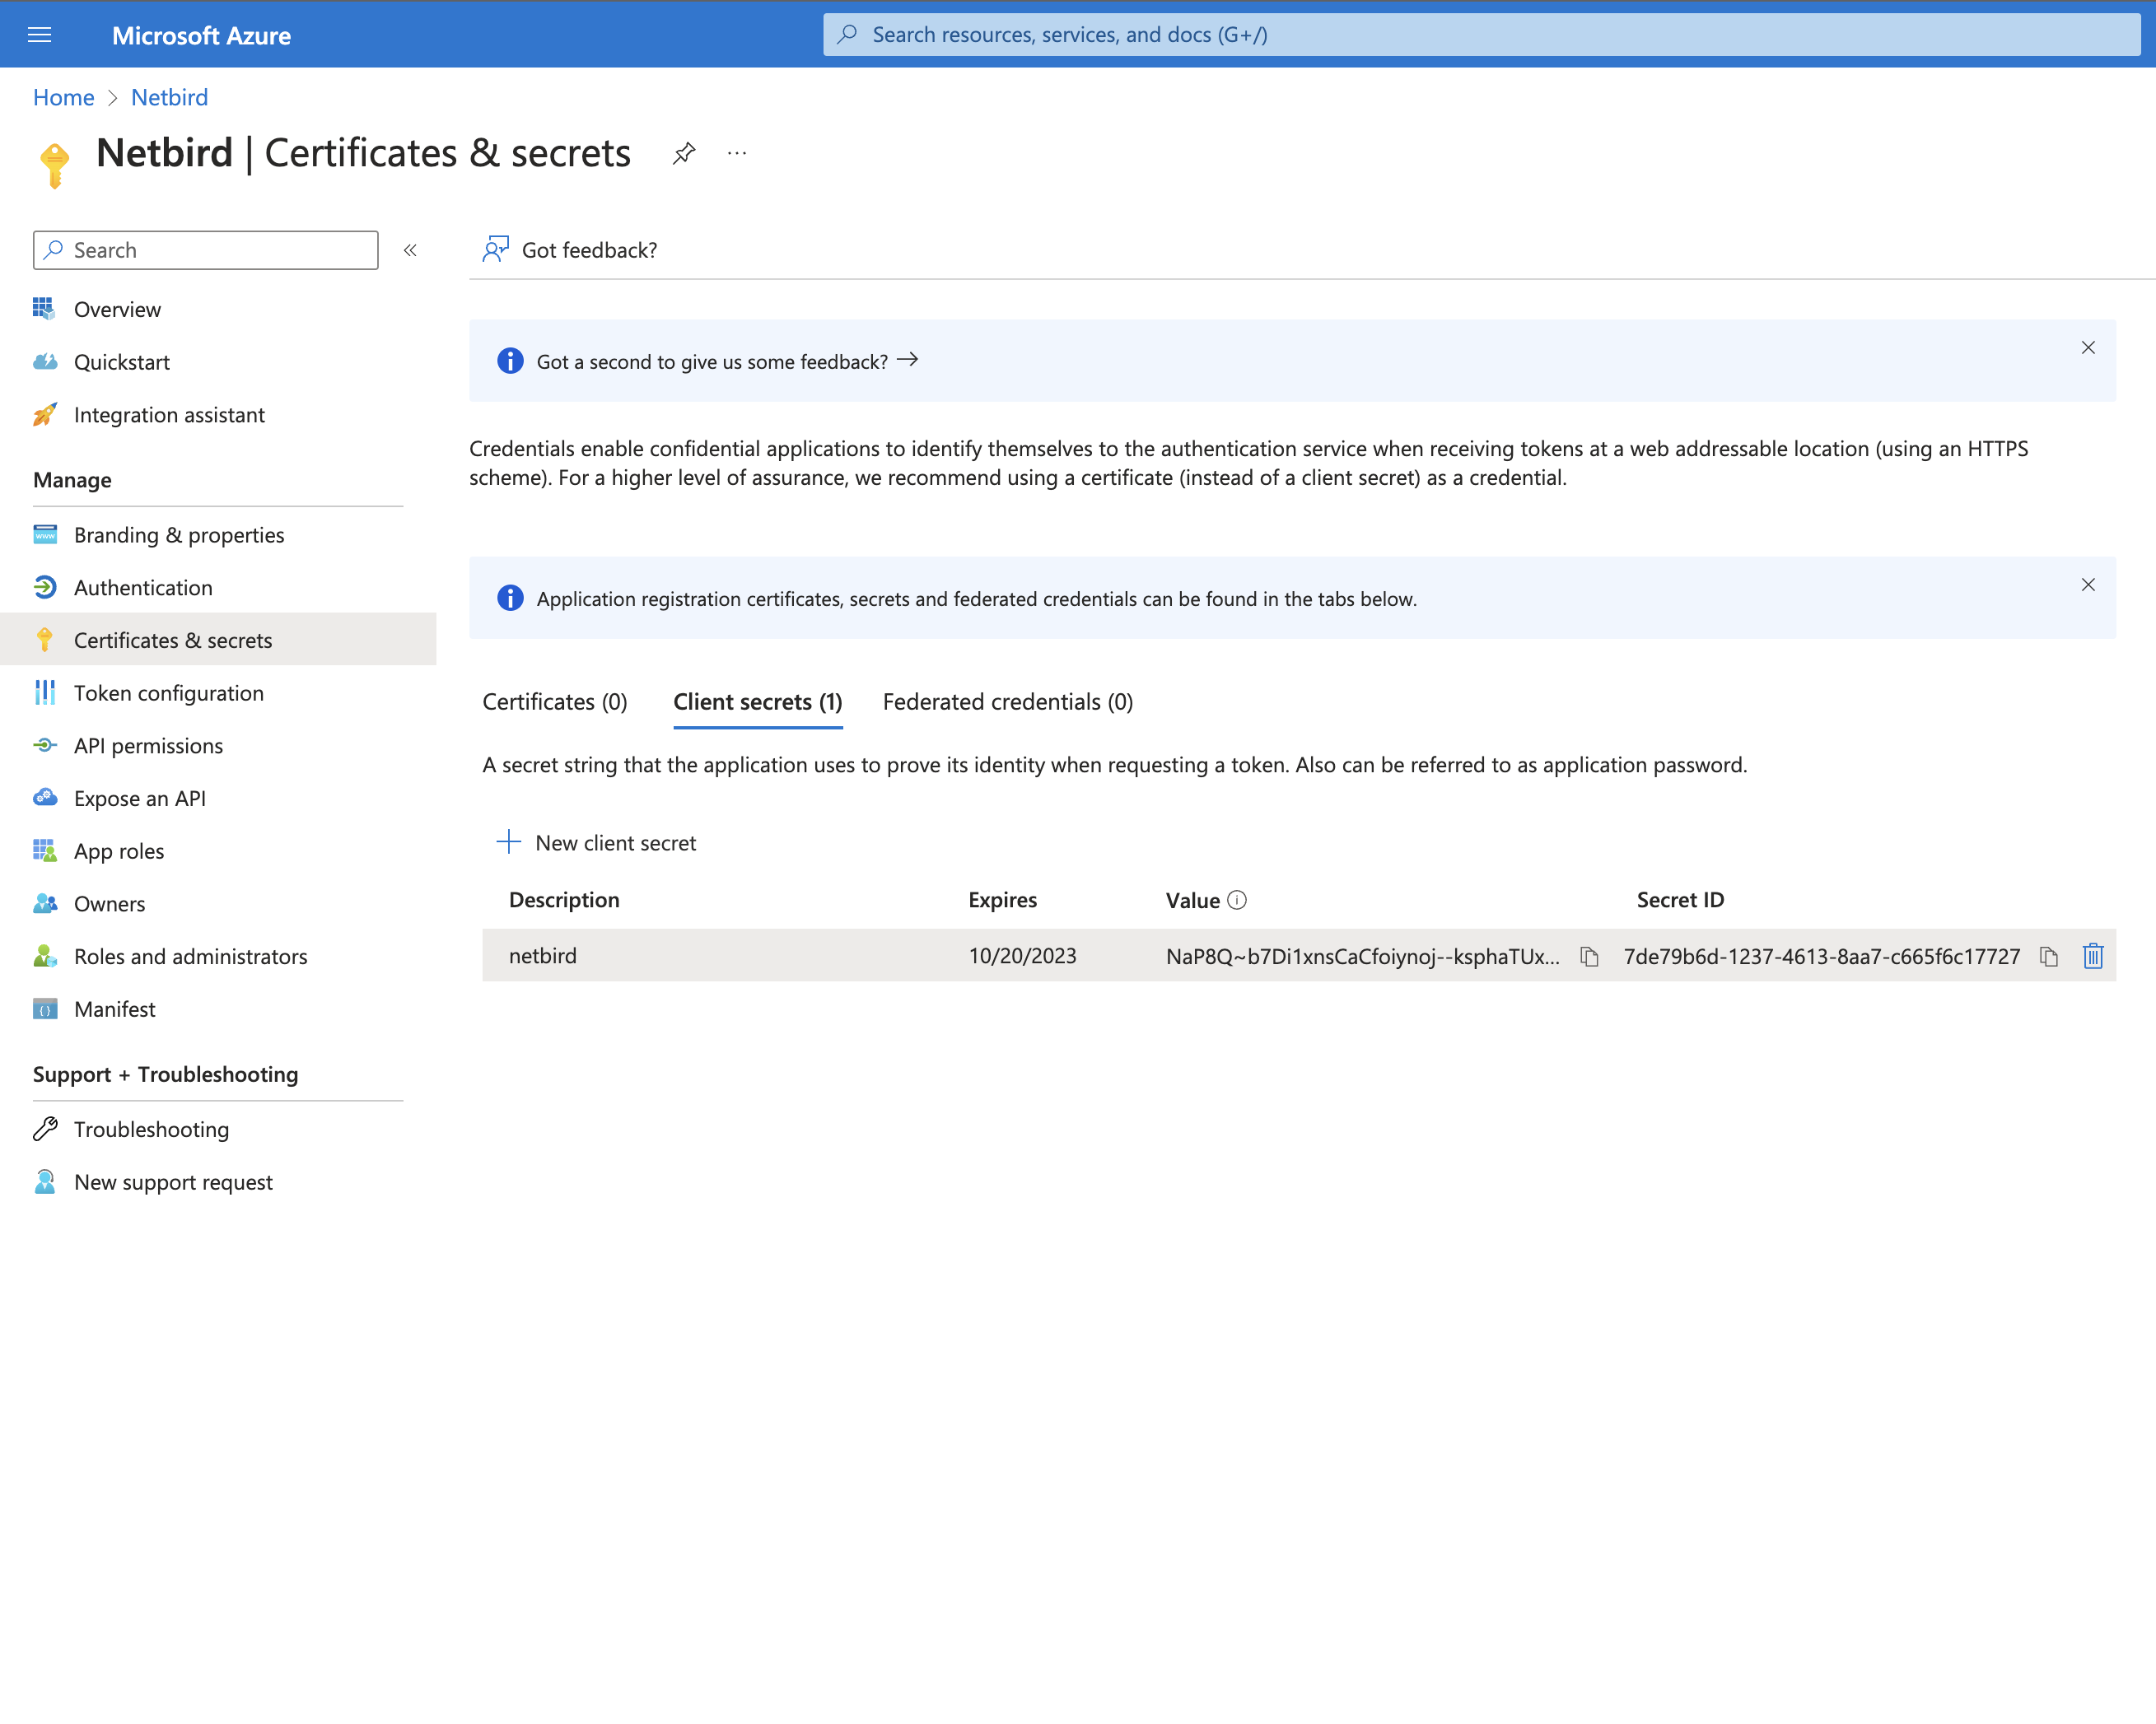
Step 6. Generate client secret
- Click
Certificates & secretson left menu - Click
New client secret - Fill in the form with the following values and click
Add - Description:
Netzilo - Copy
Valueand save it as it can be viewed only once after creation.
- Click
Overviewon left menu and take note ofApplication (client) ID,Object IDandDirectory (tenant) IDwill be required in next step.
Your authority OIDC configuration will be available under:
https://login.microsoftonline.com/<Directory (tenant) ID>/v2.0/.well-known/openid-configuration
Double-check if the endpoint returns a JSON response by calling it from your browser.
- Set properties in the
setup.envfile:
NETZILO_DOMAIN="<YOUR_DOMAIN>"
NETZILO_AUTH_OIDC_CONFIGURATION_ENDPOINT="https://login.microsoftonline.com/<Directory (tenant) ID>/v2.0/.well-known/openid-configuration"
NETZILO_USE_AUTH0=false
NETZILO_AUTH_CLIENT_ID="<Application (client) ID>"
NETZILO_AUTH_SUPPORTED_SCOPES="openid profile email offline_access User.Read api://<Application (client) ID>/api"
NETZILO_AUTH_AUDIENCE="<Application (client) ID>"
NETZILO_AUTH_REDIRECT_URI="/auth"
NETZILO_AUTH_SILENT_REDIRECT_URI="/silent-auth"
NETZILO_AUTH_USER_ID_CLAIM="oid"
NETZILO_TOKEN_SOURCE="idToken"

NETZILO_AUTH_DEVICE_AUTH_PROVIDER="none"

NETZILO_MGMT_IDP="azure"
NETZILO_IDP_MGMT_CLIENT_ID="<Application (client) ID>"
NETZILO_IDP_MGMT_CLIENT_SECRET="<CLIENT_SECRET>"
NETZILO_IDP_MGMT_EXTRA_OBJECT_ID="<Object ID>"
NETZILO_IDP_MGMT_EXTRA_GRAPH_API_ENDPOINT="https://graph.microsoft.com/v1.0"
Step 7: Continue with the Netzilo Self-hosting Guide
You've configured all required resources in Azure AD. You can now continue with the Netzilo Self-hosting Guide.
Okta
This guide is a part of the Netzilo Self-hosting Guide and explains how to integrate self-hosted Netzilo with Okta.
If you prefer to have full control over authentication and authorization of your Netzilo network, there are good self-hosted alternatives to the managed Okta service like Keycloak.
Before you start creating and configuring an Okta application, ensure that you have an Okta workforce identity cloud account. If you don't have one, sign up for a free account at https://www.okta.com/free-trial/.
Step 1. Create and configure Okta single-page application
In this step, we will create and configure Netzilo single-page application in okta.
- Navigate to Okta Admin Dashboard
- Click
Applicationsin the left menu and then click onApplications - Click
Create App Integration - Fill in the form with the following values and click
Next- Sign-in method:
OIDC - OpenID Connect - Application type:
Single-Page Application
- Sign-in method:
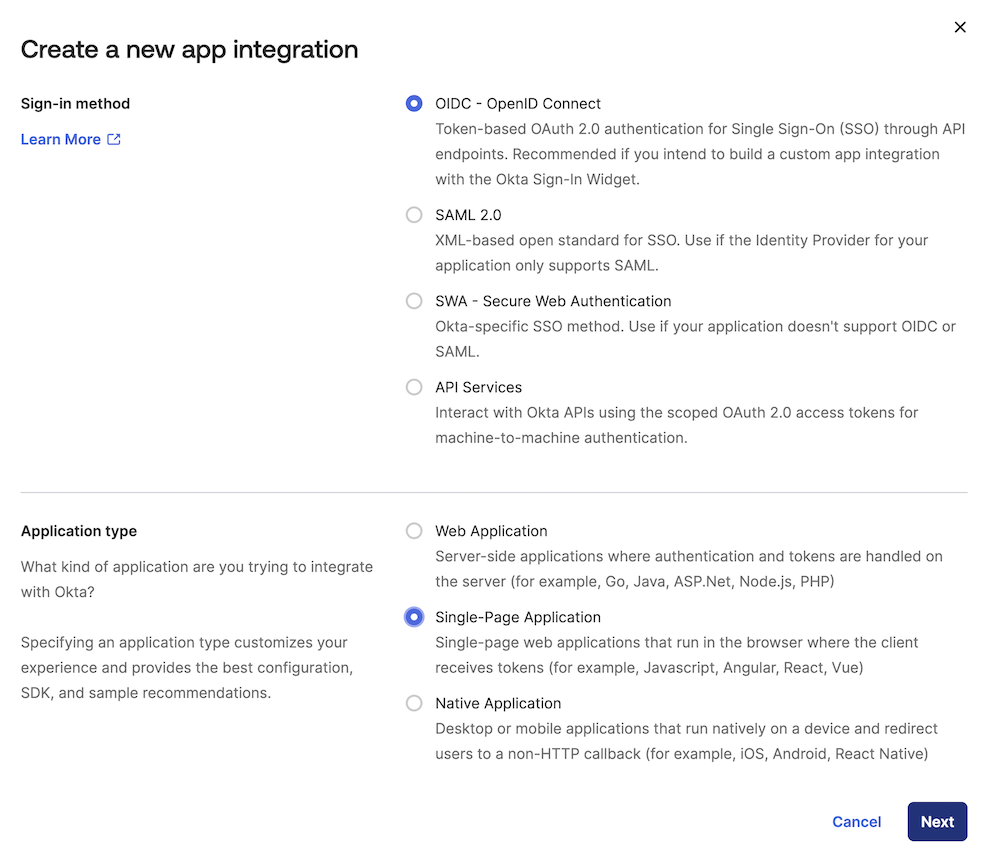
- Fill in the form with the following values and click
Save- App integration name:
Netzilo - Grant type:
Authorization CodeandRefresh Token - Sign-in redirect URIs:
https://<yournetzilodomain.com>/auth,https://<yournetzilodomain.com>/silent-authandhttp://localhost:53000 - Sign-out redirect URIs:
https://<yournetzilodomain.com>/
- App integration name:
- Click
Save

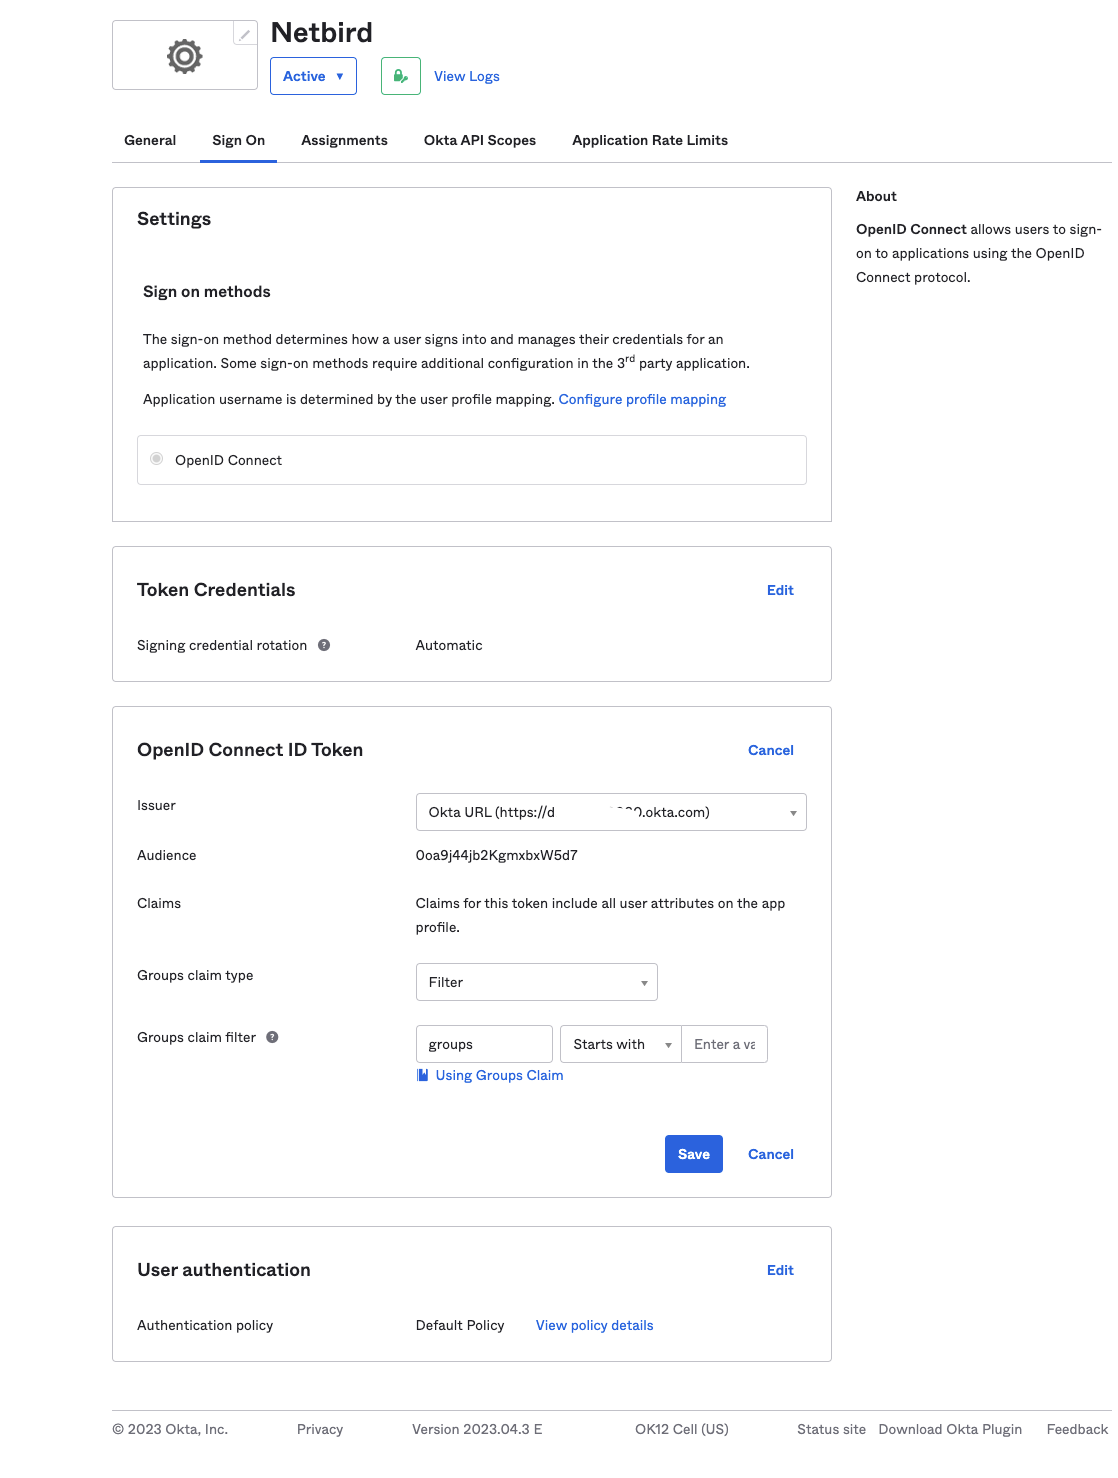
- Navigate to Okta Admin Dashboard
- Click
Applicationsin the left menu and then click onApplications - Select
Netziloapplication on the list and take a note of theClient ID, we will use it later - Click on
Sign Ontab on top menu - Under
OpenID Connect ID Tokensection, clickEditand updateIssuerto use theOkta URL - Click
Save
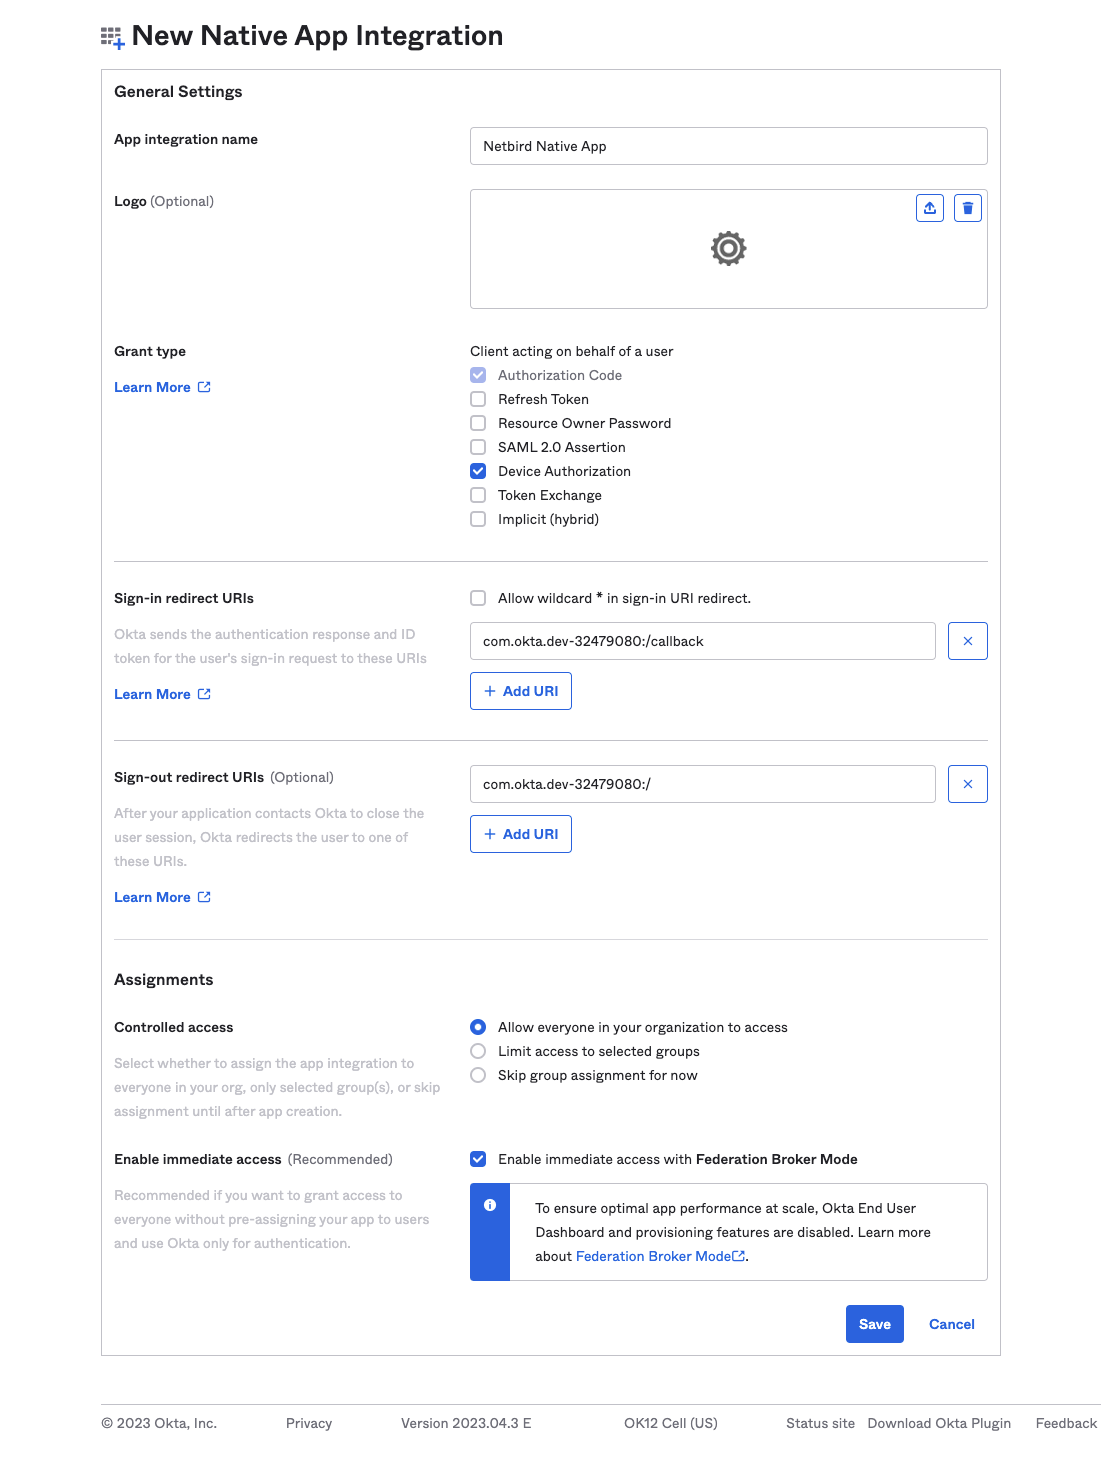
Step 2. Create and configure Okta native application
In this step, we will create and configure Netzilo native application in okta.
- Navigate to Okta Admin Dashboard
- Click
Applicationsin the left menu and then click onApplications - Click
Create App Integration - Fill in the form with the following values and click
Next- Sign-in method:
OIDC - OpenID Connect - Application type:
Native Application
- Sign-in method:
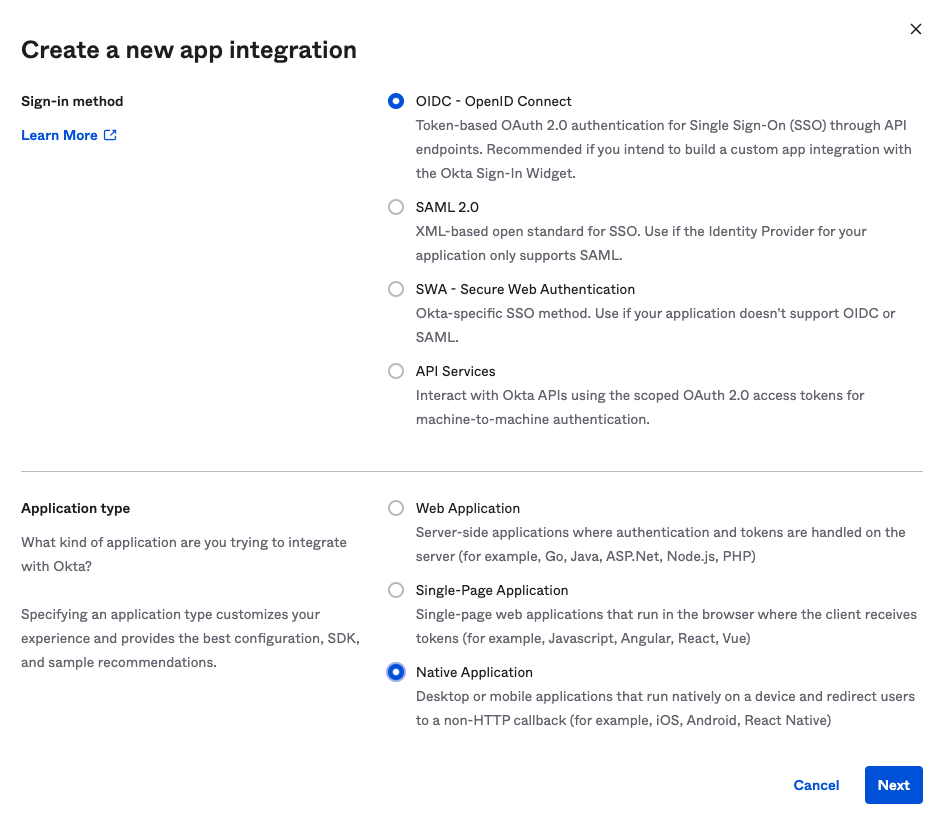
- Fill in the form with the following values and click
Save- App integration name:
Netzilo Native App - Grant type:
Device Authorization
- App integration name:
- Click
Save
- Navigate to Okta Admin Dashboard
- Click
Applicationsin the left menu and then click onApplications - Select
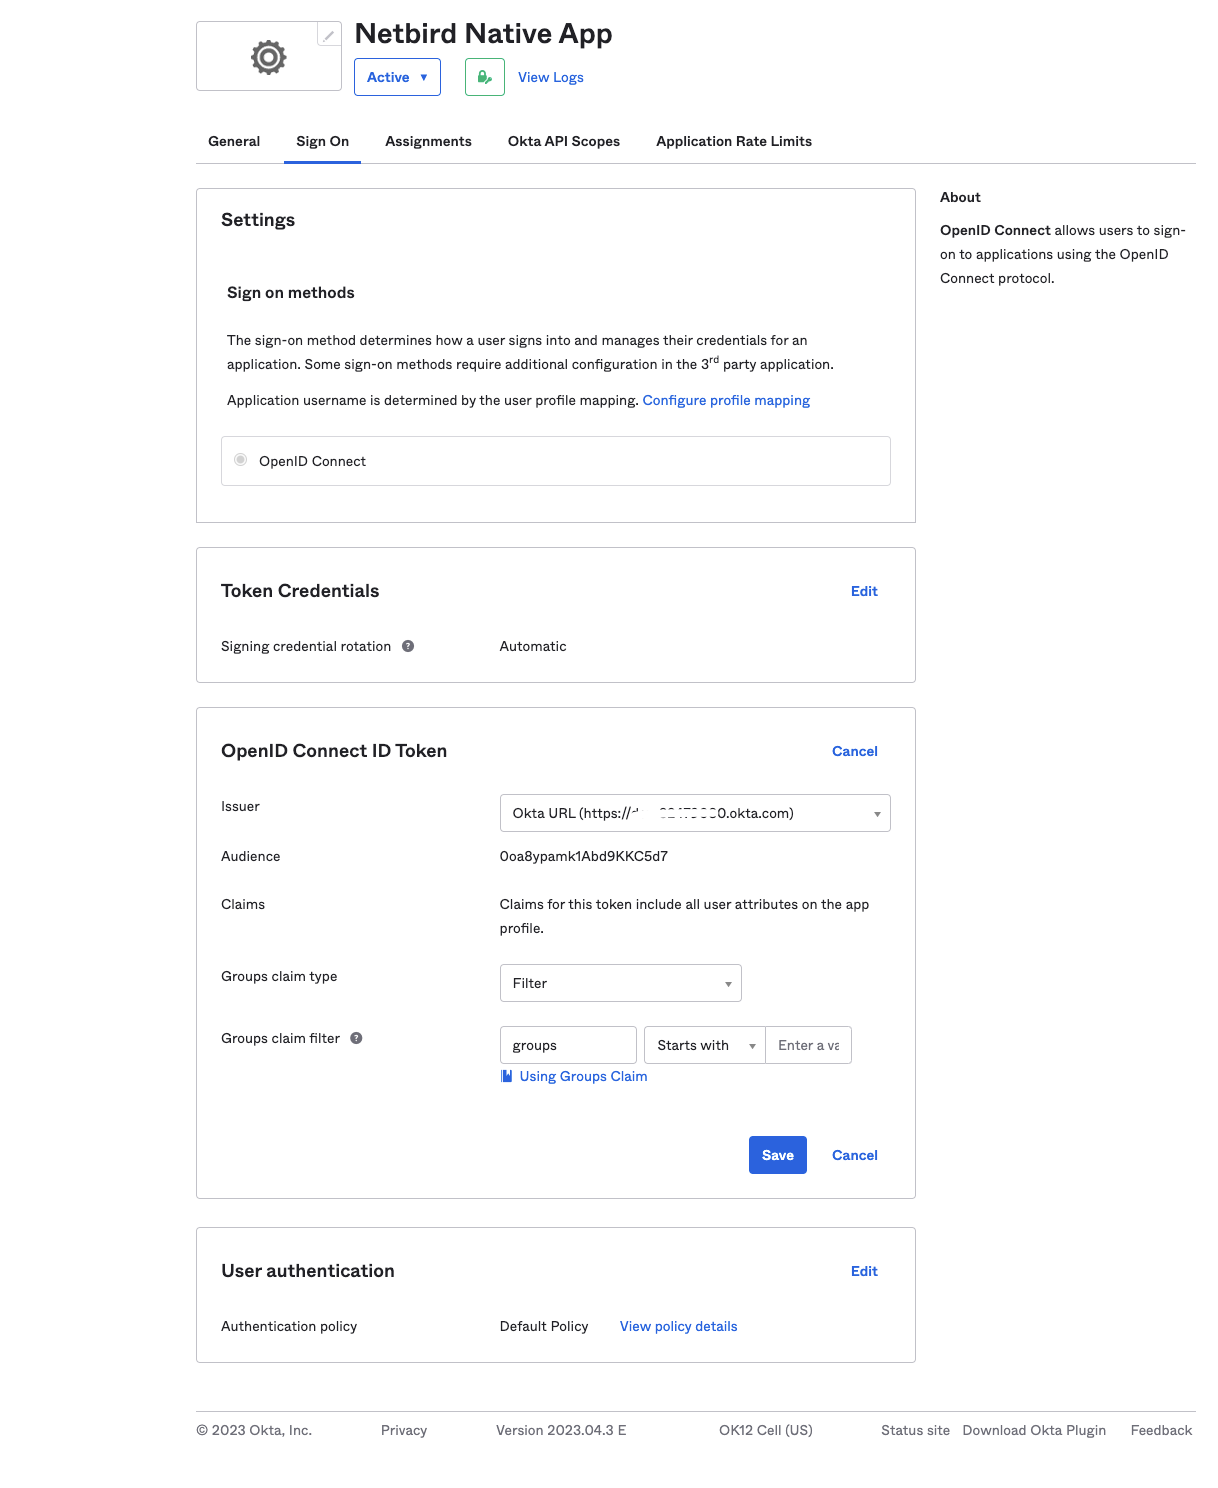
Netzilo Native Appapplication on the list and take a note of theClient ID, we will use it later - Click on
Sign Ontab on top menu - Under
OpenID Connect ID Tokensection, clickEditand updateIssuerto use theOkta URL - Click
Save
Step 3. Generate api token
In this step, we will generate netzilo api token in okta for authorizing calls to user api.
- Navigate to Okta Admin Dashboard
- Click
Securityin the left menu and then click onAPI - Click on
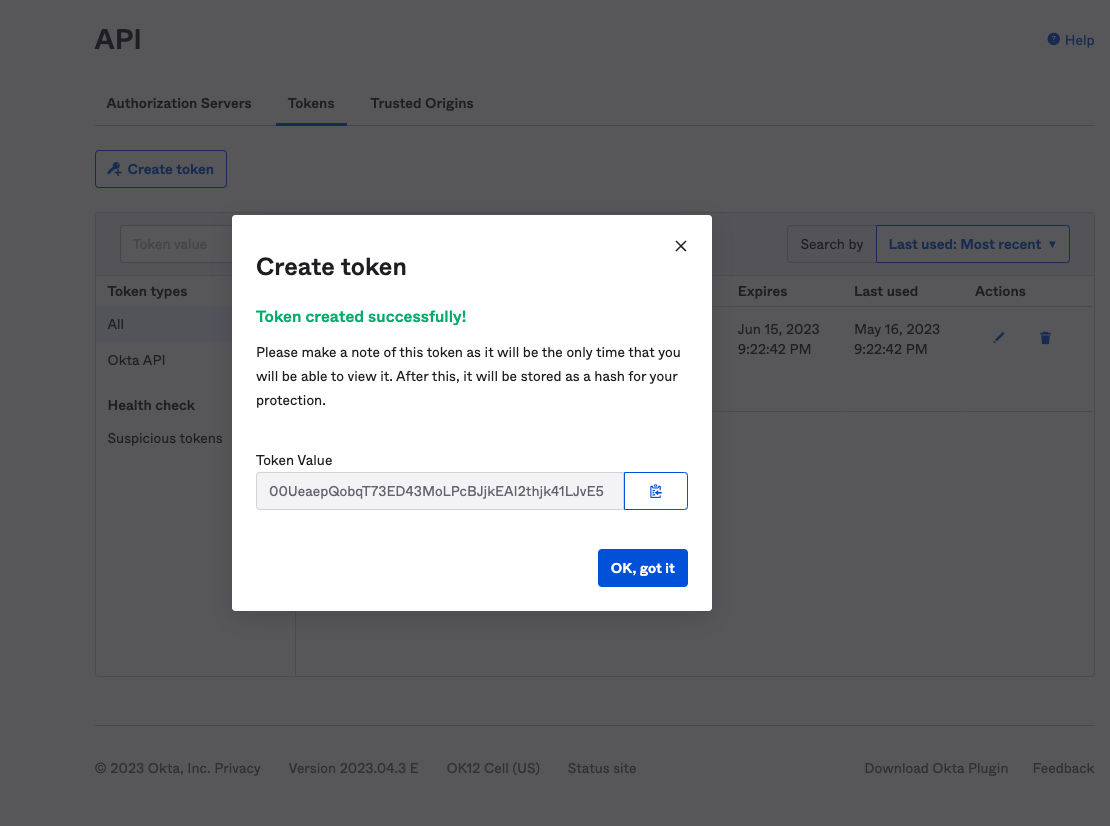
Tokenstab on top menu - Click
Create token - Fill in the form with the following values and click
Create token- Name:
Netzilo
- Name:
- Take note of token value and click
OK, got it
Your authority OIDC configuration will be available under:
https://<YOUR_OKTA_ORGANIZATION_URL>/.well-known/openid-configuration
Double-check if the endpoint returns a JSON response by calling it from your browser.
- Set properties in the
setup.envfile:
NETZILO_DOMAIN="<YOUR_DOMAIN>"
NETZILO_AUTH_OIDC_CONFIGURATION_ENDPOINT="https://<YOUR_OKTA_ORGANIZATION_URL>/.well-known/openid-configuration"
NETZILO_USE_AUTH0=false
NETZILO_AUTH_AUDIENCE="<<NETZILO_CLIENT_ID>>"
NETZILO_AUTH_CLIENT_ID="<NETZILO_CLIENT_ID>"
NETZILO_AUTH_SUPPORTED_SCOPES="openid profile email"
NETZILO_AUTH_REDIRECT_URI="/auth"
NETZILO_AUTH_SILENT_REDIRECT_URI="/silent-auth"
NETZILO_TOKEN_SOURCE="idToken"

NETZILO_AUTH_DEVICE_AUTH_PROVIDER="hosted"
NETZILO_AUTH_DEVICE_AUTH_CLIENT_ID="<NETZILO_NATIVE_CLIENT_ID>>"
NETZILO_AUTH_DEVICE_AUTH_AUDIENCE="<NETZILO_NATIVE_CLIENT_ID>"
NETZILO_AUTH_DEVICE_AUTH_SCOPE="openid email"
NETZILO_AUTH_DEVICE_AUTH_USE_ID_TOKEN=true

NETZILO_MGMT_IDP="okta"
NETZILO_IDP_MGMT_EXTRA_API_TOKEN="<api_token>"
Step 4: Continue with the Netzilo Self-hosting Guide
You've configured all required resources in Okta. You can now continue with the Netzilo Self-hosting Guide.
Google Workspace
This guide is a part of the Netzilo Self-hosting Guide and explains how to integrate self-hosted Netzilo with Google Workspace.
Beginning with Netzilo version v0.23.6 and onwards, the Google Workspace IdP manager no longer requires the creation of a custom admin role called User and Schema Management.
Instead, we are transitioning towards a more tailored role explicitly designed for managing read-only user information.
Consequently, you have the option to remove the previously established custom admin role and refer to the documentation to configure the admin role scope for read-only access correctly.
Before you start creating and configuring an Google Workspace application, ensure that you have the following:
- An Google Workspace account: To create an Google Work application, you must have an Google Workspace. If you don't have one, sign up at https://workspace.google.com/business/signup/welcome.
- User account with admin permissions: You must have an Google Workspace user account with the admin permissions to create and manage Google Workspace applications. If you don't have the required permissions, ask your workspace administrator to grant them to you.
- Create new
Netziloproject in Google cloud console https://console.cloud.google.com. - Enable
Admin SDK APIforNetziloproject at https://console.cloud.google.com/apis/library/admin.googleapis.com.
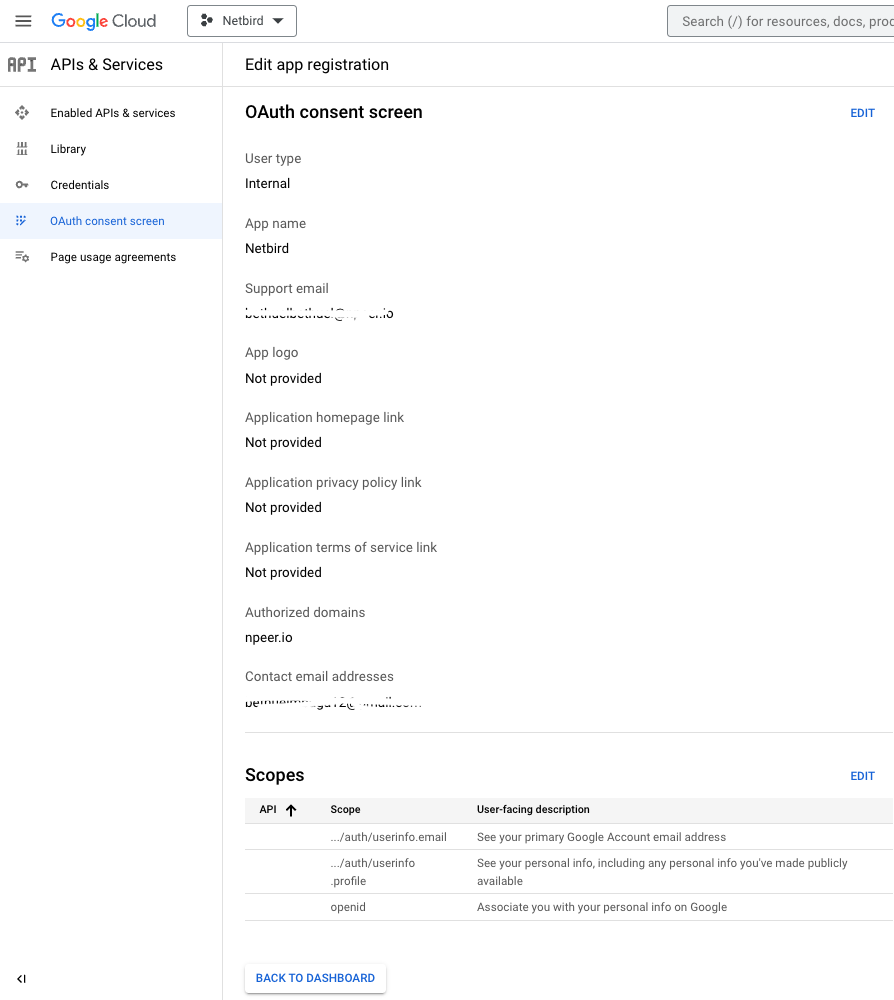
Step 1: Configure OAuth consent screen
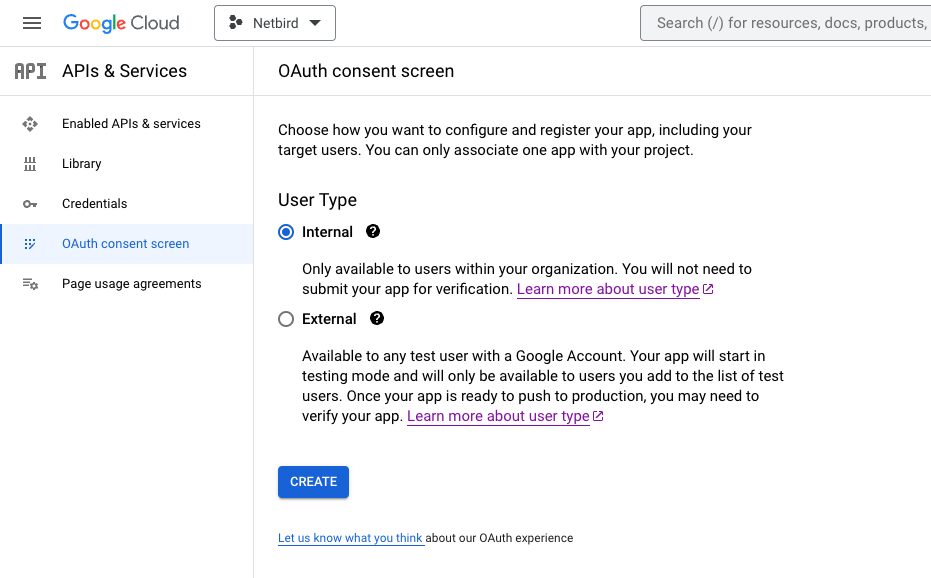
- Navigate to OAuth consent page
- Select
InternalUser Type and click create
- Fill in the form with the following values and click
SAVE AND CONTINUE- App name:
Netzilo - User support email:
<administrator email address> - Authorized domain:
<your netzilo domain> - Developer contact information:
<developer email address>
- App name:
- Click
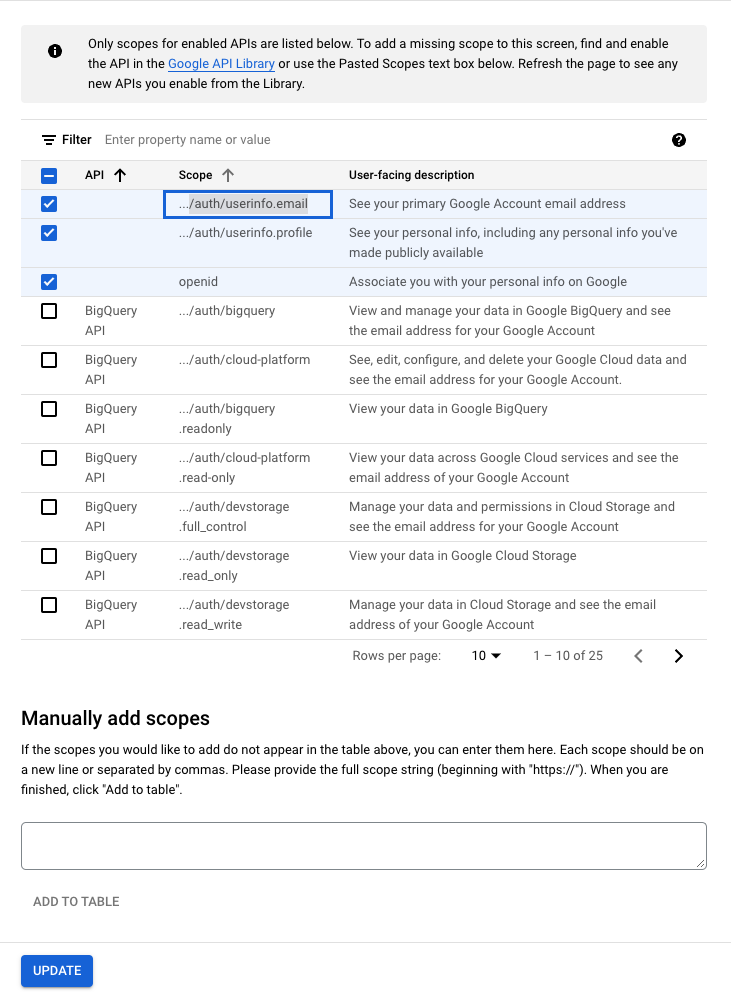
ADD OR REMOVE SCOPES - Select
/auth/userinfo.email,/auth/userinfo.profileandopenidscopes and then clickUPDATE
- Click
SAVE AND CONTINUE - Verify the summary of the OAuth consent screen to ensure that everything is properly configured, and then click
BACK TO DASHBOARD
Step 2: Create OAuth 2.0 credentials
- Navigate to API Credentials page
- Click
CREATE CREDENTIALSat the top and selectOAuth client ID - Fill in the form with the following values and click
CREATE- Application type:
Web application - Name:
netzilo - Authorized JavaScript origins:
https://<your netzilo domain>andhttp://localhost - Authorized redirect URIs:
https://<your netzilo domain>/auth,https://<your netzilo domain>/silent-authandhttp://localhost:53000
- Application type:
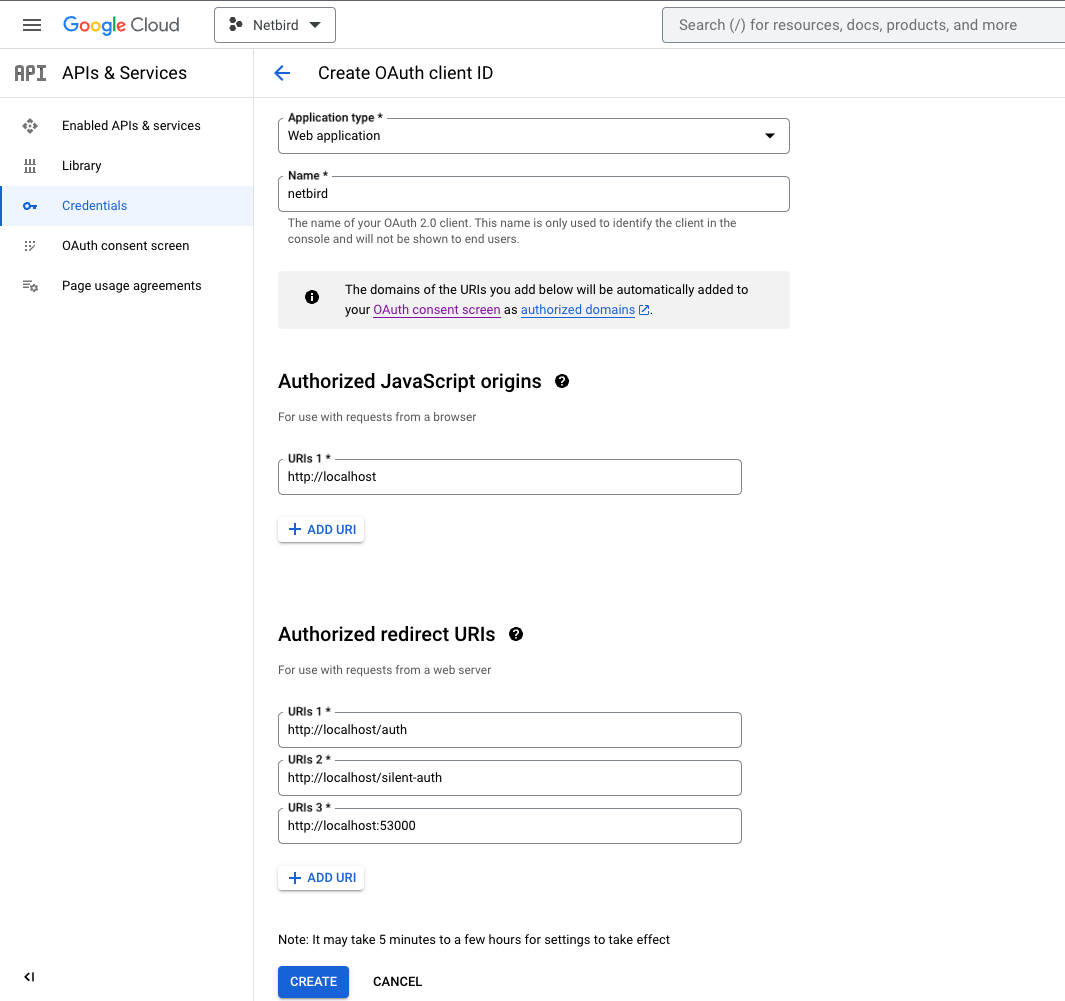
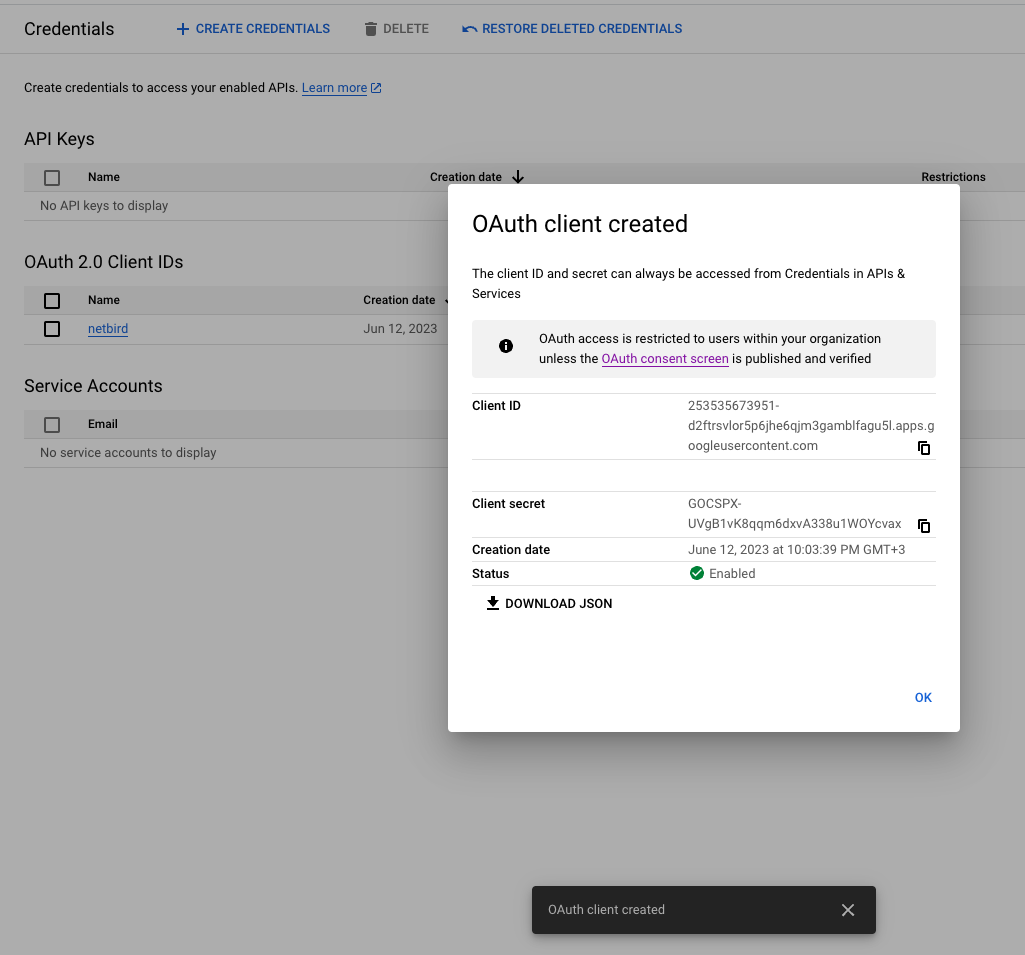
- Take note of
Client IDandClient Secretand clickOK
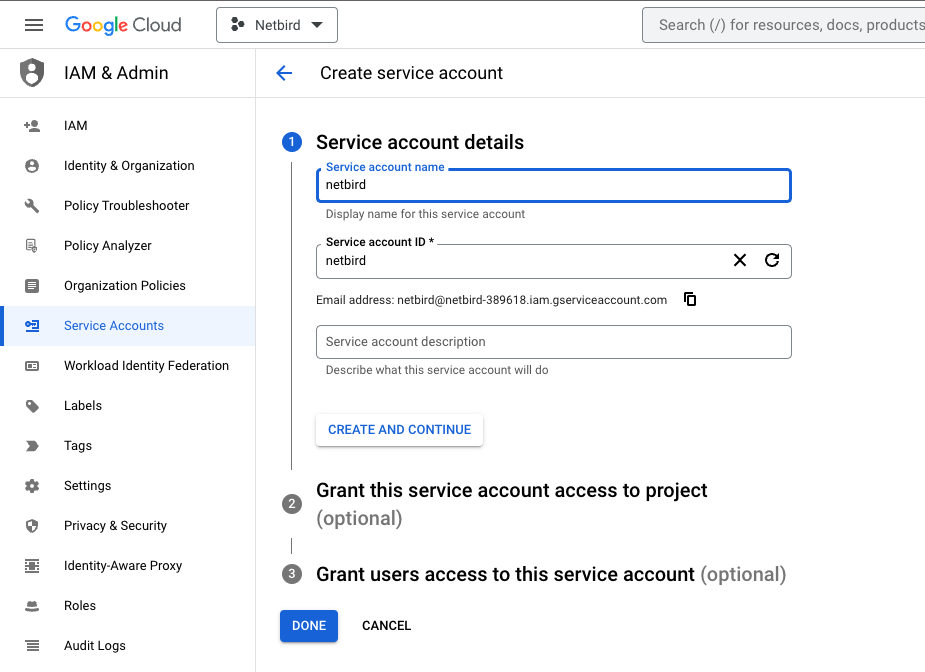
Step 3: Create service account
- Navigate to API Credentials page
- Click
CREATE CREDENTIALSat the top and selectService account - Fill in the form with the following values and click
CREATE- Service account name:
netzilo - Service account ID:
netzilo
- Service account name:
- Take note of service account email address, we will use it later
- Click
DONE
Step 4: Create service account keys
- Navigate to API Credentials page
- Under
Service Accountsclick thenetziloto edit the service account
- Click the
Keystab - Click the
Add keydrop-down menu, then selectCreate new key - Select
JSONas the Key type and clickCreate
When you create a service account key by using the Google Cloud console, most browsers immediately download the new key and save it in a download folder on your computer. Read how to manage and secure your service keys here
- Open downloaded json file and take note of
client_idwill be used later asService Account Client ID
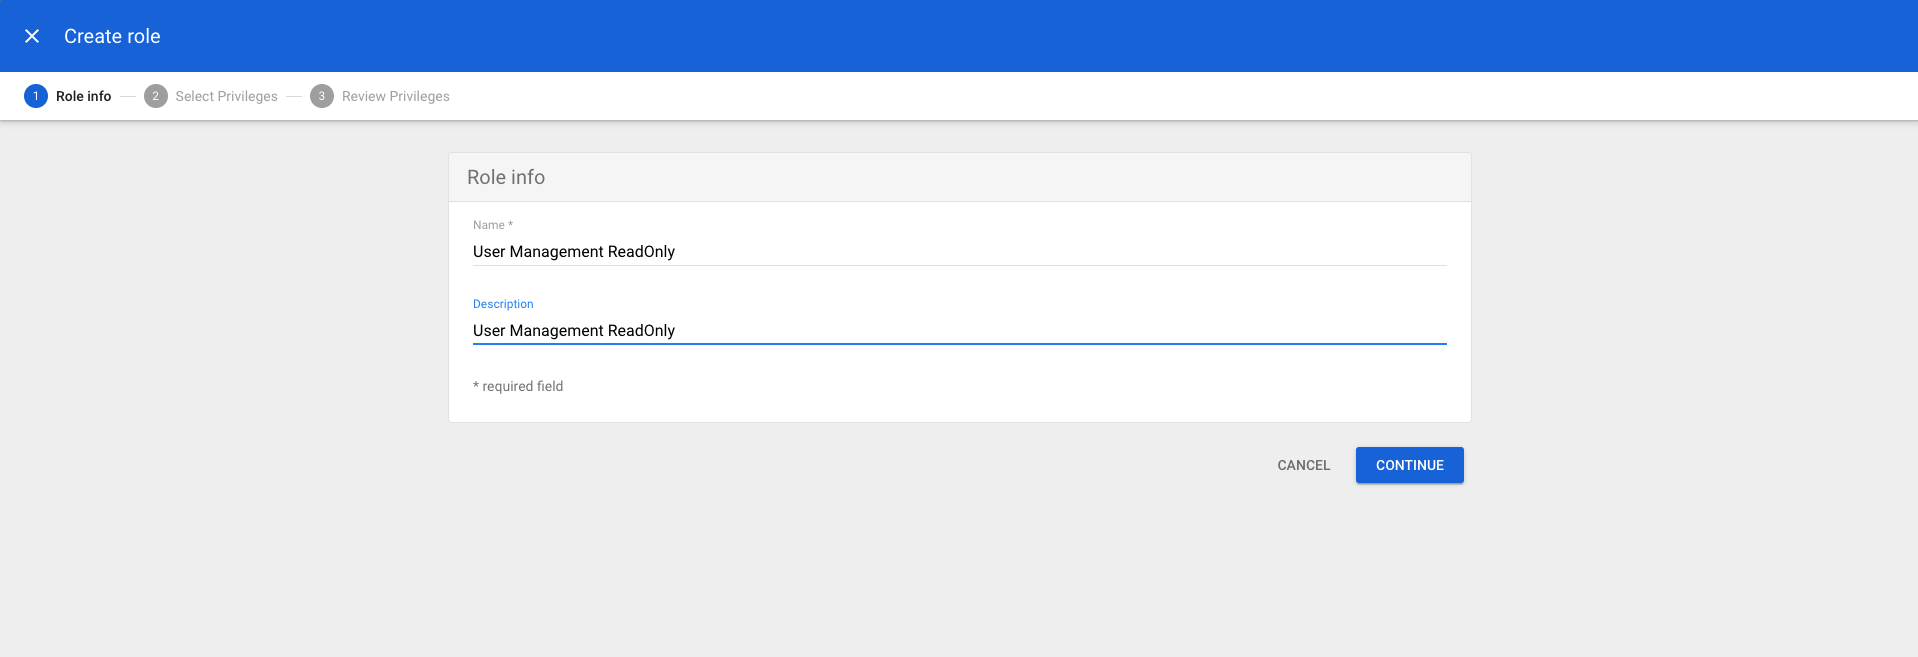
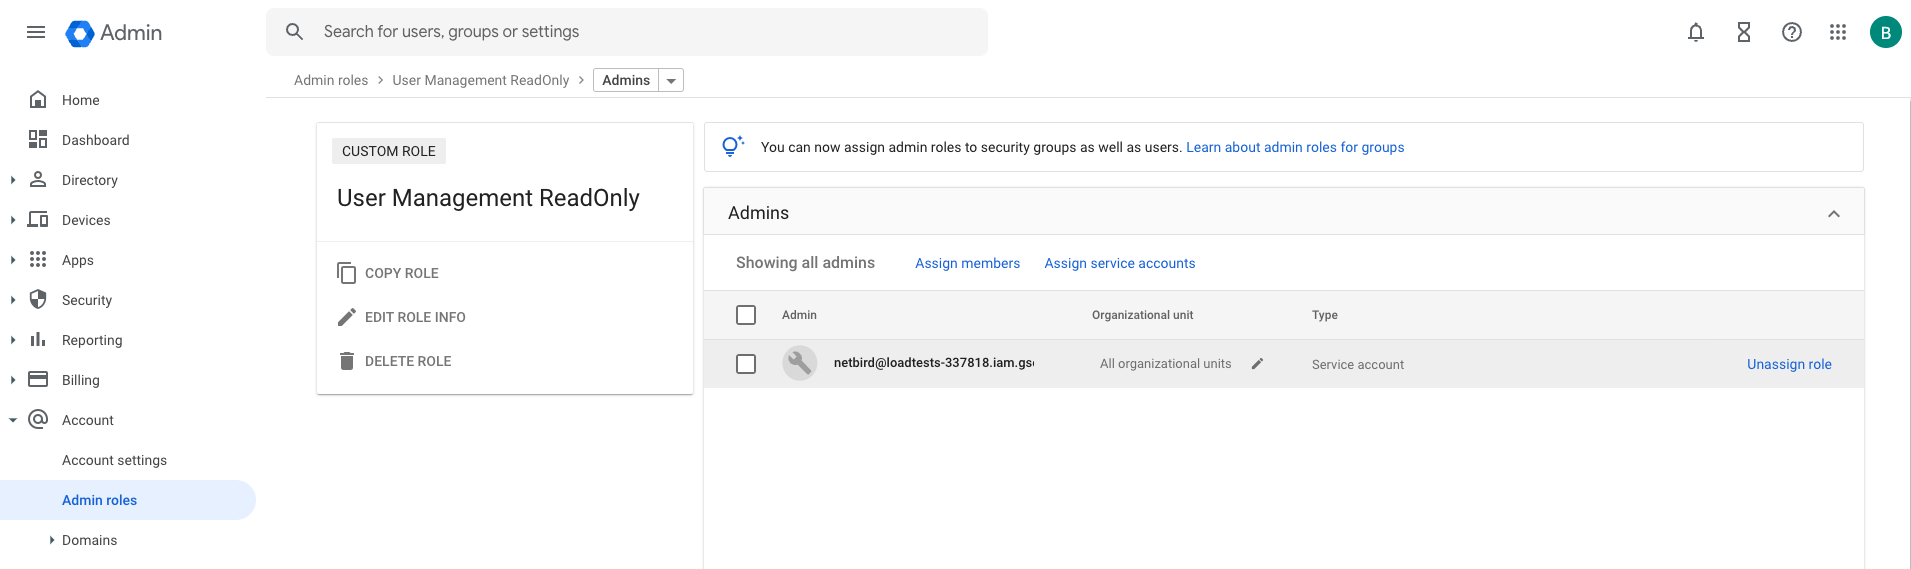
Step 5: Grant user management admin role to service account
- Navigate to Admin Console page
- Select
Accounton the left menu and then clickAdmin Roles - Click
Create new role - Fill in the form with the following values and click
CREATE- name:
User Management ReadOnly - description:
User Management ReadOnly
- name:
- Click
CONTINUE
- Scroll down to
Admin API privilegesand add the following privileges- Users:
Read
- Users:
- Click
CONTINUE
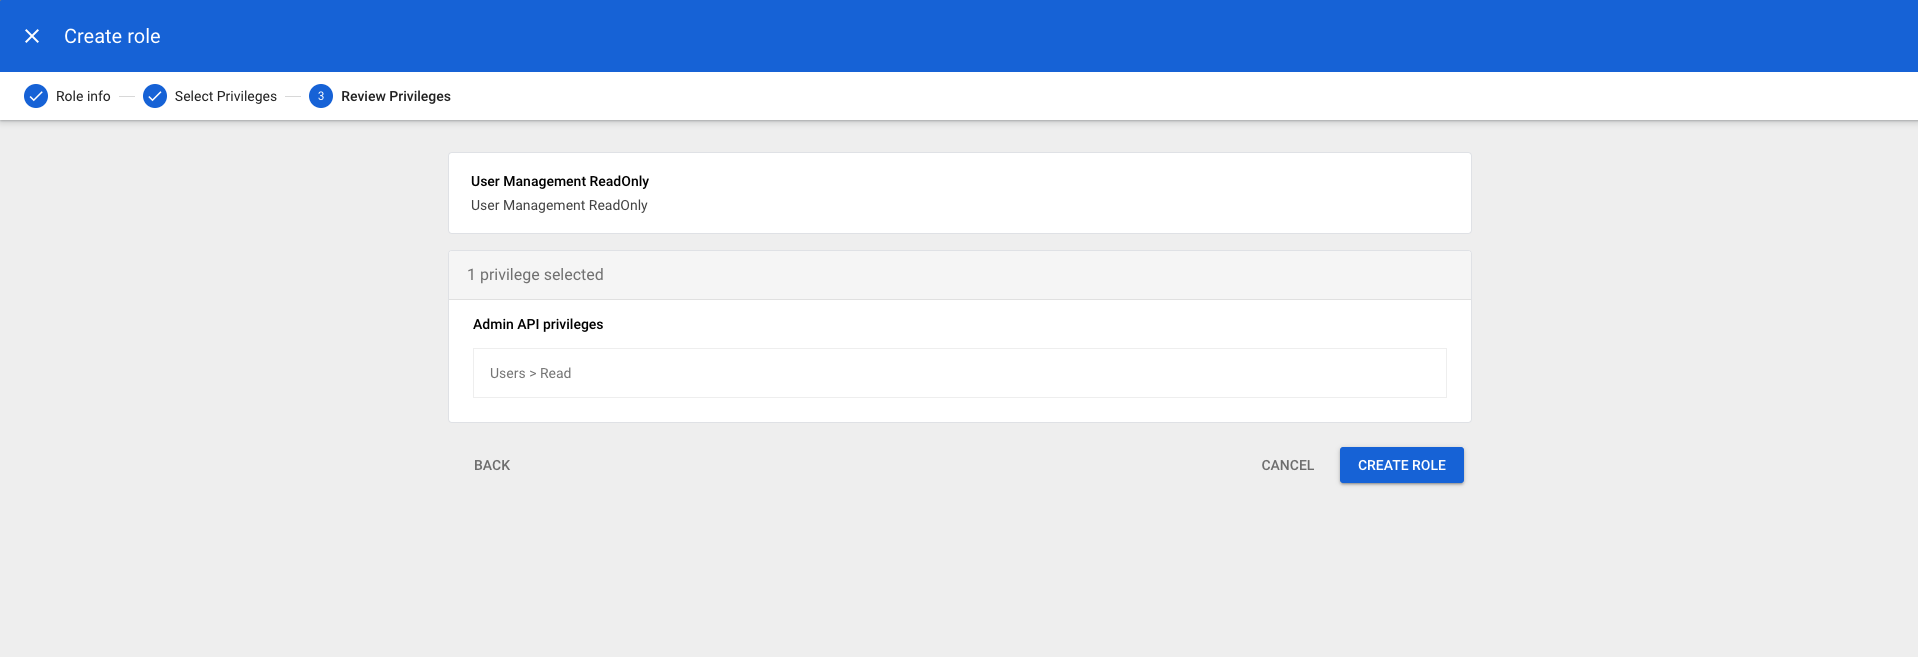
- Verify preview of assigned Admin API privileges to ensure that everything is properly configured, and then click
CREATE ROLE - Click
Assign service accounts, add service account email address and then clickADD
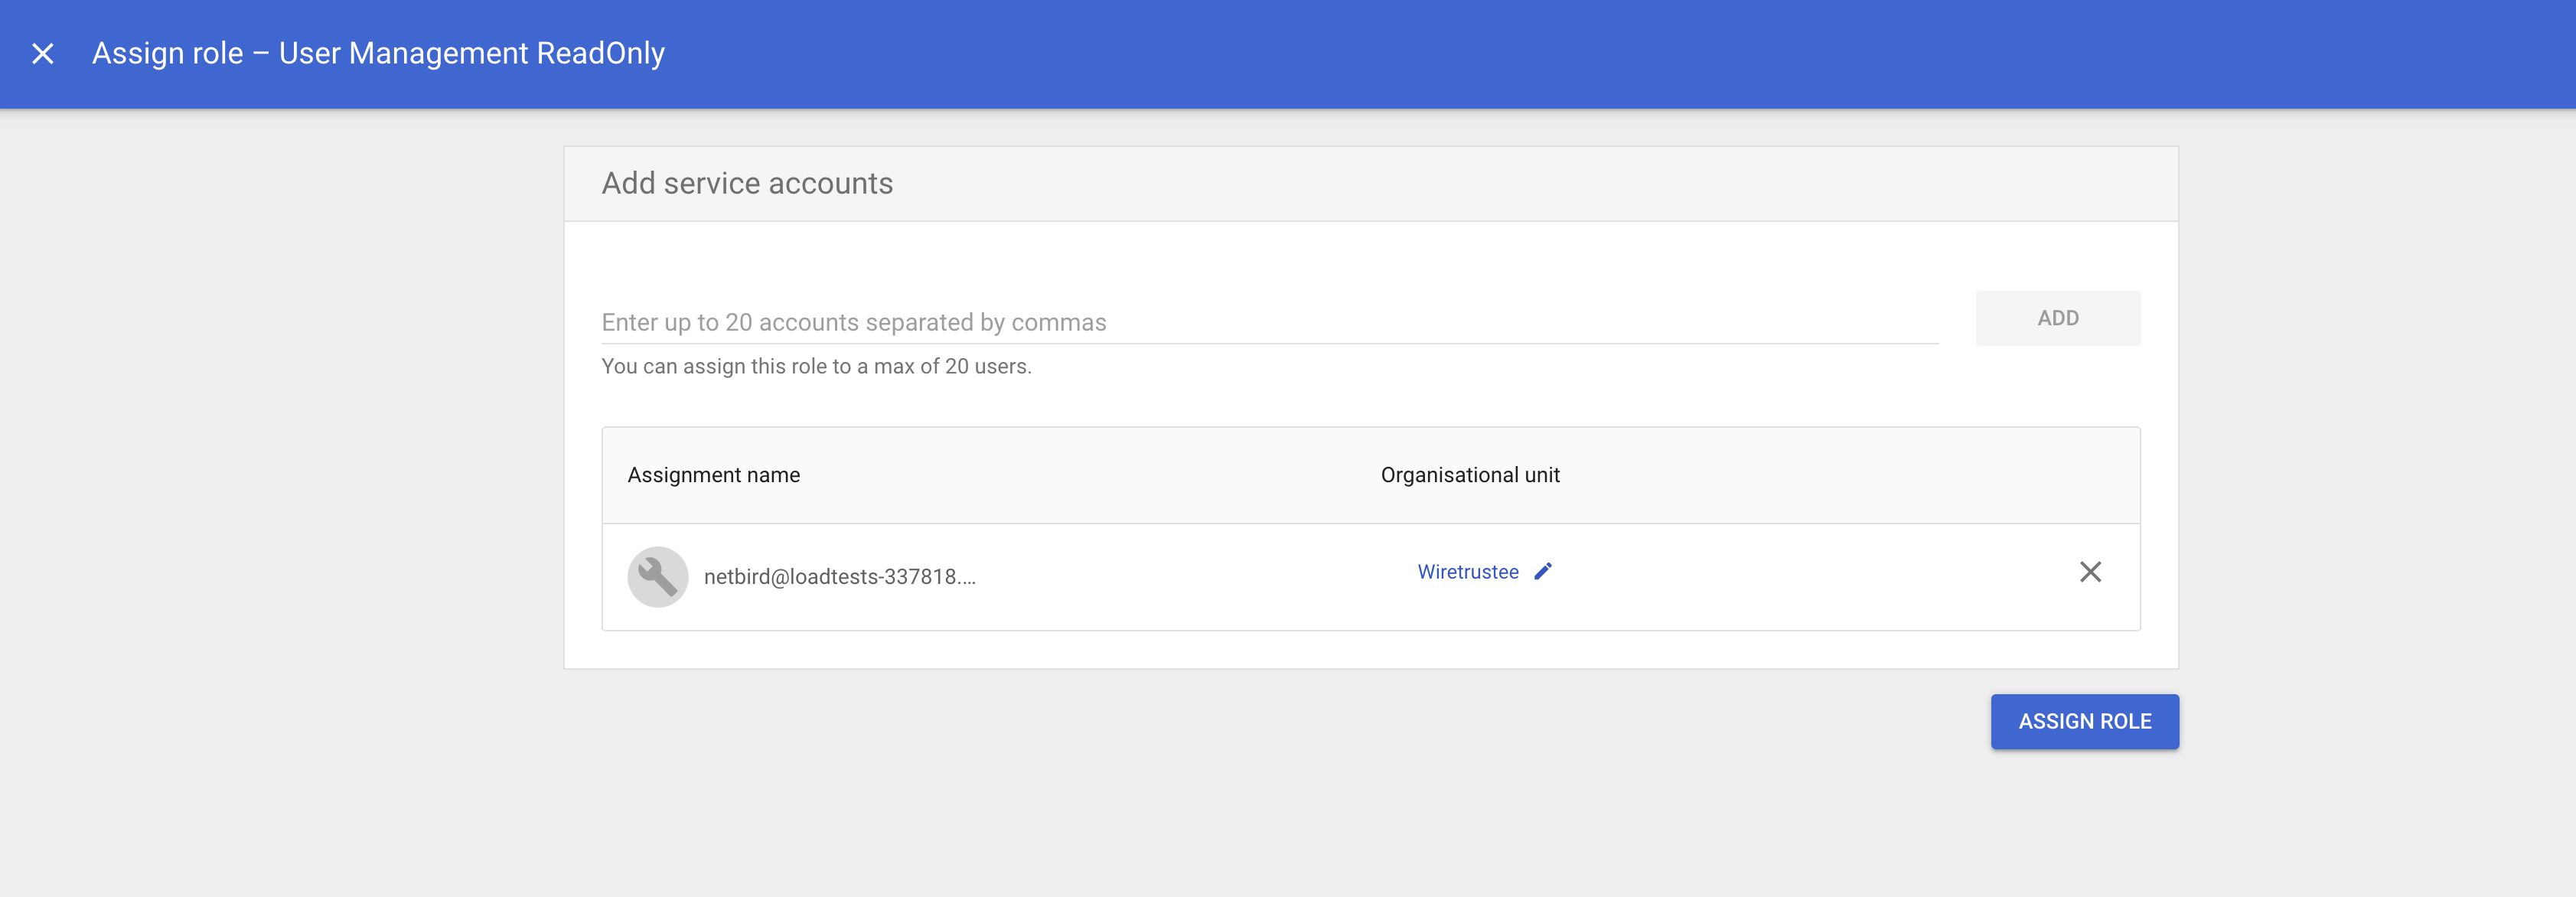
- Click
ASSIGN ROLEto assign service account toUser Management ReadOnlyrole
-
Navigate to Account Settings page and take note of
Customer ID -
Encode service account json key into base64 format
base64 -i <SERVICE_ACCOUNT_KEY_PATH> -
Set properties in the
setup.envfile:
NETZILO_DOMAIN="<YOUR_DOMAIN>"
NETZILO_AUTH_OIDC_CONFIGURATION_ENDPOINT="https://accounts.google.com/.well-known/openid-configuration"
NETZILO_USE_AUTH0=false
NETZILO_AUTH_AUDIENCE="<OAUTH_CLIENT_ID>"
NETZILO_AUTH_CLIENT_ID="<OAUTH_CLIENT_ID>"
NETZILO_AUTH_CLIENT_SECRET="<OAUTH_CLIENT_SECRET>"
NETZILO_AUTH_SUPPORTED_SCOPES="openid profile email"
NETZILO_AUTH_REDIRECT_URI="/auth"
NETZILO_AUTH_SILENT_REDIRECT_URI="/silent-auth"
NETZILO_TOKEN_SOURCE="idToken"

NETZILO_AUTH_DEVICE_AUTH_PROVIDER="none"

NETZILO_MGMT_IDP="google"
NETZILO_IDP_MGMT_EXTRA_SERVICE_ACCOUNT_KEY="<BASE64_SERVICE_ACCOUNT_KEY>"
NETZILO_IDP_MGMT_EXTRA_CUSTOMER_ID="<GOOGLE_WORKSPACE_CUSTOMER_ID>"
Step 6: Continue with the Netzilo Self-hosting Guide
You've configured all required resources in Google Workspace. You can now continue with the Netzilo Self-hosting Guide.
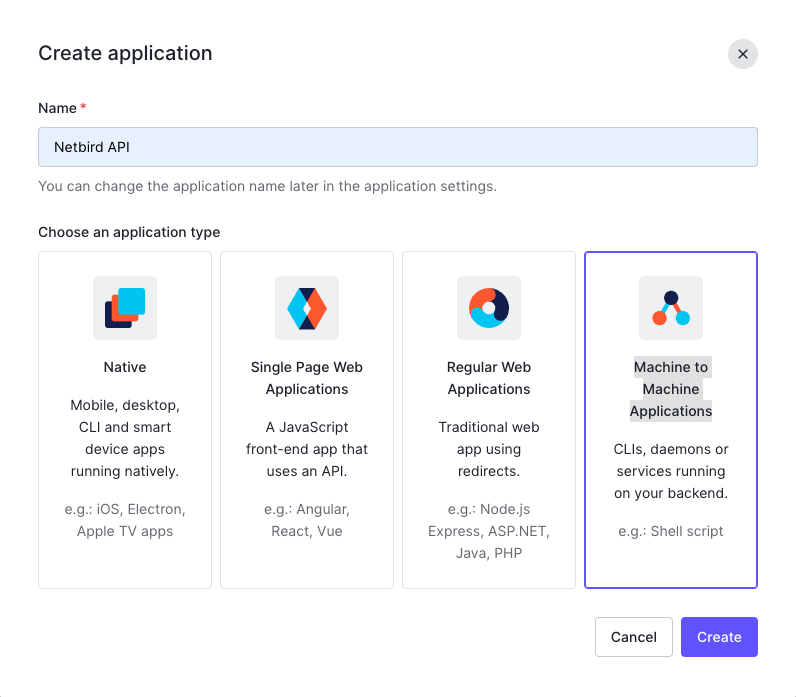
Auth0
This guide is a part of the Netzilo Self-hosting Guide and explains how to integrate self-hosted Netzilo with Auth0.
Auth0 is a flexible, drop-in solution to add authentication and authorization services to your applications. It is a 3rd party managed service and can't be self-hosted. Auth0 is the right choice if you don't want to manage an Identity Provider (IDP) instance on your own.
If you prefer to have full control over authentication and authorization of your Netzilo network, there are good self-hosted alternatives to the managed Auth0 service like Keycloak.
Step 1: Create Auth0 account
To create an Auth0 account, sign up at https://auth0.com.
There are multiple properties of the setup.env file that we will configure in this guide:
NETZILO_AUTH_CLIENT_IDNETZILO_AUTH_OIDC_CONFIGURATION_ENDPOINTNETZILO_USE_AUTH0NETZILO_AUTH_AUDIENCENETZILO_AUTH_DEVICE_AUTH_CLIENT_ID(Optional)NETZILO_MGMT_IDPNETZILO_IDP_MGMT_CLIENT_IDNETZILO_IDP_MGMT_CLIENT_SECRETNETZILO_IDP_MGMT_EXTRA_AUDIENCE
Step 2: Create and configure Auth0 application
This Auth0 application will be used to authorize access to Netzilo Dashboard (Web UI).
- Follow the steps in the Auth0 React SDK Guide up until "Install the Auth0 React SDK".
- Use
https://YOUR DOMAINandhttp://localhost:53000as:Allowed Callback URLs, - Use
https://YOUR DOMAINandhttp://localhostas:Allowed Logout URLs,Allowed Web Origins,Allowed Origins (CORS)
Make sure that Token Endpoint Authentication Method is set to None.
- Use
Client IDto setNETZILO_AUTH_CLIENT_IDproperty in thesetup.envfile. - Use
Domainto configureNETZILO_AUTH_OIDC_CONFIGURATION_ENDPOINTproperty in thesetup.envfile like so:
https://<DOMAIN>/.well-known/openid-configuration
Double-check if the endpoint returns a JSON response by calling it from your browser.
Step 3: Create and configure Auth0 API
This Auth0 API will be used to access Netzilo Management Service API.
- Follow the steps in the Auth0 Create An API.
- Use API
Identifierto setNETZILO_AUTH_AUDIENCEproperty in thesetup.envfile. - Set
NETZILO_USE_AUTH0totruein thesetup.envfile.
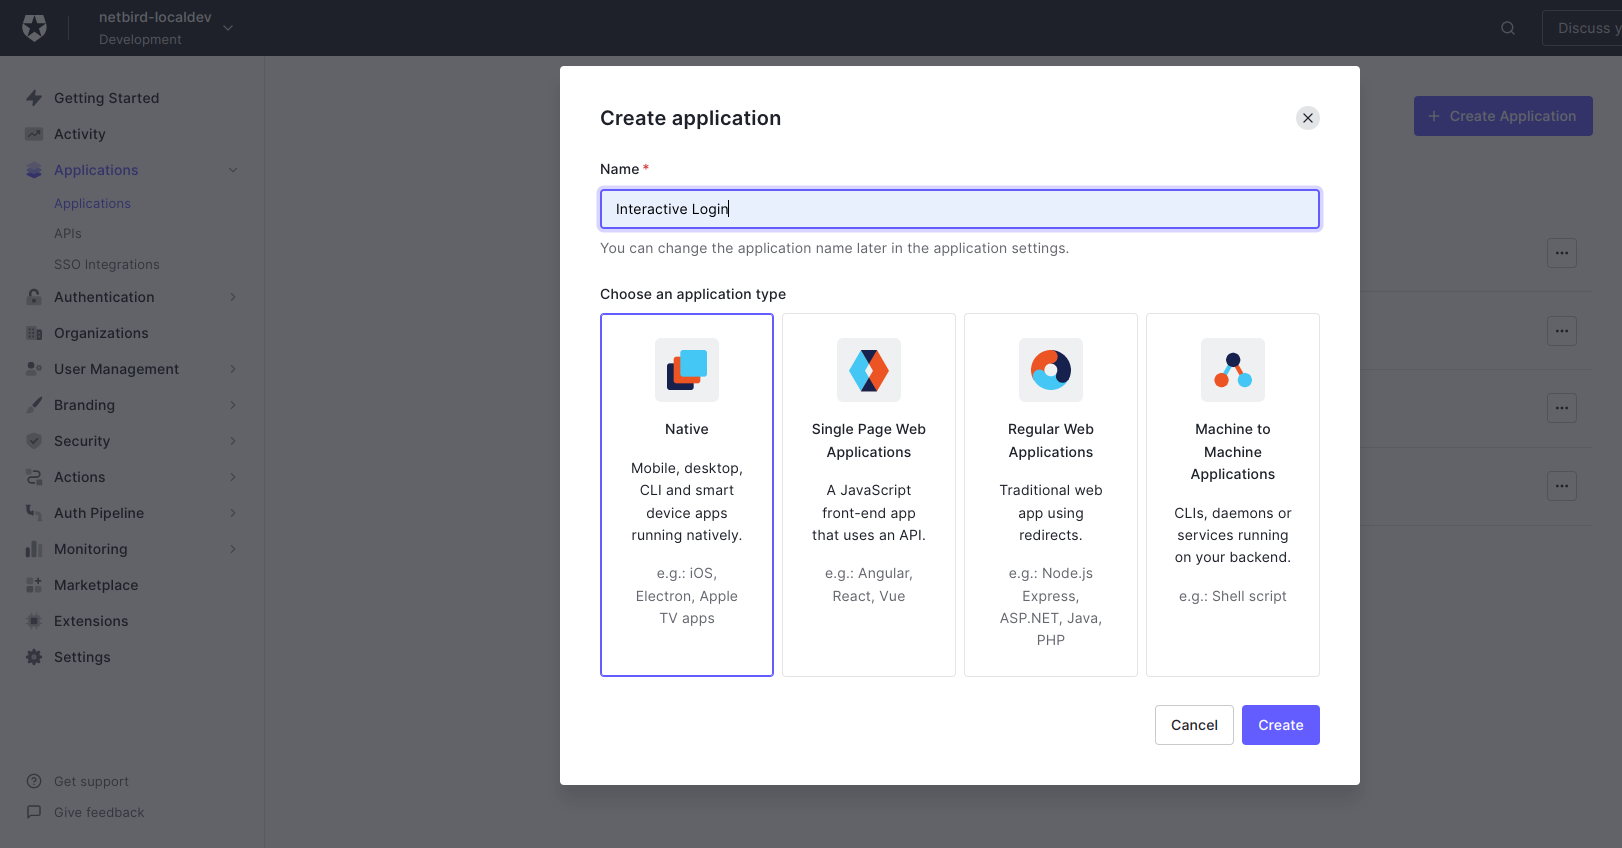
Step 4: Enable Interactive SSO Login (Optional)
The Interactive SSO Login feature allows for machine authorization with your Identity Provider. This feature can be used as an alternative to setup keys and is optional.
You can enable it by following these steps:
- Log in to your Auth0 account https://manage.auth0.com/
- Go to
Applications(left-hand menu) - Click
Create Applicationbutton (top right) - Fill in the form with the following values:
- Name:
Interactive Login - Application type:
Native
- Name:
- Click
Create
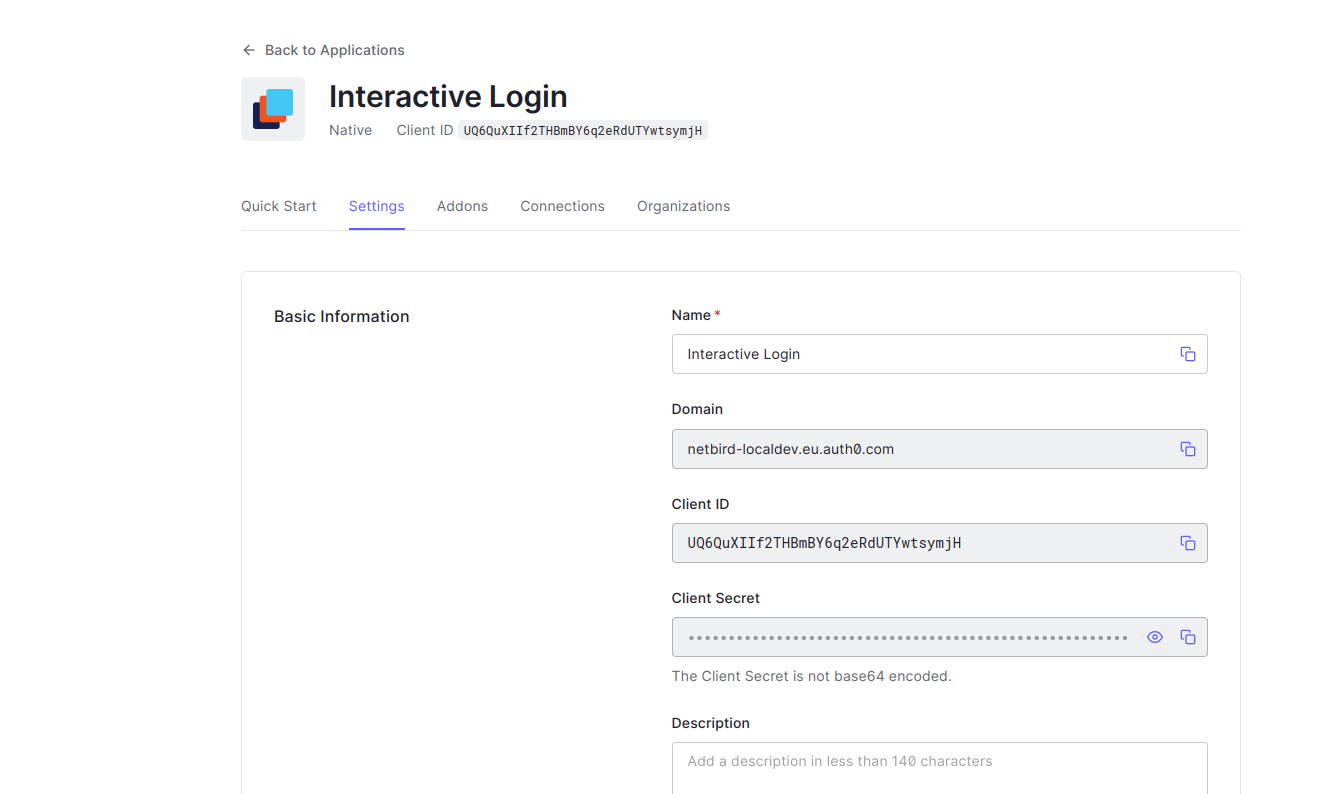
- Click
Settingstab - Copy
Client IDtoNETZILO_AUTH_DEVICE_AUTH_CLIENT_IDin thesetup.envfile
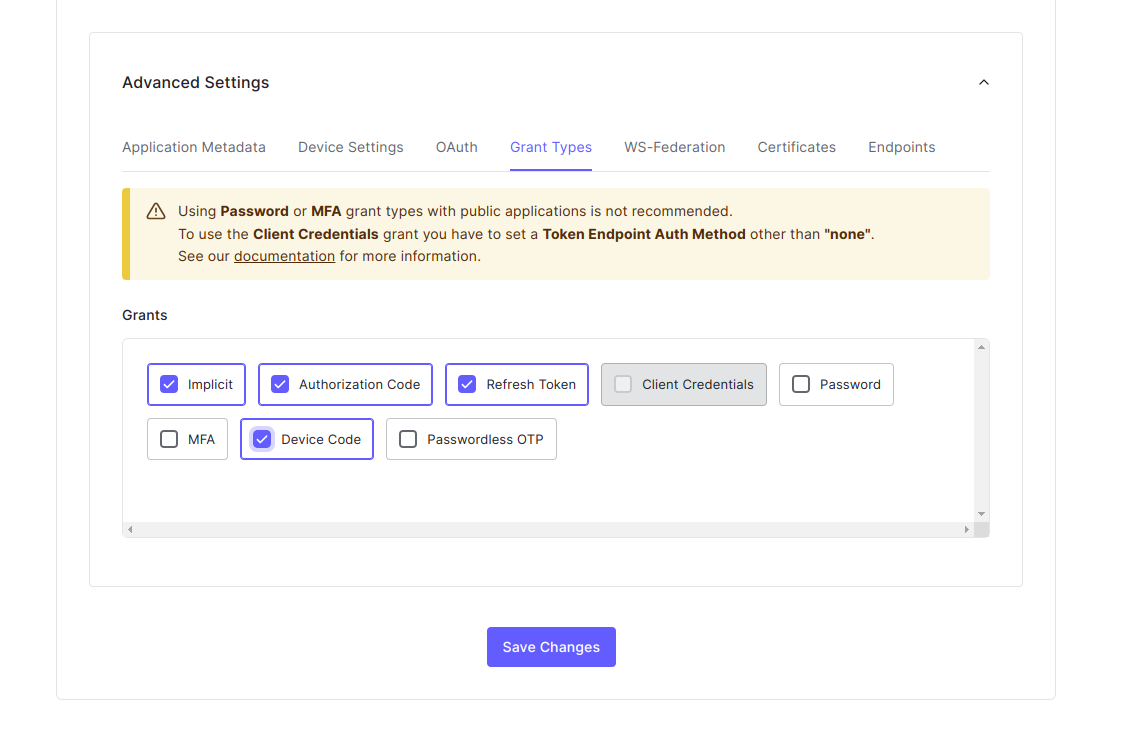
- Scroll down to the
Advanced Settingssection - Enable
Device Code - Click
Save Changes
Step 5: Create and configuire Machine to Machine application.
This application will be used to authorize access to Auth0 Management API.
- Log in to your Auth0 account https://manage.auth0.com/
- Go to
Applications(left-hand menu) - Click
Create Applicationbutton (top right) - Fill in the form with the following values:
- Name:
Netzilo API - Application type:
Machine to Machine Applications
- Name:
- Click
Create
- Fill the form with the following values:
- API:
Auth0 Management API - Permissions:
read:users,update:users,create:users,read:users_app_metadata,update:users_app_metadata,create:users_app_metadata - Click
Authorize
- API:

Optional
Netzilo offers the ability to automatically delete a user from the Auth0 side when the user is deleted from the associated account.
To enable this functionality, include the --user-delete-from-idp flag in the management startup command within your Docker Compose configuration. If you choose to enable this feature, please ensure that you assign the delete:users permission following the steps outlined above.
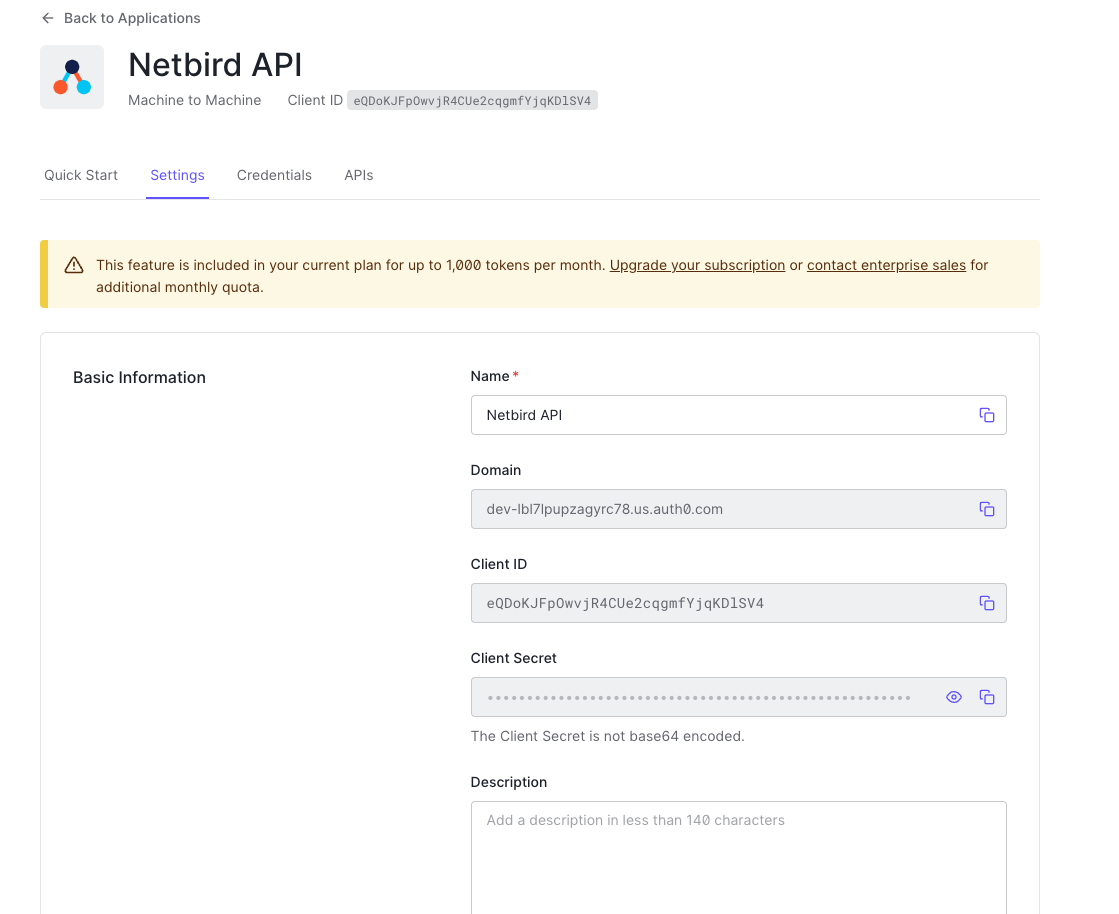
- Click
Settingstab - Copy
Client IDtoNETZILO_IDP_MGMT_CLIENT_IDin thesetup.envfile - Copy
Client SECRETtoNETZILO_IDP_MGMT_CLIENT_SECRETin thesetup.envfile - Copy
DOMAINtoNETZILO_IDP_MGMT_EXTRA_AUDIENCEin thesetup.envfile
- Set properties in the
setup.envfile:
NETZILO_AUTH_OIDC_CONFIGURATION_ENDPOINT="https://<DOMAIN>/.well-known/openid-configuration"
NETZILO_USE_AUTH0=true
NETZILO_AUTH_CLIENT_ID="<Client_ID>"
NETZILO_AUTH_SUPPORTED_SCOPES="openid profile email offline_access api email_verified"
NETZILO_AUTH_AUDIENCE="<IDENTIFIER>"
NETZILO_AUTH_DEVICE_AUTH_CLIENT_ID="<INTERACTIVE_CLIENT_ID>"

NETZILO_MGMT_IDP="auth0"
NETZILO_IDP_MGMT_CLIENT_ID="<NETZILO_API_CLIENT_ID>"
NETZILO_IDP_MGMT_CLIENT_SECRET="<NETZILO_API_CLIENT_SECRET>"
NETZILO_IDP_MGMT_EXTRA_AUDIENCE="https://<DOMAIN>/api/v2/"
Step 6: Continue with the Netzilo Self-hosting Guide
You've configured all required resources in Auth0. You can now continue with the Netzilo Self-hosting Guide.
JumpCloud
This guide is a part of the Netzilo Self-hosting Guide and explains how to integrate self-hosted Netzilo with JumpCloud.
Before you start creating and configuring an JumpCloud application, ensure that you have the following:
- An JumpCloud account: To create application, you must have an JumpCloud account. If you don't have one, sign up at https://jumpcloud.com/.
- User account with admin permissions: You must have an JumpCloud account with the admin permissions. If you don't have the required permissions, ask your administrator to grant them to you.
Step 1: Create and configure SSO application
- Navigate to to Admin Portal page
- Click
SSO Applicationson the left menu underUSER AUTHENTICATIONsection - Click
Add New Applicationand selectCustom Application
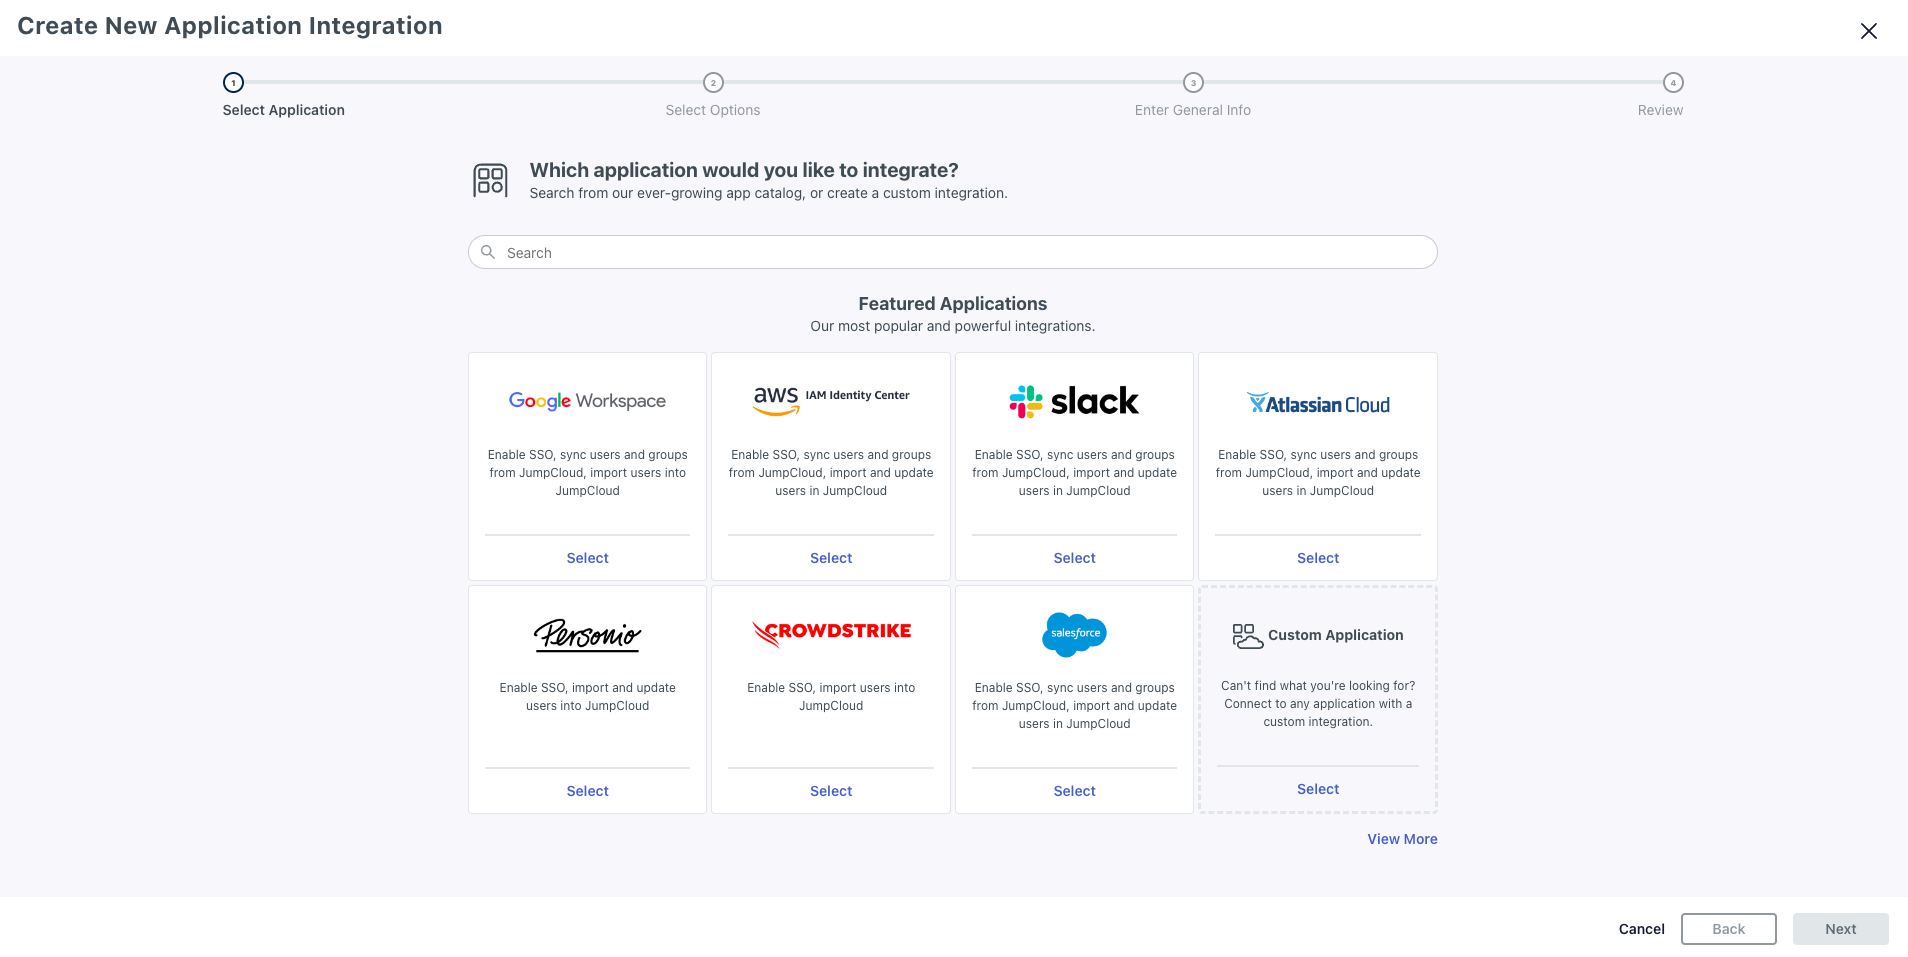
- On the
Which application would you like to integratescreen, confirm that you've selectedCustom applicationand clickNext
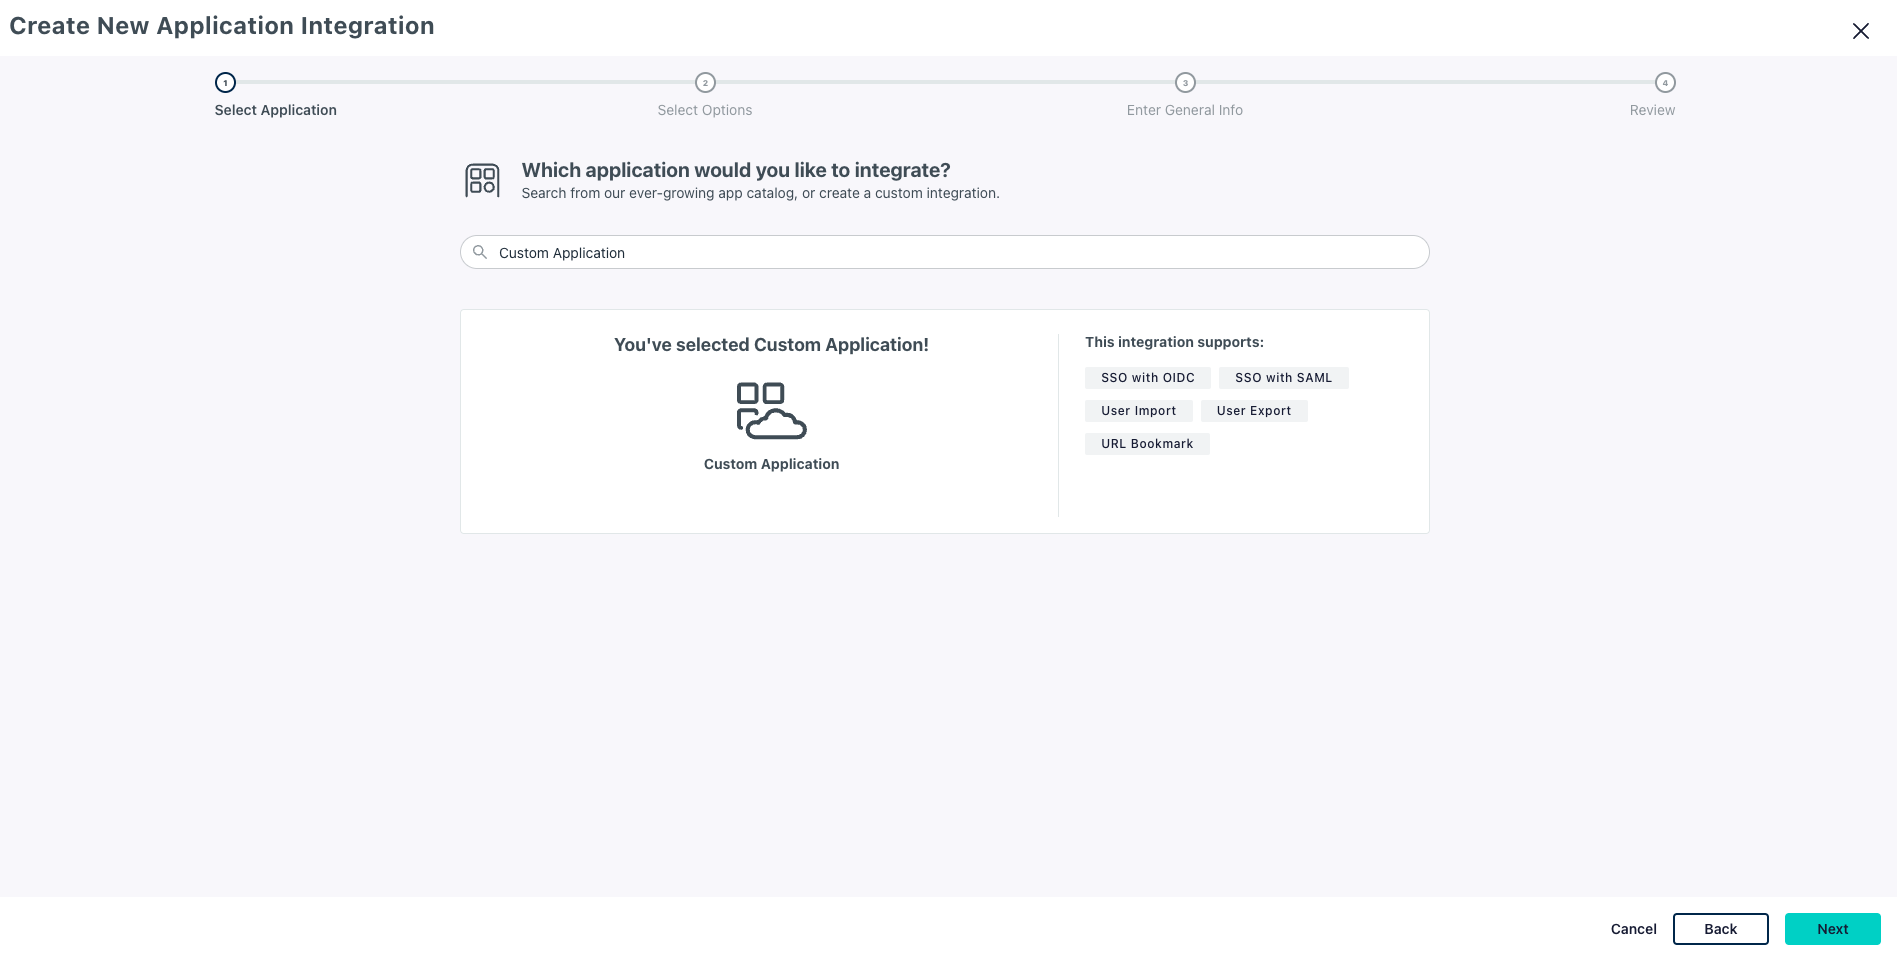
- On the
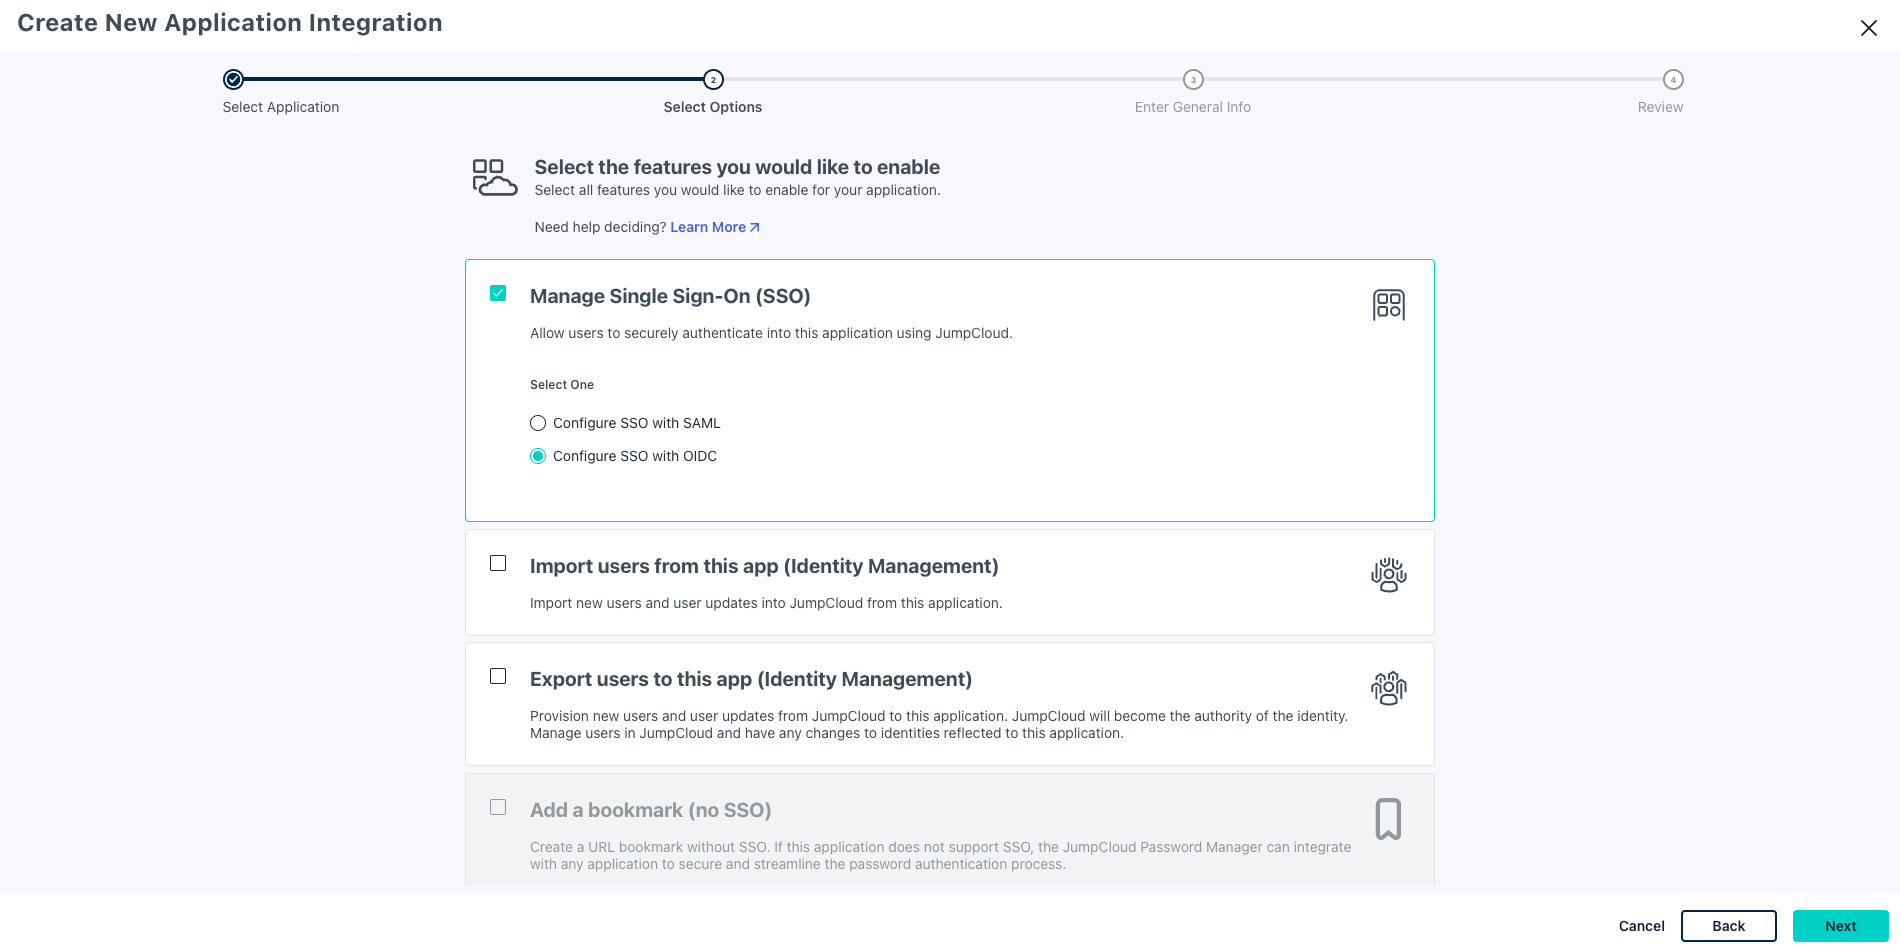
Select the features you would like to enablescreen, selectManage Single Sign-On (SSO)and checkConfigure SSO with OIDCand clickNext
- On the
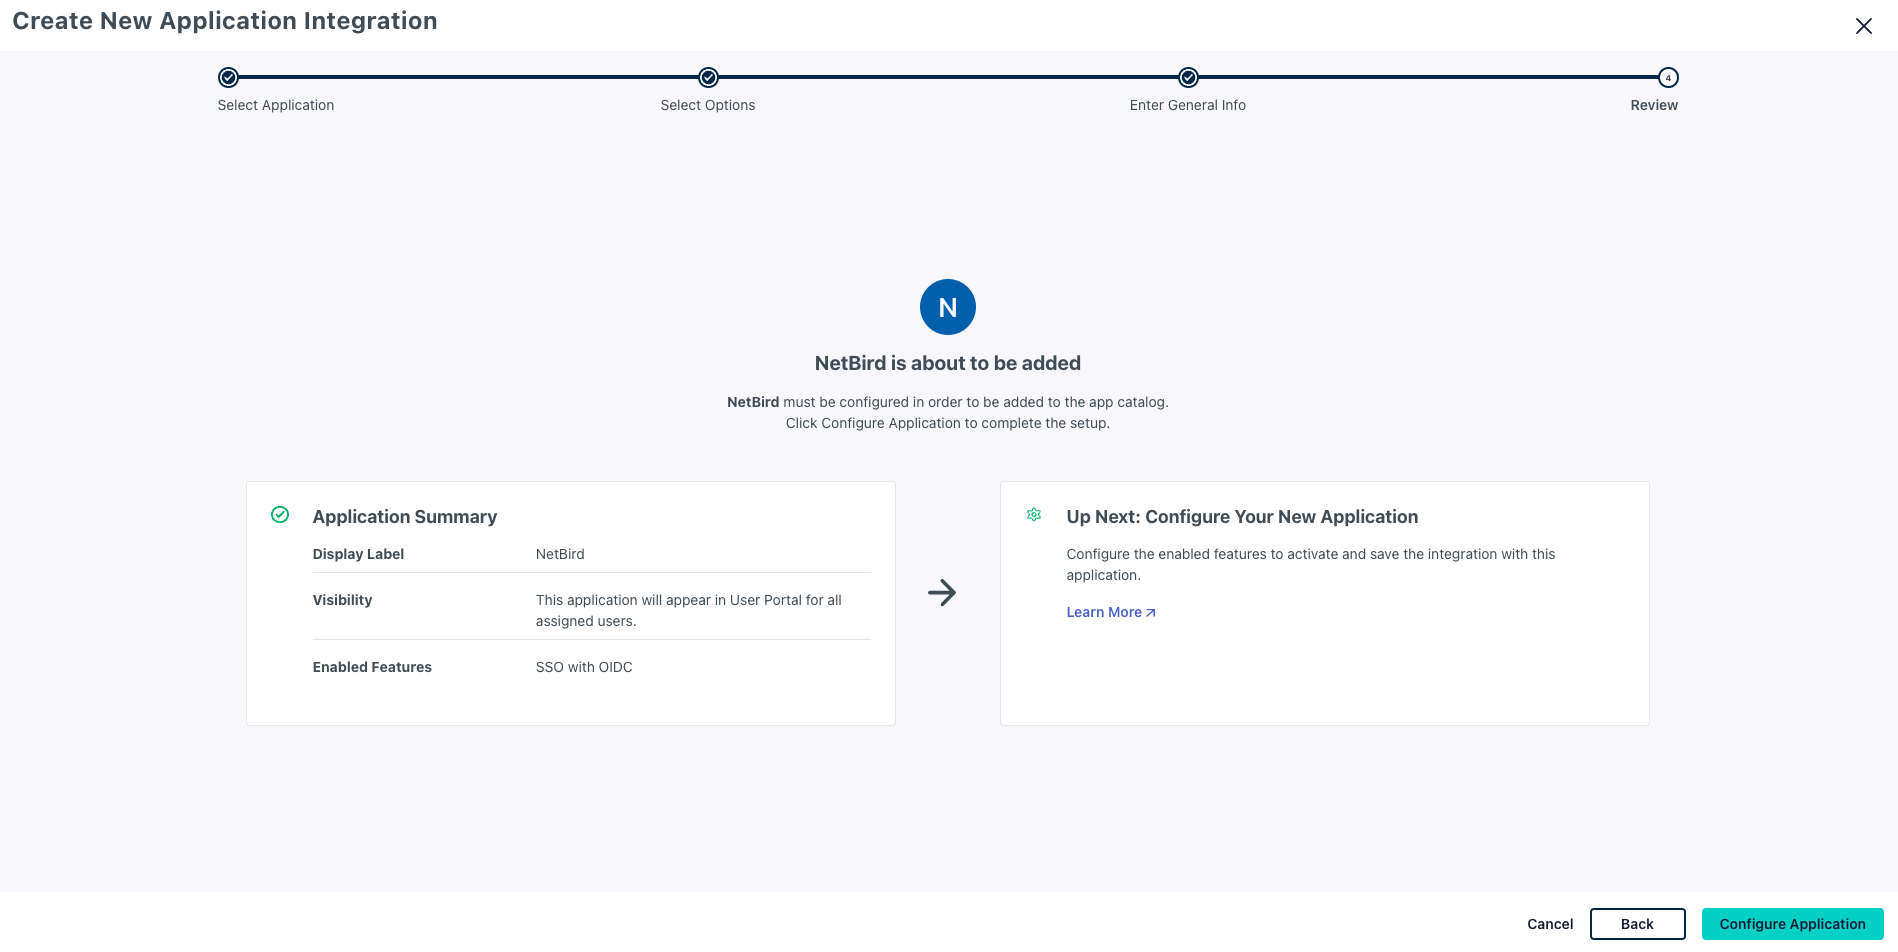
Enter General infoscreen, addNetziloasDisplay Labeland clickNext

- On the confirmation screen, review the information and click on
Configure Applicationto proceed
- On the
New Applicationscreen, click on the SSO tab and enter the following values:- Under
Endpoint Configurationsection:- Redirect URIs:
https://<domain>/silent-auth,https://<domain>/authandhttp://localhost:53000 - Client Authentication Type:
Public (None PKCE) - Login URL:
https://<domain>
- Redirect URIs:
- Under
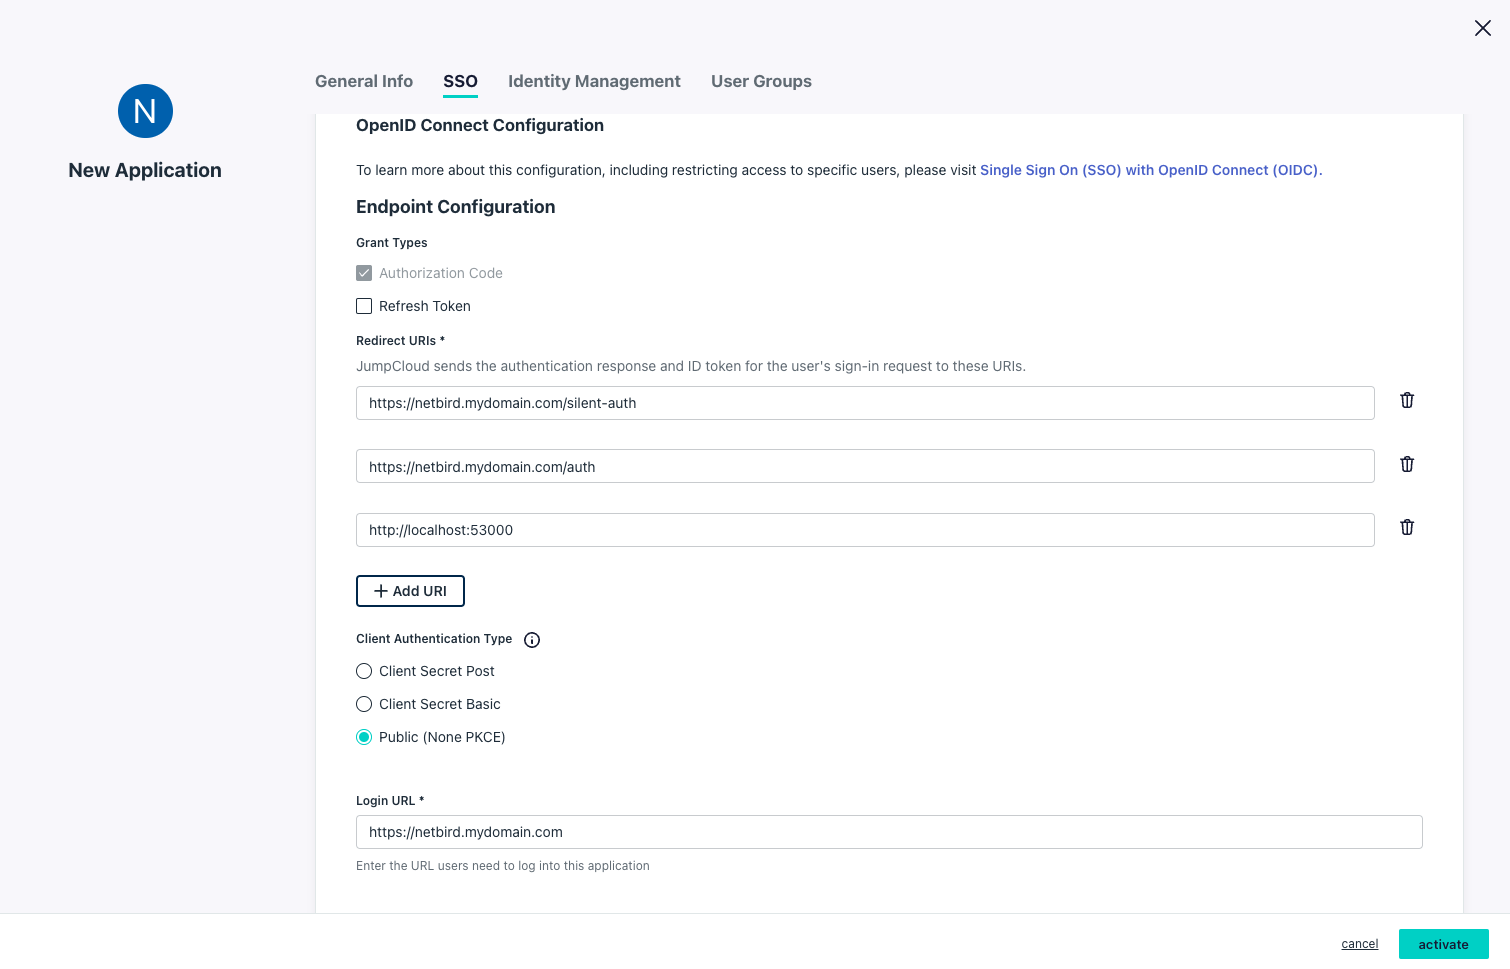
- Under
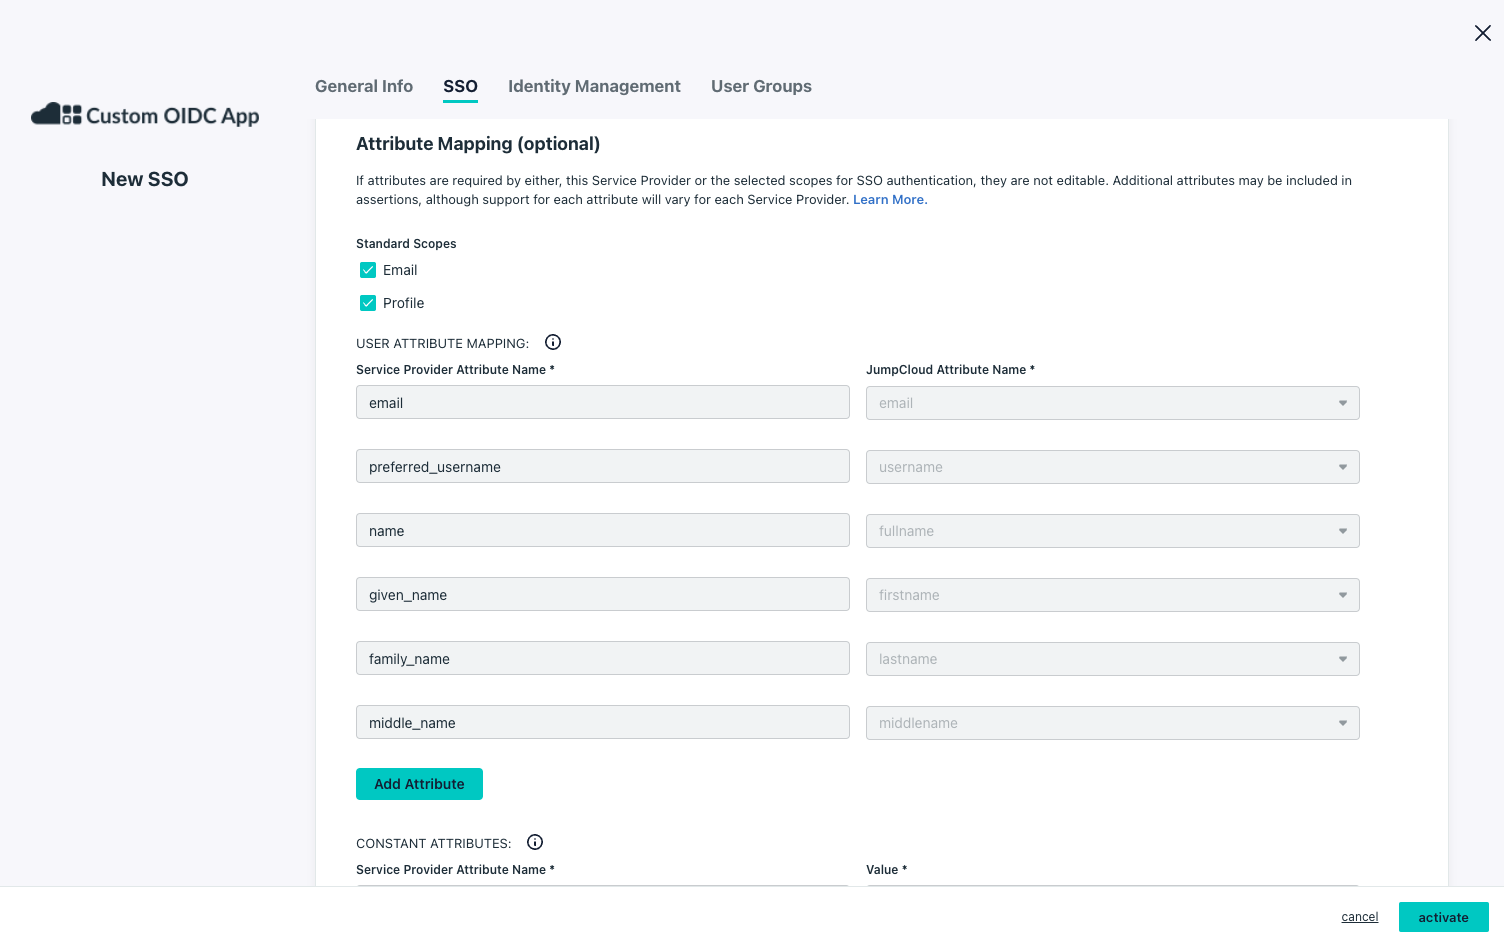
Attribute Mapping (optional)section:- Standard Scopes:
Email,Profile
- Standard Scopes:
- Click on the
User Groupstab and select the user groups that can access this application
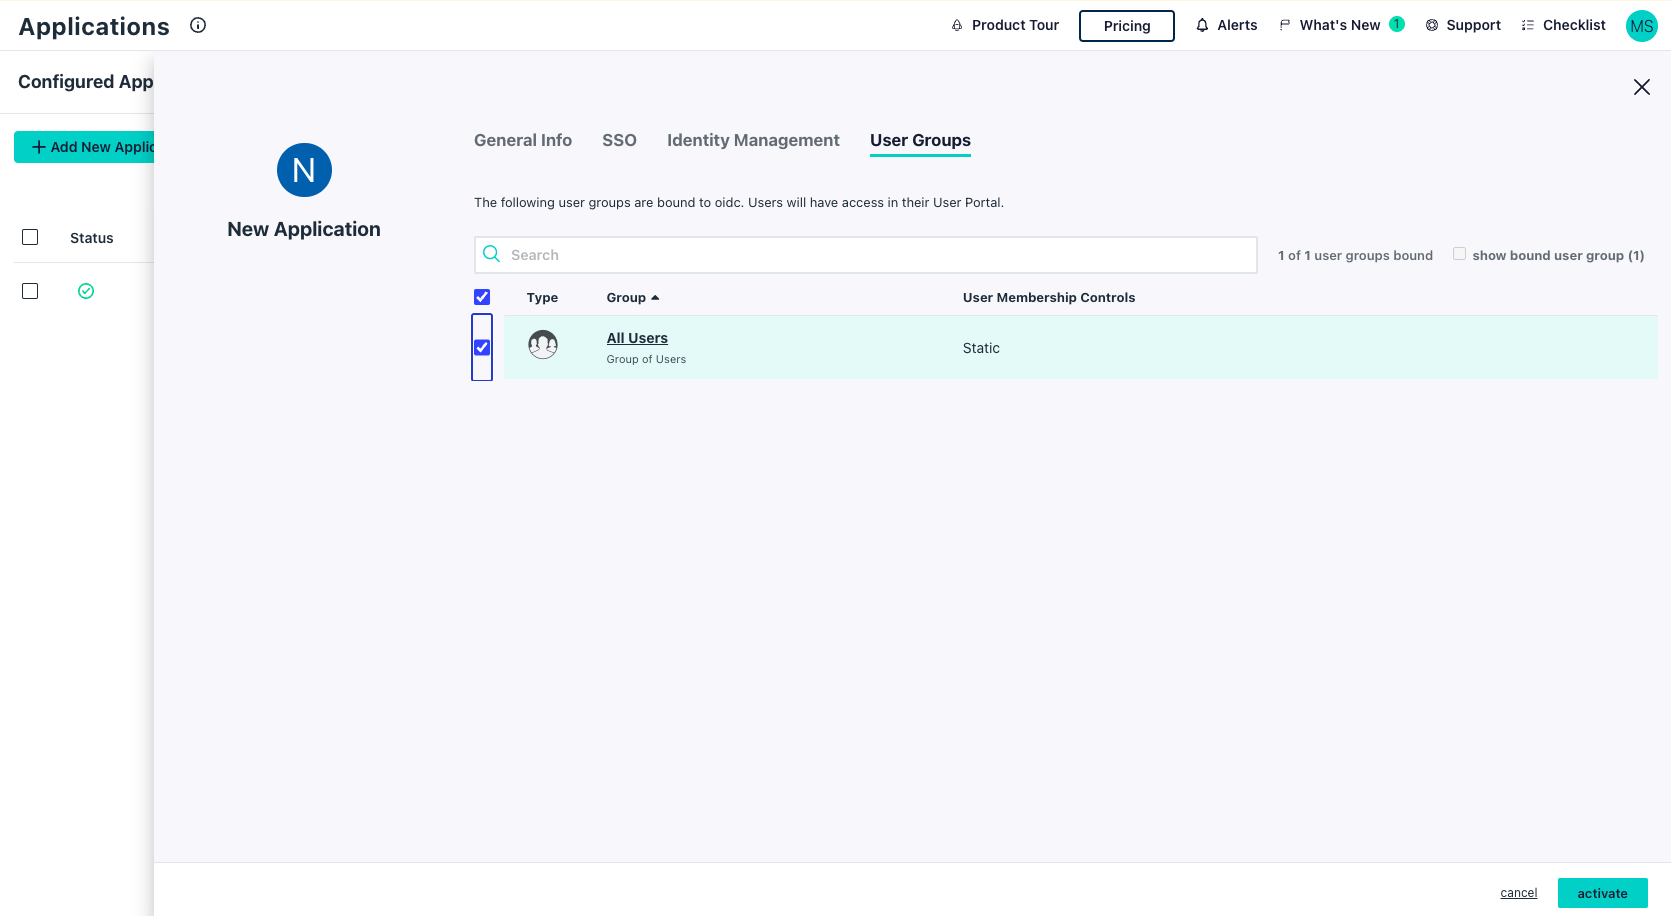
- Click
Activate
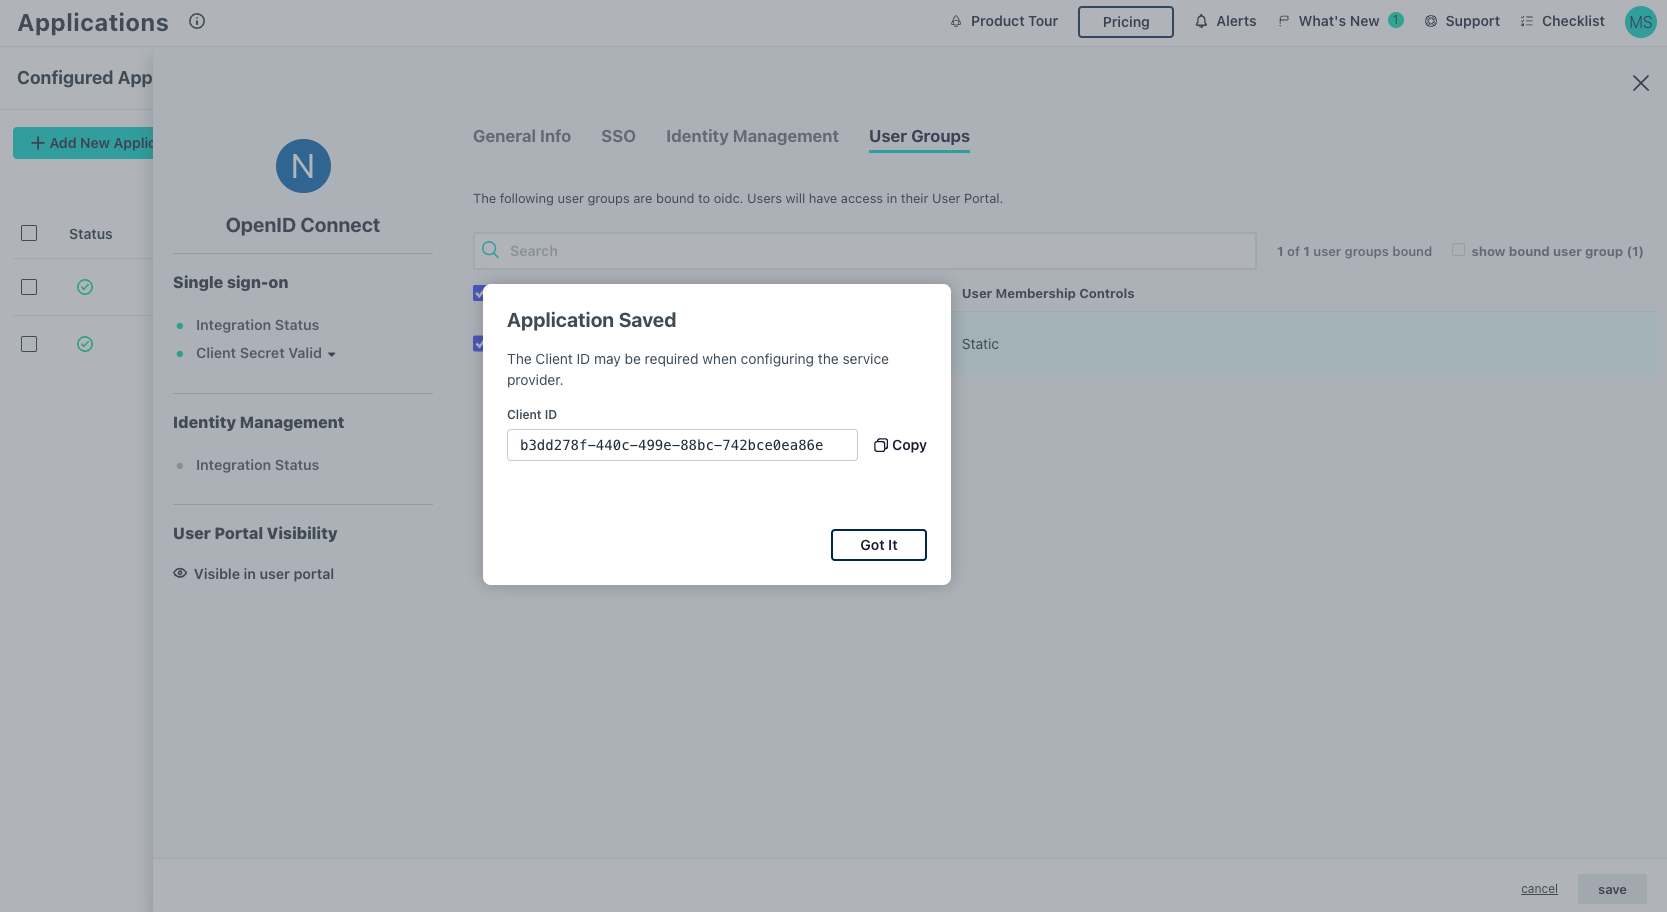
- Take note of
Client ID, will be used later
Step 2: Create an account administrator for integration
The Netzilo management system requires an API token to get user information from JumpCloud. This API is bound to an administrator user configured in JumpCloud's admin portal.
The following steps will assume that you are creating a new account. If you already have a user for this purpose, confirm it has the required role described below and skip to Step 3 in this guide.
- Navigate to to Admin Portal page
- Go to account
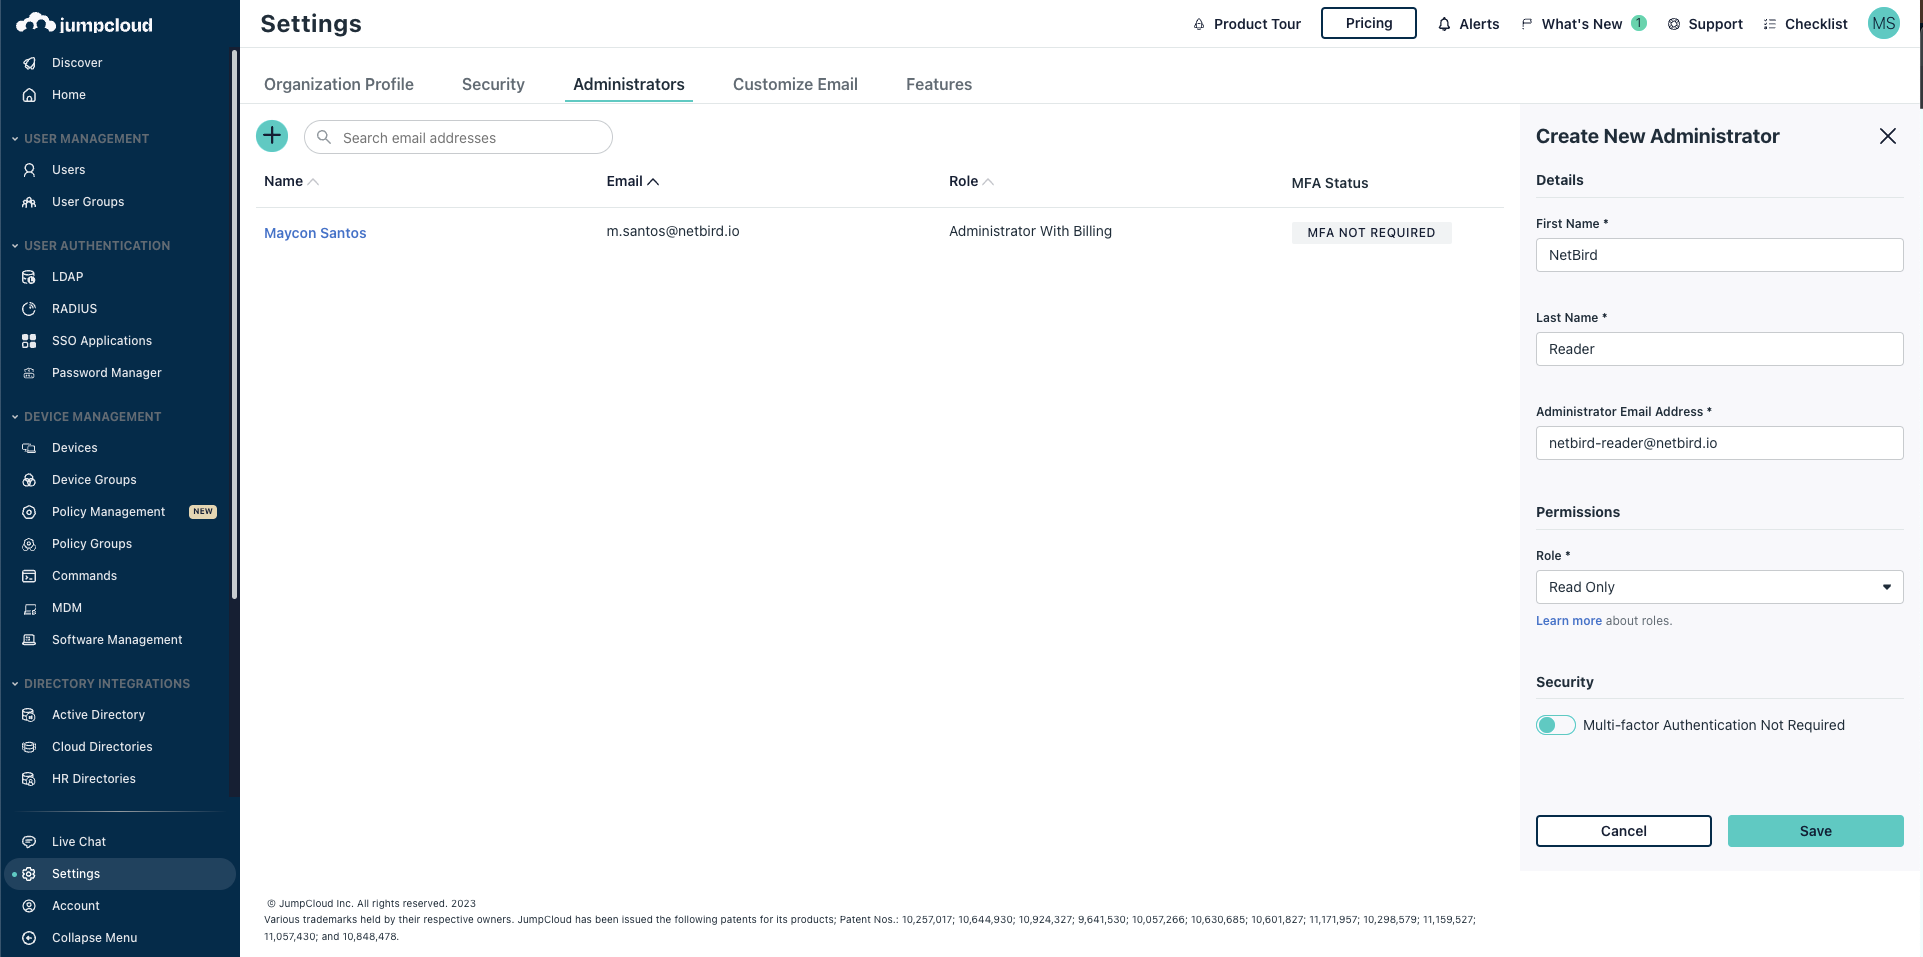
Settingsand click on the add button (+) - On the
Create New Administratorwindow, enter the following values:- First Name:
Netzilo - Last Name:
Integration - Administrator Email:
netzilo-user@<yourdomain># this email will be used to receive the login instructions - Role:
Read Only - Click
Save
- First Name:
Optional
Netzilo offers the ability to automatically delete a user from the JumpCloud side when the user is deleted from the associated account.
To enable this functionality, simply include the --user-delete-from-idp flag in the management startup command within your Docker Compose configuration. If you choose to enable this feature,
please ensure that you assign the Help Desk role to the Netzilo Integration user following the steps outlined above.
After following the steps above, you will receive the login instructions for the newly created user in the email configured. Please follow the instructions to set a password for the user.
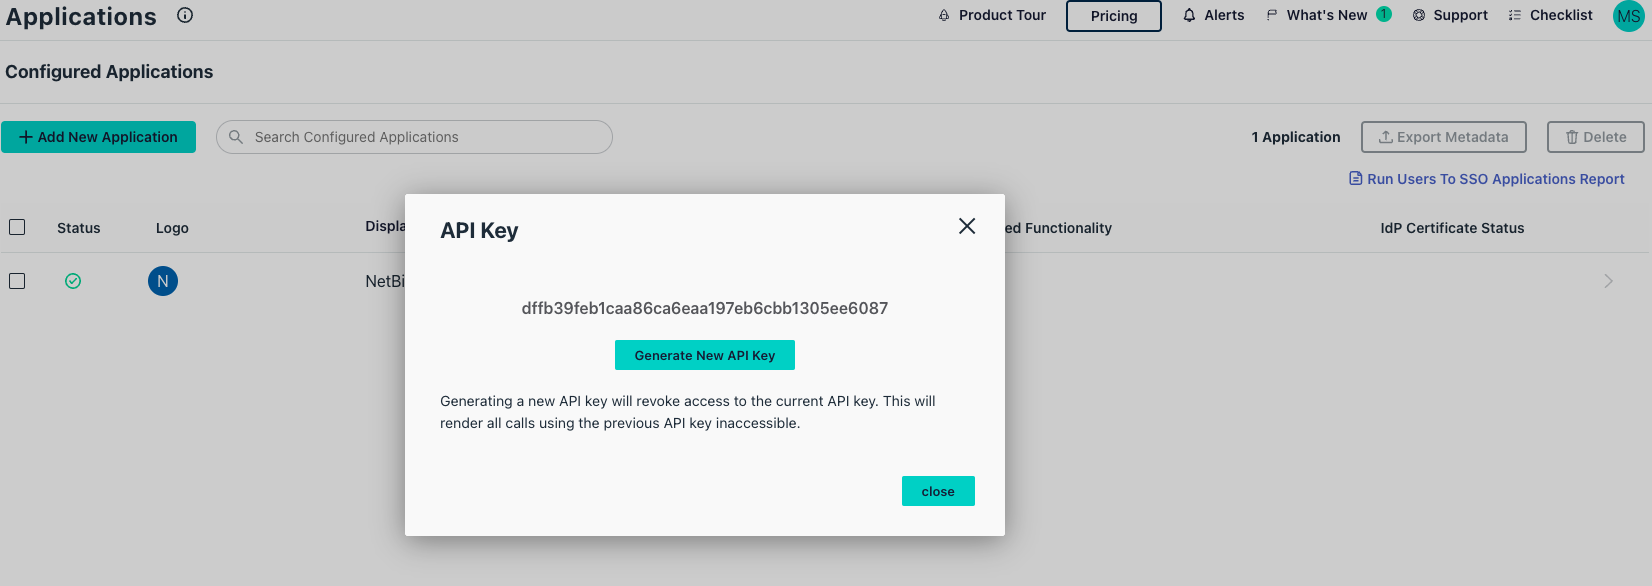
Step 3: Generate api token
In this step, we will generate netzilo api token in jumpcloud for authorizing calls to user api.
- Navigate to to Admin Portal page
- Login with the user created in the previous step or with an existing user
- Click on the account initials displayed at the top-right and select
My API Keyfrom the drop-down
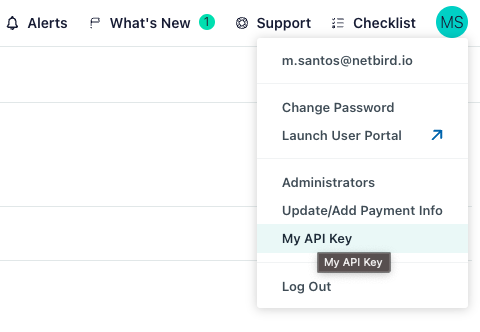
- If there is no API key generated, click on
Generate New API Keybutton - Take note of your api token displayed
- Set properties in the
setup.envfile:
NETZILO_DOMAIN="<YOUR_DOMAIN>"
NETZILO_AUTH_OIDC_CONFIGURATION_ENDPOINT="https://oauth.id.jumpcloud.com/.well-known/openid-configuration"
NETZILO_USE_AUTH0=false
NETZILO_DASH_AUTH_USE_AUDIENCE=false
NETZILO_AUTH_AUDIENCE="<CLIENT_ID>"
NETZILO_AUTH_SUPPORTED_SCOPES="openid profile email offline_access"
NETZILO_AUTH_CLIENT_ID="<CLIENT_ID>"
NETZILO_AUTH_REDIRECT_URI="/auth"
NETZILO_AUTH_SILENT_REDIRECT_URI="/silent-auth"
NETZILO_TOKEN_SOURCE="idToken"

NETZILO_AUTH_DEVICE_AUTH_PROVIDER="none"

NETZILO_MGMT_IDP="jumpcloud"
NETZILO_IDP_MGMT_EXTRA_API_TOKEN="<API_TOKEN>"
Step 4: Continue with the Netzilo Self-hosting Guide
You've configured all required resources in JumpCloud. You can now continue with the Netzilo Self-hosting Guide.