

Published applications
Published applications let users open a private web application at an address of its own,
such as crm.apps.example.com, in any browser with nothing installed. On a self-hosted
server they are served by the reverse-proxy container, behind Caddy on port 443. This
page covers the server side: the applications domain, certificates, adding the reverse
proxy to an older server, its options and its logs.
Publishing an application, who may open it and what users see are on
Published Applications. On Netzilo Cloud the reverse
proxy and the domain netzilo.app are provided and there is nothing to install.
Published applications need a management server and dashboard from September 2026 or later. A server installed over plain HTTP never has them.
How it works
- You choose an applications domain, for example
apps.example.com, and point the wildcard record*.apps.example.comat the server. - Caddy serves every name under that domain on port 443 and passes the requests to the
reverse-proxycontainer. No new port is opened. - A user opens
https://crm.apps.example.com/. The reverse proxy sends them to the Workplace on your server's domain to sign in, then asks management whether the user may open that application. - Each request then goes through the user's own tunnel, a virtual peer named
vp-<n>-RPROXYin the user's account, with that user's policies, routes and DNS.
Only names that are actually published answer. Any other name under the domain answers There is no application at this address.
Before you start
-
An applications domain other than the server's own domain, and not under
netzilo.network. A subdomain such asapps.go.example.comor a separate domain such asapps.example.comboth work. -
A wildcard DNS record for it pointing at the server's public IP:
*.apps.example.com A 203.0.113.10 -
A release with published applications. From any machine, with no token:
curl -sS -w ' %{http_code}\n' 'https://go.example.com/api/published-apps/exists?domain=check.example.com'{"published":false} 200means the server supports them.404means management is older: update management, then the dashboard, see Upgrade and add components.
Step 1: Give the domain at install time
When you install a new server, give it the applications domain. The installer then adds
the reverse-proxy container and Caddy's site for it.
| Installed with | Where to enter the domain |
|---|---|
| One-line installer | The prompt Published applications domain (optional), or NETZILO_APPS_DOMAIN=apps.example.com for an install without prompts, see Install on your own server |
| AWS CloudFormation | The parameter Published applications domain |
| Azure managed application | Published applications domain (optional) on the Basics page |
The installer warns when the wildcard record does not resolve to the server yet, and continues. It installs without published applications (with a warning) when your own certificate does not cover the wildcard and you gave no second certificate for it.
For a server installed without an applications domain, see Add published applications to an older server.
Step 2: Check the certificates
| Certificate mode | What serves *.apps.example.com |
|---|---|
| Let's Encrypt | Caddy gets one certificate per published name, on that name's first visit. Before it asks Let's Encrypt, it checks with the reverse proxy that the name is published, so only real applications get a certificate. The first visit of a new application can take a few seconds, and may fail once while the certificate is issued |
| Your own certificate | Used as is when it covers *.apps.example.com. Otherwise give a second certificate and key for the wildcard: NETZILO_APPS_CERT_FILE and NETZILO_APPS_KEY_FILE at install time. It is stored in apps-certs/ in the compose folder; renew it like the main certificate |
| Self-signed | The installer adds *.apps.example.com to the certificate. Browsers trust it only where it is installed |
With Let's Encrypt, a name nobody publishes has no certificate, so a browser shows a TLS error for it. That is by design.
Step 3: Switch on published applications
In the dashboard, go to Settings > Permissions and turn on Allow published applications.
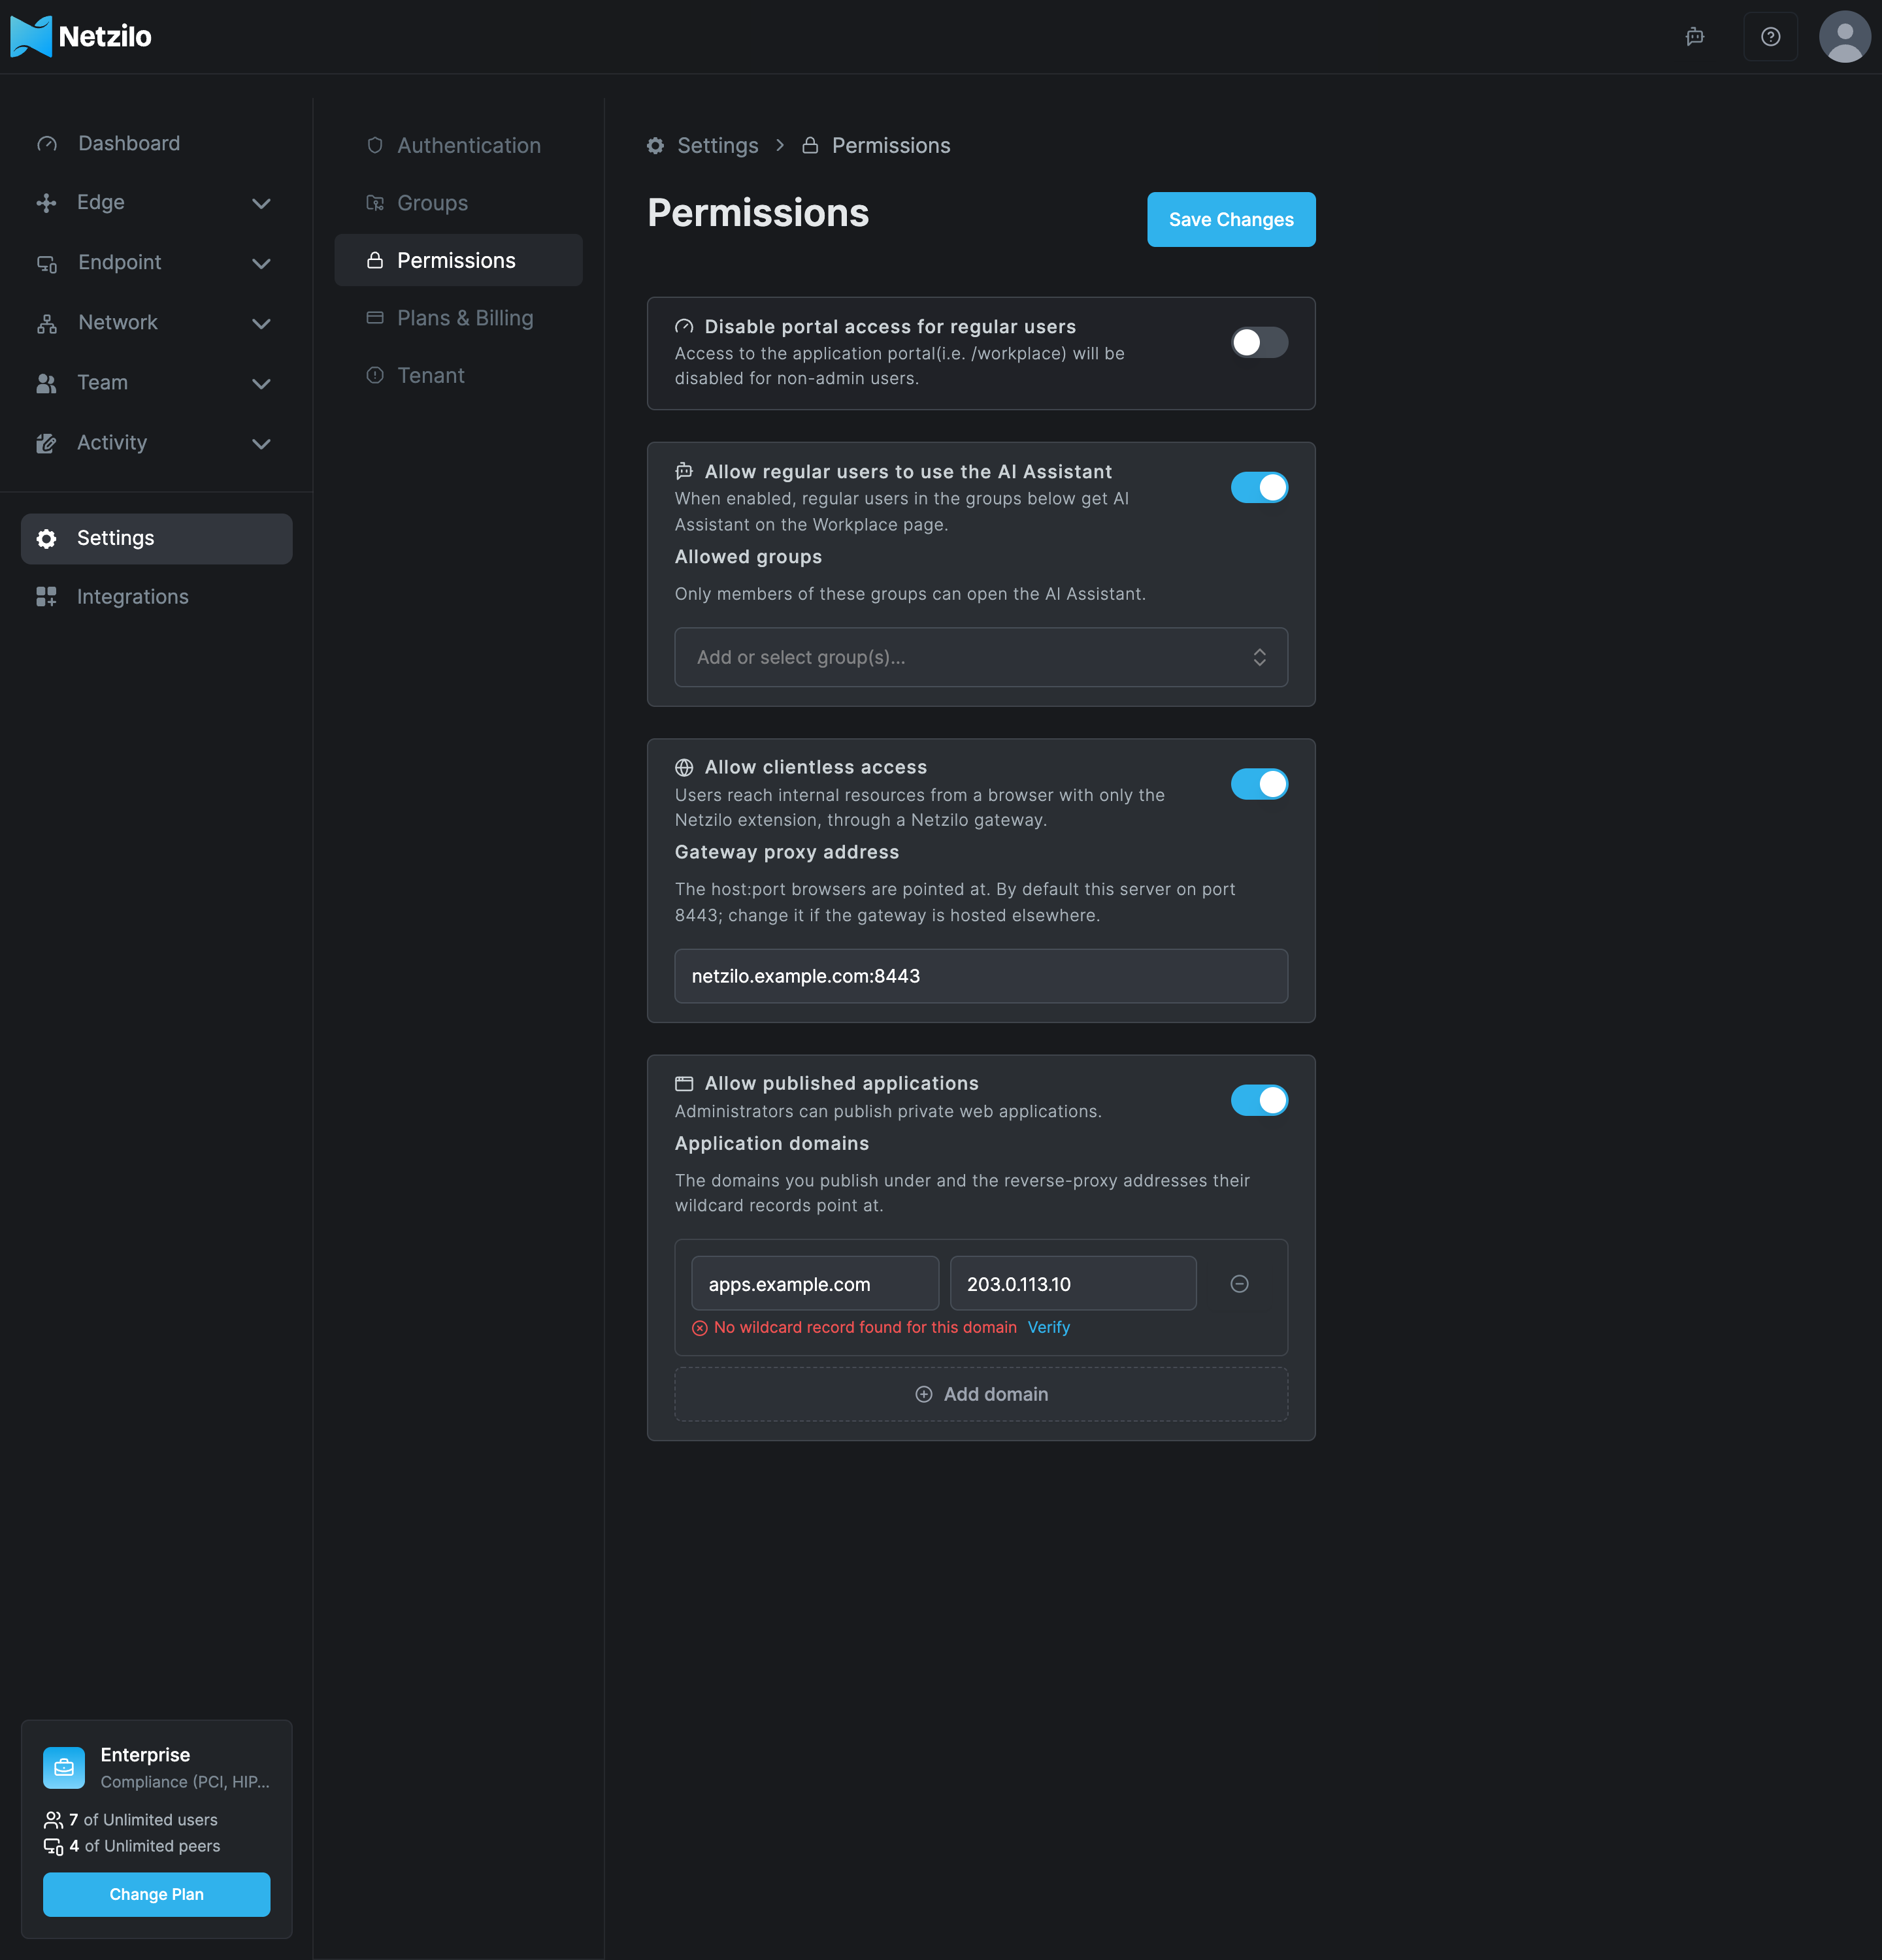
| Field | What to enter |
|---|---|
| Allow published applications | On. A server upgraded to a release with published applications starts with it off |
| Application domains | Click Add domain, enter the applications domain and the server's public IP. The installer prints the IP and writes it into /opt/netzilo/CREDENTIALS |
Click Verify on the row. Management resolves a random name under the domain and reports whether the wildcard record points at the server. It is a check, not a gate: you can save the domain before the record exists.
Then publish applications under Network > Applications, see Published Applications.
Add published applications to an older server
Use this for a server installed before September 2026, or without an applications domain. Never re-run the installer for it: that erases the server. Create the wildcard record first.
Servers installed with the one-line installer. If the published installer has the component commands (check as described in Upgrade and add components), one command adds the reverse proxy, with a backup first:
curl -fsSL https://pkg.netzilo.com/download/install-netzilo.sh | sudo bash -s -- install reverse-proxy
It asks for the applications domain (default apps.<server domain>), refuses the server's
own domain and anything under netzilo.network, checks the wildcard record, reuses your
certificate when it covers the wildcard or asks for a second one (Let's Encrypt servers
need none), checks the new Caddyfile before Caddy loads it, and ends with the dashboard
steps. Without prompts, --yes needs NETZILO_APPS_DOMAIN. The same command repairs a
broken reverse proxy and keeps its domain and data.
AWS and Azure images, or an installer without the component commands. Add the reverse proxy in place. This applies to Let's Encrypt servers; with your own certificate the wildcard must be in it, see the note after step 4.
-
In the compose folder (
/opt/netzilo, or/opt/netzilo/runon a marketplace image), back up the two files you will edit, and check that the wildcard resolves and the image downloads:C=/opt/netzilo # /opt/netzilo/run on AWS and Azure images APPS=apps.example.com cd "$C" && sudo cp docker-compose.yml docker-compose.yml.bak-$(date +%F) && sudo cp Caddyfile Caddyfile.bak-$(date +%F) grep -q 'reverse-proxy:' docker-compose.yml && echo "already present" || echo "adding" dig +short "nz-check.$APPS" A # must print the server's public IP sudo docker pull ghcr.io/netzilo/net-reverse-proxy:latest -
In
docker-compose.yml, add the service before the top-levelvolumes:line, with--workplace-urlset to your server's own address, and add its volume undervolumes:. Keep the indentation exactly:reverse-proxy: image: ghcr.io/netzilo/net-reverse-proxy:latest container_name: reverse-proxy restart: unless-stopped cap_drop: - ALL security_opt: - 'no-new-privileges:true' networks: - netzilo depends_on: - management volumes: - /etc/ssl/certs:/etc/ssl/certs:ro - netzilo_reverse_proxy:/var/lib/netzilo-reverse-proxy command: [ "run", "--management-url", "http://management:80", "--listen", "127.0.0.1:8443", "--egress", "off", "--publish-listen", ":8444", "--publish-tls", "none", "--publish-trusted-proxies", "172.20.0.0/24", "--workplace-url", "https://go.example.com", "--admin-listen", ":9090", "--idle-timeout", "60m", "--data-dir", "/var/lib/netzilo-reverse-proxy", "--log-file", "console", "--log-level", "info" ]volumes: netzilo_reverse_proxy:If the
gatewayservice has anextra_hosts:block, copy it ontoreverse-proxytoo. -
In the
Caddyfile, add this to the global options block (the first block, in braces, at the top of the file):on_demand_tls { ask http://reverse-proxy:9090/tls-ask }and this site at the end of the file:
*.apps.example.com:443 { tls { on_demand } reverse_proxy reverse-proxy:8444 } -
Check both files, start the reverse proxy and reload Caddy:
sudo docker compose config -q sudo docker run --rm -v "$C/Caddyfile":/etc/caddy/Caddyfile:ro "$(sudo docker inspect caddy --format '{{.Config.Image}}')" \ caddy validate --config /etc/caddy/Caddyfile --adapter caddyfile | tail -1 sudo docker compose up -d reverse-proxy && sudo docker compose restart caddy sudo docker compose logs --tail=20 reverse-proxy | grep 'publishing on' sudo docker exec caddy wget -qS -O /dev/null "http://reverse-proxy:9090/tls-ask?domain=nz-check.$APPS" 2>&1 | head -1The validation prints
Valid configuration, the log showspublishing on [::]:8444, and the last line showsHTTP/1.1 404: Caddy reaches the reverse proxy, which says the test name is not published.
With your own certificate, use
tls /data/caddy/apps-certificates/fullchain.pem /data/caddy/apps-certificates/privkey.pem
instead of the tls { on_demand } block when the wildcard needs its own certificate. Then
this request answers 404 over the wildcard certificate:
curl -sS -o /dev/null -w '%{http_code}\n' -H 'Accept: application/json' "https://nz-check.$APPS/"
On a Let's Encrypt server that request fails its TLS handshake by design. The proof there is the first application you publish: see Test without a browser.
Then switch published applications on as in Step 3.
Roll back. Restore the two .bak- files, then run
sudo docker compose up -d --remove-orphans && sudo docker compose restart caddy. A reverse
proxy added with install reverse-proxy rolls back from the backup folder the command
printed, see Upgrade and add components.
Options
The reverse proxy's settings are command-line options in the command: of the
reverse-proxy service in docker-compose.yml. After a change, recreate it with
sudo docker compose up -d --no-deps reverse-proxy. A restart sends browsers through the
Workplace again, silently while their Workplace session lasts.
| Option | Default | Controls |
|---|---|---|
--workplace-url | The server's address | Where users sign in. It must be the server's own domain. A wrong value refuses every sign-in with The sign-in did not come from the Workplace |
--publish-session-max-age | 12h | How long a sign-in on one address lasts |
--revalidate | 10m | How often each session's admission is checked again with management |
--idle-timeout | 60m | How long a user's tunnel may go without traffic before it stops |
--max-sessions | 2000 | Tunnels in total |
--publish-trusted-proxies | 172.20.0.0/24 | The address range of the proxy in front (Caddy), whose forwarded client addresses are trusted |
--log-level | info | debug logs every connection to a target. Set it back afterwards |
Logs and health
cd /opt/netzilo
sudo docker compose logs --tail=200 reverse-proxy
sudo docker compose logs caddy | grep -i 'apps\.'
Every request writes one access line. Its id= is the request id the user sees on a
Netzilo error page.
| Log line | Meaning |
|---|---|
gateway: publishing on [::]:8444 (tls none, sign-in at https://...) | Publishing is on; the sign-in address in use |
gateway: access GET crm.apps.example.com/path 200 ... user=... id=... | One request |
gateway: <email> signed in at <address> from <ip> (...) | A sign-in was accepted |
gateway: <email> refused at <address>: not admitted (...) | The user is in none of the application's groups |
gateway: <email> refused at <address>: posture: ... | The application's posture check failed |
gateway: session vp-<n>-RPROXY (<email>) ready: ... | The user's tunnel is up |
gateway: <email> at <address>: session: ... | The tunnel could not start: the user sees Access Failed |
The users' tunnels appear in Endpoint > Peers as vp-<n>-RPROXY, one per user, public
address and operating system. They keep their names across restarts and are removed
automatically some time after they go offline.
Troubleshooting
Test without a browser
From any machine, no token needed, with the address of a published application:
A=crm.apps.example.com
curl -sS -o /dev/null -w 'navigation -> %{http_code} %{redirect_url}\n' -H 'Accept: text/html' -H 'Sec-Fetch-Mode: navigate' "https://$A/"
curl -sS -w '\nfetch -> %{http_code}\n' -H 'Accept: application/json' "https://$A/"
Expect 302 to https://go.example.com/publish-auth?... and 401 with
{"error":"sign in required",...}, both over a valid certificate.
The address does not resolve, or the browser shows a certificate error. The wildcard
record is missing or points elsewhere (Verify under Settings > Permissions says
so). With Let's Encrypt, the first visit may still be getting the certificate: retry, and
check sudo docker compose logs caddy. With your own certificate, it does not cover the
wildcard.
There is no application at this address. Published applications are switched off, the application is disabled or deleted, or the address differs from the published one.
Sign-in refused: The sign-in did not come from the Workplace. --workplace-url does
not match the address users sign in at. Set it to https:// and your server's exact
domain, and recreate the container.
Stuck at Logging in. The reverse proxy cannot reach management, or the user's tunnel
cannot connect through signal and the relay. Check sudo docker compose logs -f reverse-proxy while the user retries.
Peers show the server's IP for vp-<n>-RPROXY. --publish-trusted-proxies does not
cover Caddy's address. Use 172.20.0.0/24, the compose network.
The reverse-proxy container keeps restarting. Read sudo docker compose logs --tail=50 reverse-proxy: a malformed option, or management not reachable for 5 minutes.
For Access Denied and Access Failed, which are about groups, policies and routes, see Published Applications.
Related Documentation
- Published Applications - publish an application and control who opens it
- Permissions - the account switches and application domains
- Clientless-access gateway - access for browsers with the Netzilo extension
- Server reference - containers, ports and certificates